background image


Safety Warnings and Information 


Special attention should be given to potential hazard labeling on the equipment and the signal words 
and symbols that are used throughout this manual. They may also be used to alert against unsafe 
practices. 
 

WARNING: 

Indicates a potentially hazardous situation that may result in serious injury 

or death. 


CAUTION: 

Indicates a potentially hazardous situation that may result in personal injury.  

The situation may also result in equipment or property damage. 

Note:

    Indicates  installation,  operation,  or  maintenance  information  which  is  important,  but  not 

related to personal injury or property damage. 
 
Note: 

Check  for  freight  damage  before  proceeding  with  the  equipment  installation.    Be  sure  to  inspect  the 
equipment carefully for any damage that may not have been evident on the outside of the carton.  Contact 
the freight carrier immediately to report any damage and file a claim.  Have carrier note the damage on the 
bill of lading.  Call Maxx Cold with your claim number to arrange replacement or repair. 


  Read the entire manual before installing, operating or servicing the machine. 


  Follow these installation instructions exactly. 


  All machines have been tested and adjusted for correct performance at the factory. 


  Knowledge  of  proper  installation  and  service  procedures  is  essential  for  the  safe  operation  and 

maintenance of MAXX ICE equipment.  Refer all installation and service work to qualified technicians. 


  This equipment must be installed in compliance with the applicable federal, state/province, and/or local 

plumbing, electrical, and health/sanitation codes and requirements


  Always disconnect the power supply before servicing the equipment or when the equipment will not be 

used for a period of time. 
 

  Never operate equipment that has been damaged or does not have all the protective covers in place. 


  Never operate equipment that has been altered from the original MAXX ICE specifications. 


WARNING: 

Use only genuine MAXX ICE replacement parts, Use of non-approved parts 

when  servicing  MAXX  ICE  equipment  may  create  a  safety  hazard,  cause 
equipment damage, property damage and will void the warranty. 

Summary of Contents for MAXX ICE MID200 Series

Page 1: ... Installation Operation Manual Maxx Cold Food Service Weston FL 33331 U S A Phone 954 202 7419 Fax 954 202 7337 www maxximumfoodservice com This manual is updated periodically Visit http www maxximumfoodservice com for the latest version ...

Page 2: ...riting problems or that the product is free from minor flaws or that it meets the needs of the customer November 2019 Table of Contents Section 1 General Information Safety Information 1 Model Number Key 2 Date Code Key 2 Serial Number Plate Location 2 Section 2 Installation Unpacking 3 Carton Contents 3 Installation Requirements 4 Plumbing 5 Electrical 5 Section 3 Operation Construction and Opera...

Page 3: ...ll Maxx Cold with your claim number to arrange replacement or repair Read the entire manual before installing operating or servicing the machine Follow these installation instructions exactly All machines have been tested and adjusted for correct performance at the factory Knowledge of proper installation and service procedures is essential for the safe operation and maintenance of MAXX ICE equipm...

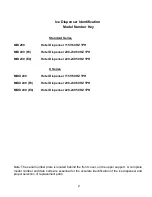
Page 4: ...40 50HZ 1PH X Series MIDX 200 Hotel Dispenser 115V 60HZ 1PH MIDX 200 F0 Hotel Dispenser 208 230 60HZ 1PH MIDX 200 E0 Hotel Dispenser 220 240 50HZ 1PH Note The serial number plate is located behind the front cover on the upper support A complete model number and date code are essential for the accurate identification of the ice dispenser and proper selection of replacement parts ...

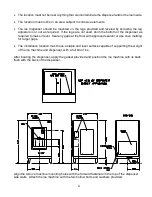
Page 5: ...nser Leg kit Installation Operation Manual Leave these with the owner user Ice machine mounting hardware gasket and wiring components for thermostat connection Installation Requirements The ice dispenser must be installed indoors Do not install the dispenser in an unprotected outdoor area or any wet area Note Consult ice machine instructions for proper installation requirements before determining ...

Page 6: ...ake it level Seal any gaps at the floor with approved sealant or use cove molding for larger gaps The installation location must have a stable and level surface capable of supporting the weight of the ice machine and dispenser with a full bin of ice After locating the dispenser apply the gasket provided and position the ice machine with its back flush with the back of the dispenser Align the two i...

Page 7: ...ath and cause damage to the machine and its surroundings WARNING Always disconnect power before servicing All models are intended to be installed with a permanent connection to the field electrical supply See rating plate on the back of the machine for power supply requirements The dispenser must be connected to a separate protected circuit with no other loads Fused disconnects installed adjacent ...

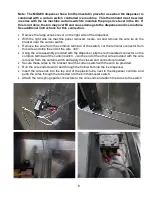
Page 8: ...the wire from the common terminal of the switch cut the terminal connector from this wire and strip the end of the wire 300 Using the wire assembly provided with the dispenser slip the red insulated connector on the common terminal of the curtain switch Join the end of the other wire provided with the wire removed from the curtain switch and apply the closed end connector provided Secure these wir...

Page 9: ...7 Wiring Diagram MID200 WIRING SCHEMATIC 307 1073 02 ...

Page 10: ...er must also be operational whenever there is ice in the bin even if the ice machine is not operating If the dispenser must be disconnected from the power source for more than a short time the bin should be emptied first In normal operation when power is initially provided to the dispenser the stirring bar will turn for a few seconds This is the initial agitation cycle and it will repeat periodica...

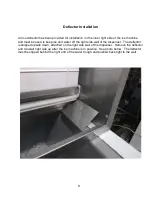
Page 11: ...ice and water off the right side wall of the dispenser The deflector is shipped upside down attached on the right side wall of the dispenser Remove the deflector and reinstall right side up after the ice machine is in position See photo below The deflector must be slipped behind the right end of the water trough and pushed back tight to the wall ...

Page 12: ...the ice machine Use a long handled brush to reach the bottom of the bin and to clean the stirring bar 4 Wash the interior of the sink with the baking soda solution and wipe dry with a clean cloth 5 Remove the front cover of the dispenser to access the spout and drain pan The spout should be removed for thorough cleaning in the baking soda solution Rinse with clean water Wash the interior of the dr...

Page 13: ...e Button or the Relay May be Defective Replace Ice Button or Relay If Agitation Motor Does Not Turn at Application of Power or When Ice Button is Pushed the Agitation Motor or Motor Capacitor May be Defective Replace Agitation Motor or Capacitor Agitation Motor is Energized but is Stuck and Cannot Turn Periodic Agitation May Not be Occurring Disconnect and Reconnect Power to the Dispenser If Motor...

Reviews: