background image

Ventamatic, Ltd.

 | P.O. Box 728, Mineral Wells, TX  76068 ▪ Phone: (800) 433-1626 ▪  www.MYMAXXAIR.com 


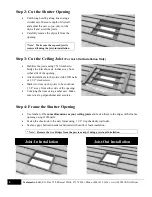
Step 5: Facing Installation 


Use 2 X 6 boards to create a square with the inside dimensions being the same distance as the shortest 
dimension of the shutter rough opening (i.e. 26” for a 24-in model, etc.). 


Nail or


screw in the facing to


the framed opening.


TIP: 

If doing a joist-out installation, use lumber from the support pieces as the long cuts and the removed joists as the 

short cuts. 


TIP: 

For a quieter fan, build a second box frame the same size as the fan frame and install it between the frame and 

facing. Ensure that there is still a minimum of  36” clearance between the fan blades and attic roof.


Step 6: Prepare and Install Fan Assembly          

Belt Drive Models 


Remove hardware and remount the motor on 
the top side of the struts. 


Position fan belt on the pulleys and adjust it to 
fit snugly with about 1/2” deflection. 

DO NOT 

OVERTIGHTEN THE BELT!


Tighten fan blade set screw and make sure the 
hub of the fan blade assembly is facing up 
towards the roof. 
 

Direct Drive Models 


Remove fan blade and wire the motor first. 


Replace and secure the blade so it is about 
half-in and half-out of the hub. 


Tighten fan blade set screw before operating 
and make sure the hub of the fan blade 
assembly is facing up towards the roof. 


Joist-In Installation 

Joist-Out Installation 

Summary of Contents for CX242DDWT

Page 1: ...ng into wall or ceiling do not damage electrical wiring and other hidden utilities d WARNING TO REDUCE THE RISK OF FIRE OR ELECTRIC SHOCK DO NOT USE THIS FAN WITH ANY SOLID STATE SPEED CONTROL DEVICE...

Page 2: ...ft and 8 10 sq ft of Net Free Exhaust Area 30 in Fans Requires attic space of at least 1800 sq ft and 10 12 sq ft of Net Free Exhaust Area 36 in Fans Requires attic space of at least 3000 sq ft and 14...

Page 3: ...st in or joist out option below Remove all insulation above the installation site Joist In Installation Align shutter vein with ceiling joist in the center of the shutter opening Draw a line on the ce...

Page 4: ...s away from either side of the opening Attach stabilizers to the joists with 12D nails or 2 1 2 deck screws Mark two lines on the joists to be cut about 1 1 2 away from either side of the opening Cut...

Page 5: ...n the frame and facing Ensure that there is still a minimum of 36 clearance between the fan blades and attic roof Step 6 Prepare and Install Fan Assembly Belt Drive Models Remove hardware and remount...

Page 6: ...the outer edges of the shutter frame Install the shutter using the white headed wood screws provided with your fan Caulk the seams for an airtight seal Step 8 Wiring Instructions Note All wiring suppl...

Page 7: ...to overheat Insufficient intake or exhaust Net Free Air Open more doors and windows or increase the amount of ventilation in the attic Check the bearing assembly for resistance on belt driven models...

Page 8: ...ed for the repair or replacement and return to you of any part or component not covered by this warranty including parts or components damaged by you The company reserves the right to demand and recei...

Reviews: