background image


20

Live

Playback

Each subsequent turn of the shuttle 

to the right increases the forward 

rate, as 1/2, 1/4, 1/8, and 1/16. 

(3) 

Reverse:

 Turn the 

Shuttle

 dial 

20


to the 

left to view the recorded video in the 

reverse direction at a speed slower 

than the recorded speed. Each 

subsequent turn of the shuttle to the 

left increases the reverse rate, as 

-1/2, -1/4, -1/8, and -1/16. 

(4)

 Normal: 

Release the 

Shuttle

 dial 

20


and then press the 

PLAY

 button 


to return to the normal speed of 

playback. 


3.3.4 Play back Picture-by-picture 


While playing back recorded video at the 

recorded speed: 

(1) Press the 

PAUSE 

button 

3

for the 

picture-by-picture mode. 

(2)There are two ways, by PAUSE button or by 

JOG, to play in the picture-by-picture mode, 

but the 

PAUSE 

button 

3

can only function 

in a forward direction; the other. The 

JOG


dial 

21

, can act in both a forward and a 

backward direction, as well as 

picture-by-picture.  

A.

 By 

PAUSE

 button 

3

:


Press the 

PAUSE 

button 

3


to display 

one frame/field of a picture at a time in the 

forward direction.


B

. By 

JOG

 dial 

21

 : 

Turn the 

JOG

 dial 

21

  clockwise to display 

one frame/field of a picture at a time in the 

forward direction. Turn the 

JOG

 dial 

21


counterclockwise to display one frame/field 

of a picture at a time in the backward 

direction. 

(3) Press the 

PLAY

 button 

4

 to return to 

the normal speed of playback. 

3.3.5 Playback Recorded Video from 
an HDD of the mobile rack (for 
removable HDD model only) 


To play back a recorded video from an HD2, 

take the following steps: 

(1) Press 

the 

Search 

button 

10

 to enter 

the search mode. 

(2) Press the  “

^

” 

12

 and 

13

  “

v

” buttons to 

select a video; press the 

11

  “

<

” and 

14


>

” buttons to flip over a page. 

(3)  Use the search function to access desired 

recorded video. For specific operation 

details please refer to the next section 

3.4 

(Search Operations).   


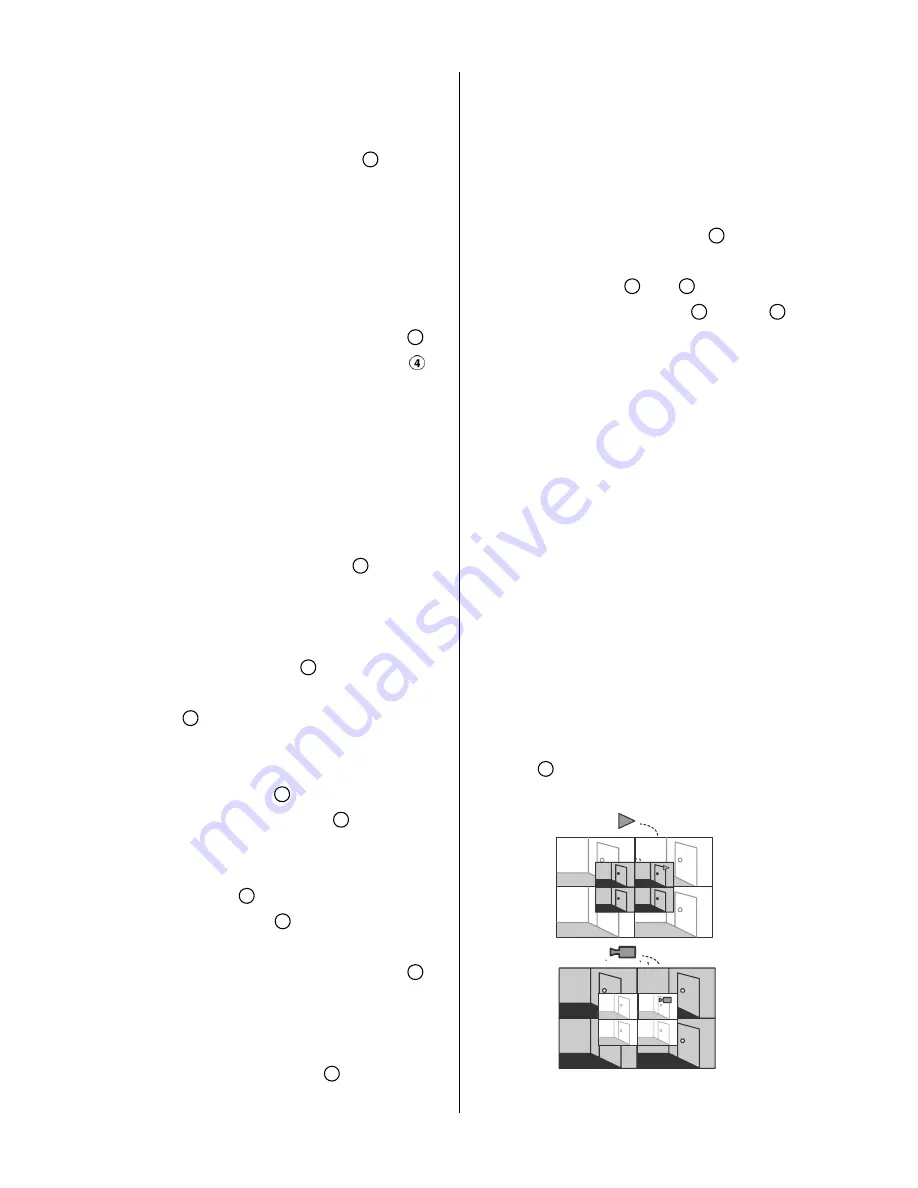
3.3.6 Picture in Picture ( PinP ) 
Display Mode 


When pressing the 

Display

 button in the play 

mode, any one of 5 statuses can result: (1) No 

information; (2) Quad view with titles and date. (3) 

PinP status 1. (4) PinP status 2. (5) Full 

information.


While playing back recorded video, the 

display mode can be switched to 

2

 different 

PinP modes by pressing the 

DISPLAY


button

8


PinP Status 1 


PinP Status 2 


Summary of Contents for AVE MVDR-5000

Page 1: ...Before trying to connect or operate this product please read this manual completely INSTALLATION OPERATION MANUAL Digital Video Recorder AVE MVDR 5000...

Page 2: ......

Page 3: ...place anything on top of the unit that might spill or fall into it Do not attempt to service this unit yourself as opening or removing covers may expose you to dangerous voltage or other hazards Pleas...

Page 4: ...3 4 6 CD MENU 23 3 5 Backup Operations 25 3 5 1 CD Rewritable unit Backup Operations FOR CD ROM MODEL ONLY 25 3 5 2 Mobile Rack HD Backup Operations 26 3 5 3 SD Card Backup Operations 27 3 6 Key Lock...

Page 5: ...s instead of VCR tapes Main recording media one hard disk drive capability and one removable hard disk For removable model only Main recording media one fixed HDD plus a CD RW For CD ROM model only Ha...

Page 6: ...the display light will be a red flash Power Supply Reading Light When a disc has been ejected the display light will be green When a disc is unable to be read or the device is being repaired the displ...

Page 7: ...ode use these buttons to select channel 1 or 2 for display In play mode use these buttons to select channel 1 or 2 as well as zoom in on the desired channel 12 13 Up Down CH4 CH3 buttons Press these t...

Page 8: ...y a recorded video in the reverse direction Turn this right to play a recorded video in the forward direction 22 POWER Indicator Indicates the power status of the unit The green light indicates the ha...

Page 9: ...the device s audio input 31 AUDIO IN Connector This connector is used to connect the audio output from a camera or other devices to the DVR 32 ETHERNET 10 100 Connector This is one standard RJ 45 conn...

Page 10: ...is is a disk full output trigger Connect this to external devices such as buzzers or lights 5V 0V Active 4 ALARM RESET INPUT This pin connects to an alarm clear device for clearing an alarm 5V 0V Acti...

Page 11: ...Alarm Reset Normally Open Normally Open Alarm1 in Normally Open Alarm2 in Normally Open Alarm3 in Normally Open Alarm4 in Ground Trigger Out 2 INSTALLATION Please follow the instruction and the diagra...

Page 12: ...installers If there is only one hard disk drive in the mobile compartment please set the HD2 USAGE option to REC please refer to section 4 5 before proceeding with the recording function The jumper s...

Page 13: ...7200 RPM 6L160P0 RoHS 160G 7200 RPM 6L200P0 RoHS 200G 7200 RPM 6L250R0 RoHS 250G 7200 RPM Maxtor 6L300R0 RoHS 300G 7200 RPM WD800AB 80G 5400 RPM WD1200AB 120G 5400 RPM WD800BB 80G 7200 RPM WD1200BB 1...

Page 14: ...efault display Press the Display button 8 again the unit will not display any OSD message Press the button one more time to go back to the default display FIGURE 3 3 A 1 2 59G Total capacity of instal...

Page 15: ...ware which will take approximately 90 seconds to process 5 Restart the unit when the device sounds a tone twice and displays the message PLEASE RESTART The process is complete If you have already foll...

Page 16: ...drive NOTE 1 Recording times on the tables below are estimated For the actual available recording time of a recording configuration refer to the system information of the DVR Please refer to section 2...

Page 17: ...17 5 2288 1 Refresh Rate Frame Sec 25 12 5 8 3 5 2 7 1 4 0 76 0 44 1 8 1 12 1 16 REC Time Mode 3 hr 6 hr 9 hr 12 hr 24 hr 48 hr 96 hr 168 hr 480 hr 720 hr 960 hr PAL Audio ON 11KHz Possible Recording...

Page 18: ...Press the REC button 6 for 3 seconds to stop recording any time 3 To access just recorded video please refer to section 3 4 for more details 3 2 2 Timer Recording Timer recording provides 2 periods o...

Page 19: ...g Note If you activate the recording function before the scheduled recording the unit will operate recording as shown in the diagram below and keep those Images in different files 03 00 06 00 08 00 12...

Page 20: ...kes Place Timer Recording Actual Recording Speed Alarm Takes Place Normal Alarm Normal Normal Alarm Alarm Normal 3 2 4 Externally Triggered Recording By connecting the RECORD IN of ALARM I O on the re...

Page 21: ...key for 3 sec PLAY Once playback reaches the end of an HDD s recorded data the DVR will show the ending message use SEARCH functions or rewind to replay the file if required 3 3 2 Fast Forward Backwar...

Page 22: ...e in the forward direction B By JOG dial 21 Turn the JOG dial 21 clockwise to display one frame field of a picture at a time in the forward direction Turn the JOG dial 21 counterclockwise to display o...

Page 23: ...R External trigger recording A Alarm recording NOTE The maximum number of indexes in the list for an HDD is 3000 3 4 2 ALARM LIST Search Take the following steps to proceed with the alarm list search...

Page 24: ...press the Enter button 15 to access the thumbnail page 3 Set the date you wish to search for the recorded video 4 Press the Enter button 15 to start searching for and displaying the concerned image Y...

Page 25: ...Enter button 15 to access the complete list of JPG files 4 Highlight the specific JPG file of your requirement and press the Enter button 15 to display the image 5 If you need another please return t...

Page 26: ...ITEM 6 NOTE If by accident one selects a CD item and forgets to insert it See the picture below for this status and please insert a CD or press the search button to exit the CD menu 3 4 6 2 BACKUP Me...

Page 27: ...PAUSE when you find it iii Press the Seq Save button and select 3 CD JPEG and enter iv You ve entered the CD JPEG menu v Select item 1 ADD to add your image into the buffer vi Turn the jog dial or Pl...

Page 28: ...MODEL ONLY There are 3 ways available to duplicate the recorded video from HD 1 Fixed HD to HD 2 Mobile Rack HD Please take the following steps to proceed 1 Set HD 2 to BACKUP first Take the following...

Page 29: ...t all the recorded video Press the 12 and v 13 buttons to select the desired clip and press the Search button 9 to mark it After completing the selection press the Enter button 15 to proceed NOTE If t...

Page 30: ...up button 9 to enter the setup mode and select the DISK 2 Highlight DISK and press the Enter button 15 to enter the DISK SETTING page 3 Then set SD FILE to AVI 4 Insert an SD Card into the SD card slo...

Page 31: ...STEM and press the Enter button 15 to enter the SYSTEM SETTING page 4 Set SD SETUP to SAVE Then the system setting info will auto save into SD card 3 5 4 2 Transfer the system setting info of DVR to a...

Page 32: ...mode 12 and v 13 buttons Press to select the desired item or entry for setting 11 and 14 buttons Press to highlight the desired option or to select the context for setting Enter 15 button Press to ent...

Page 33: ...storage media in case of a full disk REWRITE When the hard disk is full the device continues recording by displacing the old data STOP When the hard disk is full the device will stop recording AUDIO...

Page 34: ...ds at the 11KHz sampling rate 22KHZ Enables AUDIO recording and records at the 22KHz sampling rate NOTE Audio function can only be activated in the following refresh rate in NTSC PAL 30 25 15 12 5 10...

Page 35: ...ction ON Enables the motion detection OFF Disables the motion detection SENSITIVITY 1 5 This option allows users to set the motion sensitivity 1 is the most sensitive setting 5 is the least sensitive...

Page 36: ...played in a 24 hour clock format If there is a time overlapping showing between two continual time period settings the device will automatically combine the two time period settings into one SEQUENCER...

Page 37: ...ommunication port BAUD You have the option of using a Baud rate at 8 different levels 2400 4800 9600 19200 28800 38400 57600 or 115200 NET ENABLE This option selects either enable or disable for the E...

Page 38: ...essional to configure it FTP IP Every FTP server has to own an IP address to be identified on the network Enter the IP address of the FTP server USER Enter the FTP user name Login Name PASSWORD Type i...

Page 39: ...on determines the format to save the important image files in an SD card JPEG Archives images in the JPEG format to save a single picture in every file AVI Archives images in the AVI format to save a...

Page 40: ...the oldest one OSD LANGUAGE This option allows you to select the OSD language display as English or Chinese MENU BACKGND There are 3 levels of background color transparencies you can choose from level...

Page 41: ...the factory default setting SD SETUP The DVR offers a quick setup method by using an SD card If the user wants to set up many of the same devices with the same settings he can save the whole settings...

Page 42: ...Connect to a PC Use a crossover LAN cable to connect directly to a PC B Connect to a LAN Hub Intranet The RJ 45 PIN configuration for connecting with a LAN Hub is shown below C Connect to WAN Interne...

Page 43: ...ht NET ENABLE select ON Then press the Enter button to proceed 5 1 2 2 Enable DHCP Function Use the 12 and v 13 buttons to highlight NET DHCP select ON NOTE This function can only work if the LAN to w...

Page 44: ...ectly configure the MASK and GATEWAY settings according to your network architecture If you have any questions regarding those settings please contact a qualified MIS professional or your ISP 2 Connec...

Page 45: ...Point to the Local Area Connection and click the right bottom of the mouse Click the Properties to enter the Local Area Connection 3 Click the Configuration tag check if the TCP IC is included among t...

Page 46: ...rovider If you are using a DHCP server please select Obtain an IP address automatically Any assigned IP address for the connected DVRs must be in the same class type as the server If there is no DHCP...

Page 47: ...is IP is the DVR IP address which is assigned for the connected DVR 3 If you receive a response as in the sample screen below the connection hasn t been successfully established Please re check all th...

Page 48: ...earch recorded data for the event time you want It supports your local PC simultaneously with the DVR backup data The programs can be operated by a selected PC equipped with the following requirements...

Page 49: ...button to complete the installation process Step 6 After completing installation you can double click the file shown below Or click the Start Menu in the computer and select Programs to open the Progr...

Page 50: ...Available Devices button The software will automatically search the whole local LAN 4 channel DVR device to see a list NOTE If you want to create a new DVR please press the button to add it Step 2 Dou...

Page 51: ...le name If you want to exit click Cancel Print Click the Print Preview button and go to the Preview option to adjust the image size Go to the Print Settings area and then go to Mark Date and Time if y...

Page 52: ...set has four buttons each of which upon being clicked will turn the camera all the way without stopping in one of the four designated directions The fifth button in the center will stop the camera at...

Page 53: ...ant Channel ID To choose the camera Play Monitor Use the panel below to play or stop etc If you already want to back up click the Start backup button If you want to stop click the Stop backup button E...

Page 54: ...stop etc If you already want to back up click the Start backup button If you want to stop click the Stop backup button 5 2 3 4 Web Page Viewer This section provides instructions for using the Viewer...

Page 55: ...ers 30 to 1000 seconds 4 Users Management Click the Save User button to add the new user s name and password under Add New User Enter the User Name and Password and click Save User again Your new user...

Page 56: ...pan tilt zoom function camera live over a local area network or the Internet Recorded video list box This box allows you to access all recorded video which are stored in the HDD of the connected devi...

Page 57: ...able the TIMER RECORD function 4 There are two time periods available for scheduling each day The Timer Record setting page allows users to program the time each day that the DVR will start and stop r...

Page 58: ...No Parity 8 Data Bits 1 Stop Bit 6 1 2 Communication Protocol 6 1 2 0 General Command Format Lead Code 0x41 Dest ID Src ID Main category Second category Number of parameters Parameter 1 Parameter 2 En...

Page 59: ...2x 1 2x KEY_SHUTTLE_R2 140 0x 8C 4x 1 2x KEY_SHUTTLE_R3 141 0x 8D 8x 1 4x KEY_SHUTTLE_R4 142 0x 8E 16x 1 4x KEY_SHUTTLE_R5 143 0x 8F 30x 1 8x KEY_SHUTTLE_R6 144 0x 90 100x 1 8x KEY_SHUTTLE_R7 145 0x...

Page 60: ...x02 0x10 0x00 0x4f DVR Response 0x41 0x20 0x01 0x02 0x10 0x32 0x00 0x00 48 Bytes Data 0x4f 48 Bytes Data 4 HDD Status Primary Master Slave Secondary Master Slave Every HDD uses 12 Bytes 0 HDD Exists i...

Page 61: ...g screws on the mobile rack of the unit and detach it 2 Carefully lift the mobile rack to a vertical position 3 Unscrew the secured screws to detach the hard disk rack 4 Setting the jumper of your har...

Page 62: ...key is unlocked 2 Pull the active handle outward to detach the carrier body from the mobile rack 3 Slide the top cover backward and remove 4 Setting the jumper of your hard disk driver The way to set...

Page 63: ...ble must line up side by side 6 Place the HDD inside mobile rack Use four of the provided screws 7 Place the top cover back to the carrier body by sliding forward to secure 8 Slide the carrier body ba...

Page 64: ...LE MAIN PAGE SET OFF OFF SET SET SET 6 3 System Default SYSTEM MENU BACKGND BUZZER PASSWOR D SETU P PW D DEFAULT VERSION MAIN PAGE SD CD SETUP SAVE OPER ATION LO G ENTER 2 OFF SET OFF LOAD ENTER COMM...

Page 65: ...on or uses the SEARCH function but no video can be played 17 SET TO NTSC PLS RESTART System has to be set to NTSC please reboot PAL is similar 18 SOFTWARE UPDATE Software update 19 PLEASE RESTART The...

Page 66: ...a case an index for the recent recorded data will be generated and the index of the next oldest data will be erased so that the list does remain 3000 in total And the next oldest data will be kept in...

Page 67: ...ecord Search Alarm Time Event list Filter thumbnail SD card OSD Language English Chinese T Set up Menu Multi layer Network setting Log list 2000 records Alarm In Out 4 Alarm Inputs 1 Alarm Output Buil...

Page 68: ...s to display the desired changes instantly 4 Do you want to execute an automatic search for free IP If and when you want to auto search the free IP select Yes or No If clicked Yes the software will pr...

Page 69: ...ss box on the right to enter it into an IP Address on the left 2 To change any IP address type in the new address in the Free IP Address box on the right as well as the device Login Name and Password...

Page 70: ...he caddy lightly at the middle of its front and push gently to insert Ejecting The Disc 1 Press the eject button 2 Carefully lift out the disc 3 Press the eject button or lightly touch the center of t...

Page 71: ...ation As suggested in your specifications please do not install in an unstable position or in one that causes vibrations 2 Do not install in high humidity direct sunlight or damp conditions 3 Do not u...

Reviews: