background image

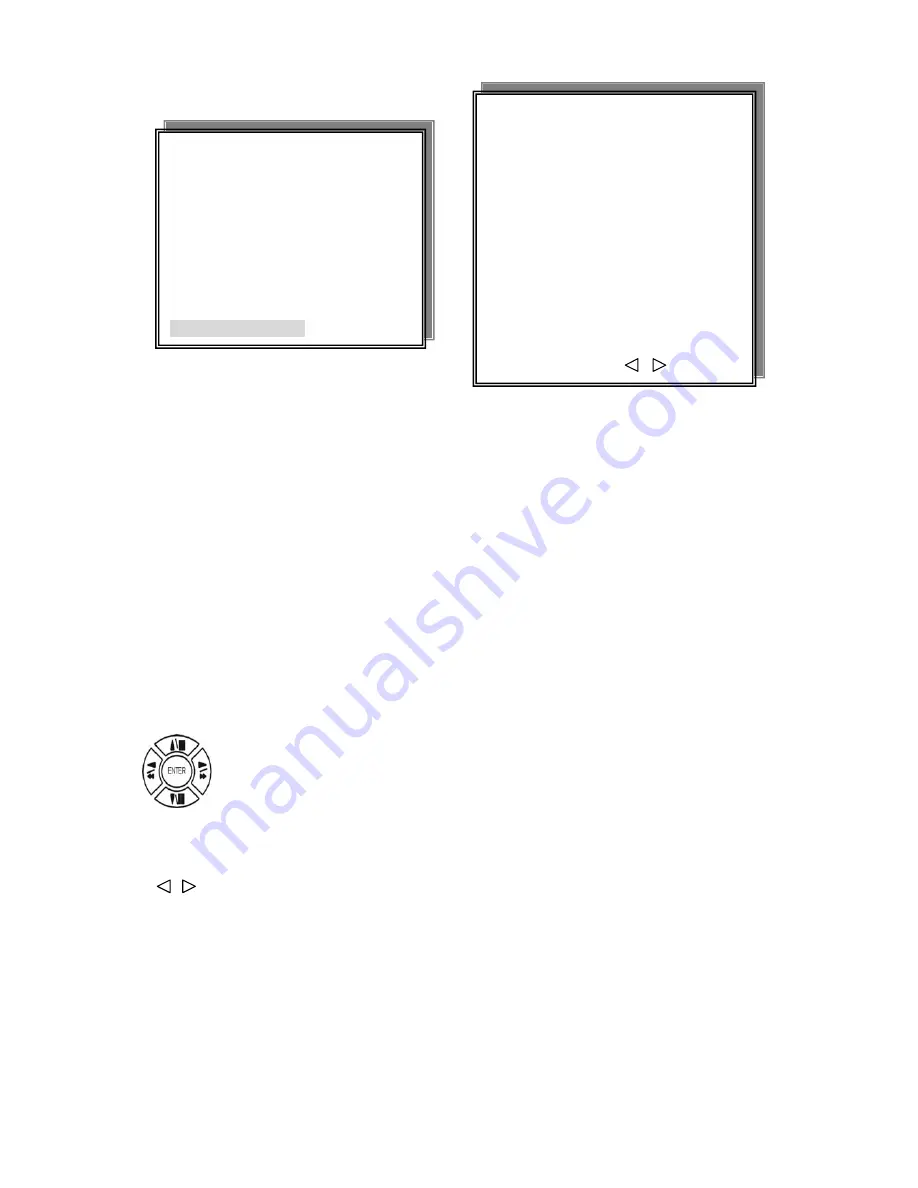
RECORD CHANNEL SETUP PAGE 


CH 01    CH 09  

CH 02    CH 10  

CH 03    CH 11  

CH 04    CH 12  

CH 05    CH 13  

CH 06    CH 14  

CH 07    CH 15  

CH 08    CH 16 

MENU, ESC: EXIT:   


 : MODIFY

7. RECORD CHANNEL SETUP PAGE 


RECORD SETUP 

1. HDD FULL   

2. RECORD SPEED 

3. RECORD MODE   

4. RECORD AUDIO   

5. QUALITY   

6. SCHEDULE SETUP   

7. CHANNEL SETUP 


CH 01 : ON / OFF    CH 09 : ON / OFF 

CH 02 : ON / OFF    CH 10 : ON / OFF 

CH 03 : ON / OFF    CH 11 : ON / OFF 

CH 04 : ON / OFF    CH 12 : ON / OFF


CH 05 : ON / OFF    CH 13 : ON / OFF 

CH 06 : ON / OFF    CH 14 : ON / OFF 

CH 07 : ON / OFF    CH 15 : ON / OFF 

CH 08 : ON / OFF    CH 16 : ON / OFF


Press direction buttons up/down to choose item.


Press values change button to change values. 


35

Summary of Contents for 16 Channel Digital Video Recorder

Page 1: ...Thank you for purchasing our product Please read this User s Manual before using the product Change without Notice 16 Channel Digital Video Recorder User s Manual 1 ...

Page 2: ...e of important operation and maintenance servicing instructions in the literature accompanying the appliance WARNING TO PREVENT FIRE OR SHOCK HAZARD DO NOT EXPOSE UNITS NOT SPECIFICALLY DESIGNED FOR Attention installation should be performed by qualified service Personnel only in accordance with the National Electrical Code or applicable local codes Power Disconnect Units with or without ON OFF sw...

Page 3: ... 5 For questions and technical assistance of this product contact your local dealer Strong recommendation on installation of the DVR unit 1 Check electricity at the place you want to install the DVR unit is stable and meets our electricity requirements Unstable electricity will cause malfunction of the unit or give critical damage to the unit 2 Several chips on the main board of the DVR unit and h...

Page 4: ... reading this document 3 Unite Description of Front Panel 5 Unit Description of Rear Panel 6 Installation 7 Function Setup 15 Login 15 Basic Operation 16 USB Data Read and Networking 39 Record Time Table 80 GB HD 49 VGA Description Optional 50 Additional 51 4 ...

Page 5: ...tton Play button Record button Key lock button Data back up button BACKUP Time search playback button Function exit button Value change button T SRH ESC Direction UP Down Direction Left Right Record and play stop Playback pause steps Playback forward or reverse ENTER Remote controller IR Function LED light display Shuttle USB Data backup or firmware update ...

Page 6: ...OFF Camera 1 16 in and looping out Audio channel input x 1 and output x 1 75 Ohm ON OFF high low adjust Monitor out VGA output PC monitor connector Optional VGA S Video Y C monitor RS 485 control keyboard connector 6 RS 232 connector ISP For RD control Alarm connector LAN ...

Page 7: ... Panel of the 16 CH DVR CH1 CH2 CH3 CH4 CH1 CH2 CH3 CH4 MONITOR VIDEO A IN OUT 4 Sensor Connection Connect the Sensor to the SENSOR INPUT 1 ALARM 1 14 ALARM 13 2 ALARM 2 15 ALARM 14 3 ALARM 3 16 ALARM 15 4 ALARM 4 17 ALARM 16 5 ALARM 5 18 6 ALARM 6 19 7 ALARM 7 20 DGND 8 ALARM 8 21 ALARM COM 9 ALARM 9 22 ALARM NC 10 ALARM 10 23 ALARM NO 11 ALARM 11 24 DGND 12 ALARM 12 25 DGND 13 DGND OUTPUT on the...

Page 8: ...l is FLOATING or 5V Following is internal circuit D1 5 V Internal Circuit Thus there is a danger of damage when the sensor input goes to a Negative level or voltage higher than 5V 5 Network Connection DVR connects to LAN r k s TERATRAY CONNECTION ETHERNET To view video image on the computer through internet with DVR view software ...

Page 9: ...et up 1 Make sure the HDD is MASTER and SLAVE 2 Make sure the cable connector is correct 3 Please check the HDD panel for Master and Slave set up Notice The 16 ch DVR provides 2 internal hard drives We provide one hard disk drive with removable rack the other one is fixed designed We recommend you to set the Removable Hard Disk as Slave Set another one as the Master Hard Disk Master and Slave jump...

Page 10: ...een mode with numeric buttons at live or playback mode then press ZOOM button to display screen Enlargement Use button to move position 3 Auto Mode Press AUTO button to start screen auto sequencing and press it again to cancel auto mode 4 W MARK Water Mark mode Water Mark protection function on or off To prevent hacker using special software to modify the image data 5 INFO System Information SYSTE...

Page 11: ...to FAT or FAT 32 on PC OS Additional During playback USB device is full or user press BACKUP button screen display a PAUSE caption User takes out the USB device to computer USB slot then save data to hard disk After re insert USB device to DVR slot user press BACKUP again Press ENTER to continue backup or backup button to cancel BACKUP CAUTION THE ORIGINAL BACKUP FILE WILL BE KILLED PRESS ENTER TO...

Page 12: ... AUDIO function Audio playback AUD Audio displays on the Upper left of screen At that time audio will playback Press it again to turn it off xxxxxxxxx Notice Audio playback only on normal x 1 playback 12 ...

Page 13: ...SLAVE TIME LIST 3 MASTER EVENT LIST 4 SLAVE EVENT LIST 5 GOTO DATE 2004 12 31 6 GOTO TIME 12 12 7 GOTO PLAY 1 TIME LIST Playback image by Time Search Recorded images list by hours TIME LIST Y M D H M Y M D H M Y M D H M Beginning of recording time Y M D H M End of recording time Every playback data list displays by an hour No page display limit 10 items display on each page Press direction button ...

Page 14: ...Motion Alarm V Loss Record 14 Press direction button UP DOWN to choose items Press values change button to change page Press ENTER to start playback Special time search playback Go TO DATE 2002 12 12 Choose year month day Press direction button Left Right to choose items press values change button to change value GOTO TIME 12 12 Choose hour and minute Press direction button Left Right to choose it...

Page 15: ... setup in MENU 2 Password enter window pop up CHECK PASSWORD MENU PASSWORD Default password Account Admin 44444 Default password Account User 11111 3 Press numeric 1 10 button or remote controller 1 10 to choose password 4 Remote controller function buttons are same as DVR panel function buttons ...

Page 16: ...1 Use direction button up down button to select setup item 2 Press button to enter into sub menu function setup 3 Press sub menu item with direction button up down or left right button And change the value with values change button or turn inner shuttle 4 Press ESC to go back to main sub menu or exit menu Notice 1 ADMIN level can setup all DVR menu functions 2 USER level cannot setup ADVANCED page...

Page 17: ...ESC EXIT ENTER RUN POSITION SIZE USED BRAND MASTER LAST TIME SLAVE LAST TIME MENU ESC EXIT PAGE 2 hard disk information display Information display POSITION SIZE USED BRAND POSITON Master Slave SIZE Hard Disk capacity xxGB Maximum display is 999MB USED 00 100 Hard disk overwrites 100 199 BRAND DVR auto detect hard disk brand LAST TIME The last record time display 17 ...

Page 18: ...play in English 4 DISPLAY AT xx LINE S Date and Time position on screen xx line s 00 23 Day and time change Press direction button up down left right to choose items or move date time position DATE TIME SETUP PAGE 1 DATE 2000 00 00 2 TIME 3 FORMAT MAIN SETUP PAGE 1 HDD INFORMATION 2 DATE TIME SETUP 3 DISPLAY SETUP 4 CAMERA SETUP 5 BUZZER SETUP 6 RELAY SETUP 7 SYSTEM SETUP 8 ADVANCED SETUP MENU ESC...

Page 19: ...VR system record playback audio caption display mode on or off setup ON OFF 6 BORDER COLOR Border color WHITE DARK BLACK GRAY Press direction button up down to choose the desired item Press values change button to change values DISPLAY SETUP PAGE 1 DATE TIME ON 2 CAMERA TITLE ON MENU ESC EXIT ENTER RUN 6 RELAY SETUP 7 SYSTEM SETUP 8 ADVANCED SETUP 5 BUZZER SETUP 4 CAMERA SETUP 3 DISPLAY SETUP MAIN...

Page 20: ...TLE SETUP 3 SCREEN POSITION SETUP 4 V LOSS DISPLAY SETUP 5 VIDEO MASK SETUP CAMERA SETUP COLOR SETUP Adjust Camera Image CHANNEL NUMBER Select camera 01 16 BRIGHTNESS Adjust screen brightness 31 32 CONTRAST Adjust color contrast 31 32 SATURATION Adjust color saturation 31 32 HUE Adjust color hue 31 32 GAIN Adjust image signal level 31 32 DEFAULT RESET Press ENTER button to reset DVR values Press d...

Page 21: ...AGE CH 01 01 CH 09 09 CH 02 02 CH 10 10 CH 03 03 CH 11 11 CH 04 04 CH 12 12 CH 05 05 CH 13 13 CH 06 06 CH 14 14 CH 07 07 CH 15 15 CH 08 08 CH 16 16 MENU ESC EXIT MODIFY CAMERA SETUP 1 COLOR SETUP 2 TITLE SETUP 3 SCREEN POSITION SETUP 4 V LOSS DISPLAY SETUP 5 VIDEO MASK SETUP Characters choose Space Numeric 0 1 2 3 4 5 6 7 8 9 Capital letter A B C D E F G H I J K L M N O P Q R S T U V W X Y Z 21 ...

Page 22: ... SCREEN POSITION SETUP CAMERA SETUP 1 COLOR SETUP 2 TITLE SETUP 3 SCREEN POSITION SETUP 4 V LOSS DISPLAY SETUP 5 VIDEO MASK SETUP 1 Press direction buttons up down left right to move screen position 2 Press ENTER button for default 3 Press ESC button to quit 22 ...

Page 23: ...UP 1 COLOR SETUP 2 TITLE SETUP 3 SCREEN POSITION SETUP 4 V LOSS DISPLAY SETUP 5 VIDEO MASK SETUP V LOSS FUNCTION ON OFF CH 01 ON OFF CH 09 ON OFF CH 02 ON OFF CH 10 ON OFF CH 03 ON OFF CH 11 ON OFF CH 04 ON OFF CH 12 ON OFF CH 05 ON OFF CH 13 ON OFF CH 06 ON OFF CH 14 ON OFF CH 07 ON OFF CH 15 ON OFF CH 08 ON OFF CH 16 ON OFF Press direction buttons up down left right to choose items Press values ...

Page 24: ...CAMERA SETUP 1 COLOR SETUP VIDEO MASK FUNCTION ON OFF CH 01 ON OFF CH 09 ON OFF CH 02 ON OFF CH 10 ON OFF CH 03 ON OFF CH 11 ON OFF CH 04 ON OFF CH 12 ON OFF CH 05 ON OFF CH 13 ON OFF CH 06 ON OFF CH 14 ON OFF CH 07 ON OFF CH 15 ON OFF CH 08 ON OFF CH 16 ON OFF MASK means the channel would not display on the live screen but still can set it on recording Press direction buttons up down left right t...

Page 25: ...ZER ON HDD FULL BUZZER ON CRASH BUZZER ON MENU ESC EXIT MODIFY BUZZER SETUP PAGE BUZZER FUNCTION ON BUZZER FUNCTION All buzzer function ON OFF 1 BUTTON BUZZER ON OFF 2 ALARM BUZZER ON OFF 3 MOTION BUZZER ON OFF 4 VLOSS BUZZER ON OFF 5 HDD FULL ON OFF Buzzer on if hard disk record only once 6 CRASH ON OFF Buzzer on if hard disk has crash area Press direction buttons up down to BUZZER SETUP items Pr...

Page 26: ...RELAY ON RELAY SETUP PAGE RELAY FUNCTION ON 1 ALARM RELAY ON 2 MOTION RELAY ON 3 V LOSS RELAY ON 4 HDD FULL RELAY ON RELAY FUNCTION ON 1 ALARM RELAY ON 2 MOTION RELAY ON 3 VLOSS RELAY ON 4 HDD FULL RELAY ON Relay on if hard disk record only once 5 CRASH RELAY ON Relay on if hard disk has crash area Press direction buttons up down to each item Press values change button to change values 26 ...

Page 27: ... menu Language would change next time back to menu 3 VIDEO INPUT NTSC PAL system detection AUTO NTSC PAL User needs to connect camera with power first before DVR power on if choose AUTO If manual NTSC PAL then need to power reset 4 RS 485 ID 01 16 5 RS 485 PROTOCOL KEYB LILIN PELCO P PELCO D NICECAM OFF 6 RS 485 BAUD RATE 1200 2400 4800 9600 UPTIME xx HRS This means the total system working time a...

Page 28: ... SETUP PAGE 1 ALARM SETUP 2 MOTION SETUP 3 RECORD SETUP 4 PASSWORD SETUP 5 NETWORK SETUP 6 HDD FORMAT 7 FACTORY DEFAULT 8 SOFTWARE UPDATE ALARM SETUP PAGE 1 ALARM FUNCTION 2 ALARM DURATION 3 ALARM RELAY SETUP 4 ALARM POLARITY SETUP MENU ESC EXIT MODIFY 1 Alarm function ON OFF Function on all channel will record if alarm trigger 2 Alarm duration 0 999 ALARM RELAY SETUP ALARM 01 ALARM 16 ON OFF ALAR...

Page 29: ...RE UPDATE MOTION SETUP MOTION FUNCTION For all channel ON OFF MOTION DURATION 0 999 CHANNEL NUMBER CH 01 16 1 SENSITIVITY Adjusts motion Detection Sensitivity 1 32 low Æhigh 2 VELOCITY Adjusts motion object slow fast speed detection 1 10 slow speedÆfast speed 3 ACTIVATION For each channel ON OFF The function only for channel motion detect active not for motion record per each 4 RELAY ON OFF 5 MOTI...

Page 30: ... button to reduce Press value change button to reduce Add lattices Icon Press to increase all area press to reduce all area Icon Press Up Down Left Right direction key to move press to increase lattices press to reduce lattices Icon Press Up Down Left Right direction key to move and increase area Icon X Press Up Down Left Right direction key to move and reduce area ...

Page 31: ...p record Two hard disk both of them record full stop record Record process OVERWRITE STOP REC M 99 S 0 Æ M 100 S 0 To second and record To second and record M 99 S 100 Æ M 100 S 100 To second and record To second and record M 0 S 99 Æ M 0 S 100 To first and record To first and record M 100 S 99 Æ M 100 S 100 To first and record Stop record Notice When hard disk is full system buzzer on and then pr...

Page 32: ... 1 3 1 3 1 2 1 2 1 1 2 2 3 3 13 5 5 10 8 33 15 12 5 30 25 60 50 120 100 120 is the maximum fps 3 RECORD MODE ALWAYS SCHEDULE EVENT EVENT ON SCHEDULE EVENT SCHEDULE Always 24 hours recording Schedule Date and time schedule recording mode Event Alarm Motion V Loss event mode recording Whatever which channel event all channel record Event on schedule Event record only on schedule time Event Schedule ...

Page 33: ...les time on recording SCHEDULE SETUP CURSOR STEP 30MIN 6MIN SUN MON 33 TUE WED THU FRI SAT Press direction buttons up down left right to see date and time difference Press values change left right button to change 30MIN or 6 MIN Increase Reduce Every day record with factory default On use up down button to choose date press button to change on or After use direction left right button to start incr...

Page 34: ...00 00 30 01 30 02 30 03 30 04 30 05 30 06 30 07 30 08 30 09 30 10 30 11 30 12 30 13 30 14 30 15 30 16 30 17 30 18 30 19 30 20 30 21 30 22 30 23 30 THU 00 00 01 00 02 00 03 00 04 00 05 00 06 00 07 00 08 00 09 00 10 00 11 00 12 00 13 00 14 00 15 00 16 00 17 00 18 00 19 00 20 00 21 00 22 00 23 00 00 30 01 30 02 30 03 30 04 30 05 30 06 30 07 30 08 30 09 30 10 30 11 30 12 30 13 30 14 30 15 30 16 30 17 ...

Page 35: ...ULL 2 RECORD SPEED 3 RECORD MODE 4 RECORD AUDIO 5 QUALITY 6 SCHEDULE SETUP 7 CHANNEL SETUP CH 01 ON OFF CH 09 ON OFF CH 02 ON OFF CH 10 ON OFF CH 03 ON OFF CH 11 ON OFF CH 04 ON OFF CH 12 ON OFF CH 05 ON OFF CH 13 ON OFF CH 06 ON OFF CH 14 ON OFF CH 07 ON OFF CH 15 ON OFF CH 08 ON OFF CH 16 ON OFF Press direction buttons up down to choose item Press values change button to change values 35 ...

Page 36: ...o ADMIN Press values change button to change values USER NONE user does not need to insert password before enter in MENU 2 ADMIN password 44444 Factory Default Notice 3 USER password Password always 5 character input cannot 5 characters 11111 Factory Default Press direction buttons up down left right to choose items position Press numeric 1 10 button or remote controller 1 10 to choose Choose ADMI...

Page 37: ...o change values 7 DNS 2 xxx xxx xxx xxx MAC ADDR XX XX XX Machine number user cannot change Network Requirement DVR can not go through IP sharing device only HUB LAN Local Area Network 1 DVR side input local IP address such as 192 168 192 5 or use the factory default IP 2 After DVR network setting install the remote viewer to computer Computer network IP also need to setup on local IP address such...

Page 38: ... ENTER TO FORMAT PRESS ESC TO CANCEL ALL DATA IN HDD WILL BE HDD FORMAT CAUTION Press ENTER button to format hard disk Press ESC button to cancel hard disk format Notice New hard disk detect When DVR power system would detect new hard disk install If the hard disk is in different format then the message popup User needs to press ENTER to format if press MENU and then this hard disk would not be de...

Page 39: ...TER TO RESTORE PRESS ESC TO CANCEL Press ENTER button to restore Press ESC button to cancel 8 SOFTWARE UPDATE ADVANCED SETUP PAGE 1 ALARM SETUP 2 MOTION SETUP 3 RECORD SETUP 4 PASSWORD SETUP 5 NETWORK SETUP 6 HDD FORMAT 7 FACTORY DEFAULT 8 SOFTWARE UPDATE SOFTWARE UPDATE UPDATE METHOD START UPDATE UPDATE METHOD USB NETWORK USB Copy firmware to USB device and then plug in DVR USB interface Choose S...

Page 40: ...USB Data Read and Networking 1 Windows 2000 XP 2 Resolution 1024 x 768 3 RAM up to 128 MB 4 Double click SETUP EXE of CD and then start to install 5 Browse install path and then click Next 40 ...

Page 41: ...6 Name chooses and then click Next 6 Click create a desktop icon or not and then click Next 41 ...

Page 42: ...7 Click INSTALL to start install 8 Click Launch Netviewer 163A and click Finish to done 42 ...

Page 43: ...t version update Video Fullsize Halfsize Not support currently Next version update NTSC PAL Frame Sec Not support currently Next version update Click OK to confirm On Live PlayBack 時 click DVR to save action pictures DVR file It needs this software to play Browser Local record path could change The path user changes is for DVR save JPG file is always C DVR 43 ...

Page 44: ... if you are a administer Must input on little character Password admin 123456 guest 123456 Password displays when log in user just needs to input ID Guest log in no PlayBack function authority Click OK after about 5 seconds admin login Message popup And then click Connect to start 44 ...

Page 45: ...isconnect to stop If the NETWORK is connecting success the blue light would keep glisten Else blue is always on light or not display the connecting is failed Click live PlayBack BackPlay mode Live DVR live watching PlayBack Change to playback mode After 2 3 seconds to change 45 ...

Page 46: ...ound 2 30 to start play first record If over 30 seconds cannot find any file or network disconnect Time out message popup Please try again play or connect again Click STOP to end playback TIME SEARCH Chose date and time click RUN around 2 30 seconds to start play first record If over 30 seconds cannot find any file or network disconnect Time out message popup Please try again play or connect again...

Page 47: ...12 BackupPlay Click Open to choose file path 47 ...

Page 48: ...Click Stop to end Click Pause to temporary stop playback Click Resume to restart Choose camera click mouse right button Camera 1 16 switches or reset all Click Save CamNo xx image save image all to save current image Save path is C DVR 48 ...

Page 49: ...uality Fine KB Range Lowest 15 Highest 28 Average 22 REC FPS 120 60 30 15 10 REC Hour 16 8 16 8 33 6 67 3 101 REC FPS 5 3 2 1 1 2 REC Hour 202 336 7 505 1010 1 2020 2 REC FPS 1 3 1 5 1 10 1 15 1 30 REC Hour 3367 5050 5 10101 16835 33670 Record Quality High KB Range Lowest 17 Highest 30 Average 24 REC FPS 120 60 30 15 10 REC Hour 15 4 15 4 30 8 61 7 92 5 REC FPS 5 3 2 1 1 2 REC Hour 185 1 308 6 462...

Page 50: ...witcher 3 Resolution and NTSC PAL switcher table Pin 4 Resolution Pin 1 Pin 2 Pin 3 PAL ON 640X480 60HZ ON ON ON NTSC OFF 800X600 60HZ ON ON OFF 1024X768 60HZ ON OFF ON 640X480 75HZ ON OFF OFF 800X600 75HZ OFF ON ON 1024X768 75HZ OFF ON OFF Resolution and NTSC PAL switcher description Step 1 DVR Power off Step 2 Pin 4 switcher to NTSC or PAL Step 3 DVR Power on Step 4 Pin 1 3 switcher resolution I...

Page 51: ...on slices are in the accessories box please tell supplier if slices are not exist 2 iron slices immobile type 51 Slices immobile type 4 screws hole on each slice 2 for DVR base fixed Another 2 for hard disk fixed Hard disk install Locking hard disk screws then locking DVR base screws to fixed on ...

Reviews: