background image

72

I


Convertible Car Seat 

I


Maxi-Cosi


Care and Maintenance - Seat Fabrics

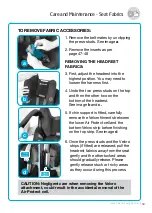
11. Begin untucking the fabrics out from behind the security of  

      the G-CELL covers, gradually and carefully making your way  

      around each of the panels until the fabrics are completely  

     free of the covers. See image and q.

o

p

CAUTION: The G-CELL cover is rigid and tight to better 

secure safety components and offer a tailored look.  

Failure to take enough care when releasing the fabrics  

from around this cover could result in pilling or damage  

to your seat cover.

12. Pull the back fabric  

      panel up and through the  

      top tether strap so that it         

      is released and in front

      of the strap.

q

Summary of Contents for Vita DAU-13-A

Page 1: ...1 Convertible Car Seat I Maxi Cosi I CONVERTIBLE CAR SEAT Suitable for newborn up to 4 years approx Images and designs may vary...

Page 2: ...nths after purchase In the event of a car accident your Maxi Cosi child restraint may have unseen damage from crash forces The Maxi Cosi Accident Exchange Service offers new for old Maxi Cosi child re...

Page 3: ...3 Convertible Car Seat I Maxi Cosi I Don t forget to please register your product warranty by visiting warranty dorelaustralia com au Always keep the original tax receipt for your product...

Page 4: ...lity solutions they can trust car seats and strollers that are safe smart and easy to use With Maxi Cosi parents know their children are in the best hands possible So they can focus on the other thing...

Page 5: ...5 Convertible Car Seat I Maxi Cosi I...

Page 6: ...ld s shoulders reach the upper shoulder height marker approximately 4 years of age Continue to use this child restraint until the child reaches this limit Do not use forward facing until child s shoul...

Page 7: ...if it has been in a severe crash even if no damage is visible DO NOT USE THIS RESTRAINT WITHOUT THE COVER To ensure infant s back is evenly supported do not put more than one nappy on the baby and ma...

Page 8: ...aint where this strap may fall into a split in the seat back or off the side of the seat Always secure the loose end of the top tether strap to prevent it hanging out of the car or being accessible by...

Page 9: ...int If a car has two or more rows of seats children under four must not travel in the front seat If all seats other than the front seats are being used by children under seven years children aged betw...

Page 10: ...and Headrest Adjustment 21 Rearward Facing Using Seatbelt 22 Rearward Facing Using ISOGO 24 FORWARD FACING Forward Facing 26 Removing Inserts 27 Harness and Headrest Adjustment 28 Recline Adjustment...

Page 11: ...Use Guide 50 Recline Adjustment 51 Checklist Before Installation 52 To Adjust the Top Tether Strap 53 Rearward Facing Installation Using Seatbelt 54 Rearward Facing Installation Using ISOGO 56 Forward...

Page 12: ...uded 1 Car seat 1 Instruction Manual 1 Swing Tag What s in the Box MAXI COSI POP TAG 016963 REV2 16 5 19 REV2 CI 280mm W x 50mm H 1 PMS 313 PROOF 1 16 May 2019 CHECK THAT THIS CHILD RESTRAINT WILL FIT...

Page 13: ...D Infant Headrest Insert E Belt mates x2 F Infant Body Insert G 6 point harness H Buckle I Harness release lever under flap J Harness tightening strap K Built in rebound bar L ISOGO storage compartme...

Page 14: ...op tether strap adjuster S Top Tether Hook T Anchor Bolt Kit U Storage Pocket instruction manual excess tether strap webbing V G Cell 2x W ISOGO Belt Path X Recline Indicator Y Rearward Facing Belt Pa...

Page 15: ...8 for visual guide see page 54 for detailed guide Between Modes 12 30 months old Choosing the best mode for your child see page 16 Forward Facing 12 months to 4 years old see page 26 for visual guide...

Page 16: ...ng allowing for greater head and neck support if the child falls asleep Both modes can use either a belt or ISOGO installation What do we recommend Maxi Cosi recommends that children remain rearward f...

Page 17: ...17 Convertible Car Seat I Maxi Cosi I Visual Guide...

Page 18: ...18IConvertible Car Seat I Maxi Cosi Car installation Rearward Facing 0 6 months 6 months 30 months...

Page 19: ...19 Convertible Car Seat I Maxi Cosi I Car installation Rearward Facing Pull Pull NOTE Body or headrest inserts can be used together or in isolation When rearward facing Lift How to remove inserts Pull...

Page 20: ...20IConvertible Car Seat I Maxi Cosi Car installation Rearward Facing Swing Lift Recline adjustment NOTE Only use recline position 4 for rearward facing mode Lift...

Page 21: ...Cosi I NOTE Position child in seat and adjust headrest and harness to be level with shoulders or slightly above but not below Car installation Rearward Facing Harness and headrest adjustment Press Pul...

Page 22: ...22IConvertible Car Seat I Maxi Cosi Car installation Rearward Facing Using Seatbelt Click Push Push out slack...

Page 23: ...23 Convertible Car Seat I Maxi Cosi I Car installation Rearward Facing Using Seatbelt Attach top tether Tighten till slack is removed TIP Position adjuster facing outwards...

Page 24: ...24IConvertible Car Seat I Maxi Cosi Car installation Rearward Facing Using ISOGO Push ISO Storage under the trim...

Page 25: ...eat I Maxi Cosi I Car installation Rearward Facing Using ISOGO TIP Always check for GREEN at eye level Click Both Sides Attach top tether TIP Position adjuster facing outwards Push Pull Pull Tighten t...

Page 26: ...26IConvertible Car Seat I Maxi Cosi 12 months 4 years Car installation Forward Facing using Seatbelt...

Page 27: ...27 Convertible Car Seat I Maxi Cosi I Car installation Forward Facing using Seatbelt How to remove inserts Pull Pull NOTE Body and headrest inserts are not to be used for forward facing Lift Pull...

Page 28: ...le Car Seat I Maxi Cosi Car installation Forward Facing using Seatbelt Harness and headrest adjustment Press Pull Lift Pull NOTE Body and headrest inserts are not to be used for forward facing Lift If...

Page 29: ...onvertible Car Seat I Maxi Cosi I Car installation Forward Facing using Seatbelt Pull up Forward position Squeeze Squeeze NOTE Recline position 1 2 or 3 can be used forward facing but never use positi...

Page 30: ...30IConvertible Car Seat I Maxi Cosi Car installation Forward Facing using Seatbelt Push Pull out slack Sash Lap Click Attach top tether Tighten till slack is removed...

Page 31: ...31 Convertible Car Seat I Maxi Cosi I Car installation Forward Facing using ISOGO ISO Storage Under the trim...

Page 32: ...32IConvertible Car Seat I Maxi Cosi TIP Always check for GREEN at eye level Click Both Sides Push Pull Pull Attach top tether Car installation Forward Facing using ISOGO Tighten till slack is removed...

Page 33: ...33 Convertible Car Seat I Maxi Cosi I Detailed Section...

Page 34: ...the infant seat in your vehicle consult your vehicle s owner s handbook Vehicle Seat Location Requirements Children are safer when properly restrained in rear vehicle seating positions Whenever possib...

Page 35: ...35 Convertible Car Seat I Maxi Cosi I Correct Forward Facing Vehicle Position CORRECT USE CORRECT USE INCORRECT USE Vehicle Information x...

Page 36: ...e locations of anchor points Sometimes it is on the parcel shelf in sedans and on the floor area in station wagons vans and hatchbacks Make sure that you do not confuse the luggage hook in the back of...

Page 37: ...i Child restraints must be used correctly to provide proper protection for you anchorage system on child restraints must be used in the correct way CORRECT Make sure there is no slack in the top strap...

Page 38: ...owner s handbook for the location of the upper anchorage point Remove the thread plug from the parcel shelf floor roof and install the attachment bolt as shown in Figure 1 CAUTION DO NOT OVERTIGHTEN...

Page 39: ...NOT FITTED WITH A CHILD RESTRAINT UPPER ANCHORAGE POINT 200mm min 2 Centre line of seating position FOR SEDANS ONLY Drill a 9mm diameter hole in the parcel shelf on the centre line of the seating pos...

Page 40: ...igure 3 It is recommended that this installation be carried out by a child restraint fitting station or licenced motor mechanic Attachment bolt Anchor fitting Spacer s if required Vehicle trim Vehicle...

Page 41: ...rrect attachment bolt length and use of spacers In New Zealand consult the agent for the vehicle CHILD RESTRAINTS MUST NOT BE ATTACHED TO UNSOUND METAL OR TO WOOD OR SYNTHETIC STRUCTURES WHEN DRILLING...

Page 42: ...42IConvertible Car Seat I Maxi Cosi Seat Angle Position seat ensuring that the angle is no greater than 40 from horizontal plane Vehicle Information 40...

Page 43: ...d that the restraint is installed in the correct direction for rearward facing application refer to page 34 DO NOT wrap baby in a blanket or swaddled as infant can be ejected and killed in an accident...

Page 44: ...MUST BE BELOW THIS LINE SHOULDERS MUST BE ABOVE THIS LINE MUST BE REAR FACING WHEN SHOULDERS BELOW THIS LINE SHOULDERS BELOW THIS LINE WHEN HEADREST AT HIGHEST POSITION SHOULDERS ABOVE THIS LINE WHEN...

Page 45: ...il their shoulders reach the upper shoulder height marker of the restraint The child restraint is unsuitable for the occupant when the shoulders are above the upper marker The child needs to be moved...

Page 46: ...rt one buckle tongue as shown in image You will not hear a click 3 Insert the second buckle tongue as shown Now listen for a click 4 Remember to always pull up on the harness straps to make sure buckl...

Page 47: ...REMOVING THE INFANT BODY INSERT Loosen the harness undo the buckle and pull the insert out an through the shoulder straps NOTE Body and headrest inserts are not to be used for foward facing NOTE Inser...

Page 48: ...bly for ease of child fitment Pull the harness straps over the sides of the car seat CONFIGURING THE HARNESS STRAPS FOR CORRECT CHILD FITMENT Pull Push REMOVING THE INFANT HEADREST INSERT Slot the sho...

Page 49: ...e headrest mechanism pull or push simultaneously to adjust headrest up or down 5 Release adjuster when desired height is reached ensuring the headrest is locked in position Adjust chin support if fitt...

Page 50: ...n 25 mm below the child s shoulders Strap can be next slot above Child shoulders Strap cannot be more than 25mm below 12 months to 4 years FORWARD FACING NOTE Moving the headrest will automatically ad...

Page 51: ...der seat and squeeze the grey recline handle 2 Whilst squeezing tilt the seat back gently to recline 3 Release the handle when desired mode is reached NOTE Never use Position 4 for forward facing Recl...

Page 52: ...r child s upper shoulders are NOT below the minumum height marker and if they are convert to rearward facing Refer to page 44 50 and 51 Check that your child s upper shoulders are NOT above the upper...

Page 53: ...sembly CAUTION CHILDREN CAN BE INJURED OR RESTRAINTS AND TOP TETHER STRAP DAMAGED BY UNSECURED CARGO IN A COLLISION SECURE OR REMOVE HAZARDOUS CARGO BEFORE USING THIS CHILD RESTRAINT Always secure the...

Page 54: ...heir slots under the car seat fabrics 4 Place restraint facing rearwards on back seat of vehicle in line with a top tether strap anchorage point 5 Thread the vehicle seat belt through the BLUE belt pa...

Page 55: ...t belt with accessory locking clip Please see instructions provided with locking clip for installation Rearward Facing Installation Using Seatbelt Push Push out slack Attach top tether TIP Position ad...

Page 56: ...storage slots under car seat fabrics 3 Place restraint facing rearwards on back seat of vehicle in line with a top tether strap anchorage point 1 Set seat to position 4 full recline for rearward facin...

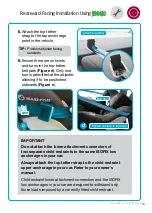
Page 57: ...r the ISOFIX logo located on the vehicle seat TIP You can move the car seat out of the way to locate and attach the connectors then place back into position before tightening 5 Attach the lower connec...

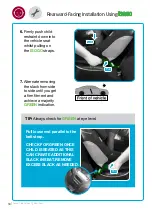
Page 58: ...g the slack from side to side until you get a firm fitment and achieve a majority GREEN indication TIP Always check for GREEN at eye level Pull loose end parallel to the belt strap CHECK FOR GREEN ONC...

Page 59: ...f two separate child restraints to the same ISOFIX low anchorages in your car Always attach the top tether strap to the child restraint upper anchorage in your car Refer to your owner s manual Child r...

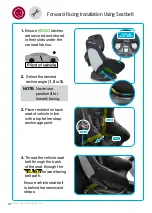
Page 60: ...Place restraint on back seat of vehicle in line with a top tether strap anchorage point 4 Thread the vehicle seat belt through the back of the seat through the YELLOW forward facing belt path Ensure v...

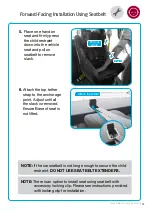
Page 61: ...cure the child restraint DO NOT USE SEAT BELT EXTENDERS NOTE There is an option to install seat using seat belt with accessory locking clip Please see instructions provided with locking clip for insta...

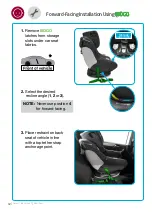
Page 62: ...ISOGO 1 Remove ISOGO latches from storage slots under car seat fabrics 2 Select the desired recline angle 1 2 or 3 3 Place restraint on back seat of vehicle in line with a top tether strap anchorage p...

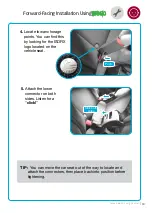
Page 63: ...e points You can find this by looking for the ISOFIX logo located on the vehicle seat TIP You can move the car seat out of the way to locate and attach the connectors then place back into position bef...

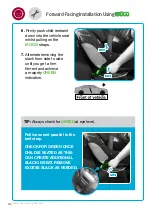
Page 64: ...on the ISOGO straps 7 Alternate removing the slack from side to side until you get a firm fitment and achieve a majority GREEN indication TIP Always check for GREEN at eye level Pull loose end parall...

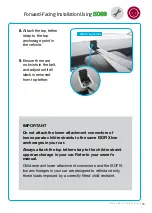
Page 65: ...ectors of two separate child restraints to the same ISOFIX low anchorages in your car Always attach the top tether strap to the child restraint upper anchorage in your car Refer to your owner s manual...

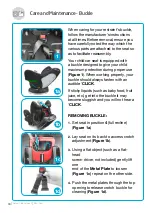
Page 66: ...erly your buckle should always fasten with an audible CLICK If sticky liquids such as baby food fruit juice etc get into the buckle it may become sluggish and you will not hear a CLICK 1 1a REMOVING B...

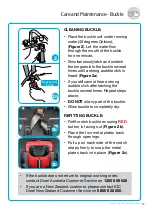
Page 67: ...imes Repeat steps above DO NOT oil any part of the buckle Allow buckle to completely dry If the buckle does not return to original working order contact Dorel Australia Customer Service on 1300 809 52...

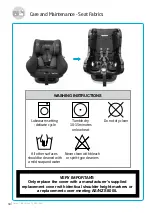
Page 68: ...e cleaned with a mild soap and water Tumble dry 10 15 minutes on low heat Never clean with bleach or spirit type cleaners Do not dry clean WASHING INSTRUCTIONS VERY IMPORTANT Only replace the cover wi...

Page 69: ...fully remove the Velcro fitments between the lower Air Protect cell and the bottom Velcro strip before finishing on the top strip See image d 6 Once the press studs and the Velcro strips if fitted are...

Page 70: ...ned below TO REMOVE THE BODY FABRICS Underneath each side of the built in rebound bar See image e Inside the seat midway up the back support and to the upper section of the seat behind the headrest Ou...

Page 71: ...gh the fabric slots on either side of the seat so the strap is internal of the fabrics See image j k and l 10 Pull the internal parts of the fabrics back support forward so the harness straps are behi...

Page 72: ...the fabrics are completely free of the covers See image p and q o p CAUTION The G CELL cover is rigid and tight to better secure safety components and offer a tailored look Failure to take enough car...

Page 73: ...ase gently release stuck or tricky areas as they occur during this process s To replace the fabrics for Vita Follow the removal process in reverse order by first placing the body fabric covers over th...

Page 74: ...eight marker approximately 4 years of age until the child s shoulders reach the upper shoulder height marker approximately 8 to 10 years of age Can also be used with child harness that is approved for...

Page 75: ...d or replaced if the goods fail to be of acceptable quality and the failure does not amount to a major failure Dorel Australia Pty Ltd warrants your new product to be free from defects in materials an...

Page 76: ...76IConvertible Car Seat I Maxi Cosi Notes...

Page 77: ...77 Convertible Car Seat I Maxi Cosi I Notes...

Page 78: ...78IConvertible Car Seat I Maxi Cosi Notes...

Page 79: ...79 Convertible Car Seat I Maxi Cosi I Notes...

Page 80: ...019729_B 05 2019 Dear Customer Don t forget to register your product within 3 months of purchase for the Lifetime Warranty offer Please visit to register now www maxi cosi com au Terms and conditions...

Reviews: