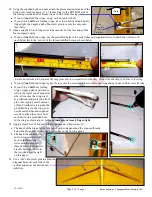
Maxford USA Fieseler Fi-156c STORCH Instruction Manual Download Page 10

Page 10 of 13 pages


54.


Apply the adhesive-backed sticker identification-markings: 

c.


Using scissors, cut around the edge of each marking; then, using a sharp blade or pin, separate each adhesive-backed sticker 
from its clear plastic or brown paper backing. 


d.


Attach stickers  
to the wing‟s 
outboard top  
and bottom  
surfaces. 


e.


Attach stickers 
to the wing‟s 
inboard 
bottom 
surfaces. 


f.


Attach stickers 
to the fuselage‟s 
aft-sides 
and to both sides 
of the rudder. 


Approx. 1-inch  

behind the hinges 

Approx. 4¾-inches in front  

of horizontal stab. 

V.2-150423 

Entire Contents © Copyright 2013 by Maxford USA


Summary of Contents for Fieseler Fi-156c STORCH

Page 1: ...clear an outcropping of rock and struck the mountainside in a controlled crash Nonetheless the Storch immediately rebounded into the air picked up flying speed and both the Fi 156 Storch and Mussolin...

Page 2: ...and the Maxford USA recommended or equivalent batteries 7 LITHIUM BATTERY HANDLING USAGE WARNING When using LiPo batteries read the battery s instruction sheet or on line information Failure to follo...

Page 3: ...ivered to us without a Maxford USA RMA is subject to being returned to the sender as received with return postage payable upon delivery Returned merchandise must be in its original condition as receiv...

Page 4: ...ve unsightly residue and or smoky or cloudy areas on nearby surfaces 3 Install the rudder and elevator servos in the fuselage and the aileron and flap servos and their extensions in both wing panels 4...

Page 5: ...through the predrilled holes on each side of the fuselage These predrilled holes are located just behind the windshield approx 5 8 of an inch back of the wing s leading edge 16 Inside the fuselage ti...

Page 6: ...or cloudy areas on nearby surfaces 23 Test fit the horizontal stabilizer in its precut horizontal slot at the end of the fuselage Remove the excess covering material at the center section of the hori...

Page 7: ...er and transmitter and proceed to step 34 b If the motor powered up in the counterclockwise wrong direction as viewed from the rear of the airplane return the throttle control to minimum disconnect th...

Page 8: ...has shown that this model when configured with folding wings is capable of scale like flying maneuvers however it is not intended for advanced stressful aerobatic flying If being able to fold back th...

Page 9: ...nd each strut within its metal tube If your Storch will have folding wings Apply a dab of petroleum jelly to the metal end of each strut where it touches the wing to act as a lubricant and protection...

Page 10: ...cked sticker from its clear plastic or brown paper backing d Attach stickers to the wing s outboard top and bottom surfaces e Attach stickers to the wing s inboard bottom surfaces f Attach stickers to...

Page 11: ...fiberglass cowl cowl cut an opening in the bottom of the cowl to expose the more forward predrilled hole c Simulated Machine Gun Make a keyhole shaped opening in the rear of the canopy using the provi...

Page 12: ...d some down trim when the flaps slats are lowered Review your radio s instruction manual if you require assistance with any radio related questions such as servo adjustments and or flap to elevator mi...

Page 13: ...s offer quality RC models at competitive prices 99 of our products are imported directly from the manufacturer s factories Our Paramount California showroom is open to the public from 10 AM to 5 PM Mo...

Reviews: