Max Meyer LabelMax SP2 User Manual Download Page 19


19 

6  Troubleshooting 

The following guide lists the most common problems that may be encountered when 

operating  this  label  printer.  If  the  printer  still  does  not  function  after  all  suggested 

solutions  have  been  invoked,  please  contact  the  Customer  Service  Department  of 

your purchased reseller or distributor for assistance. 


6.1  LED Status  

This chapter lists the common problems that according to the LED status and other 

problems you may encounter when operating the printer. Also it provides solutions. 
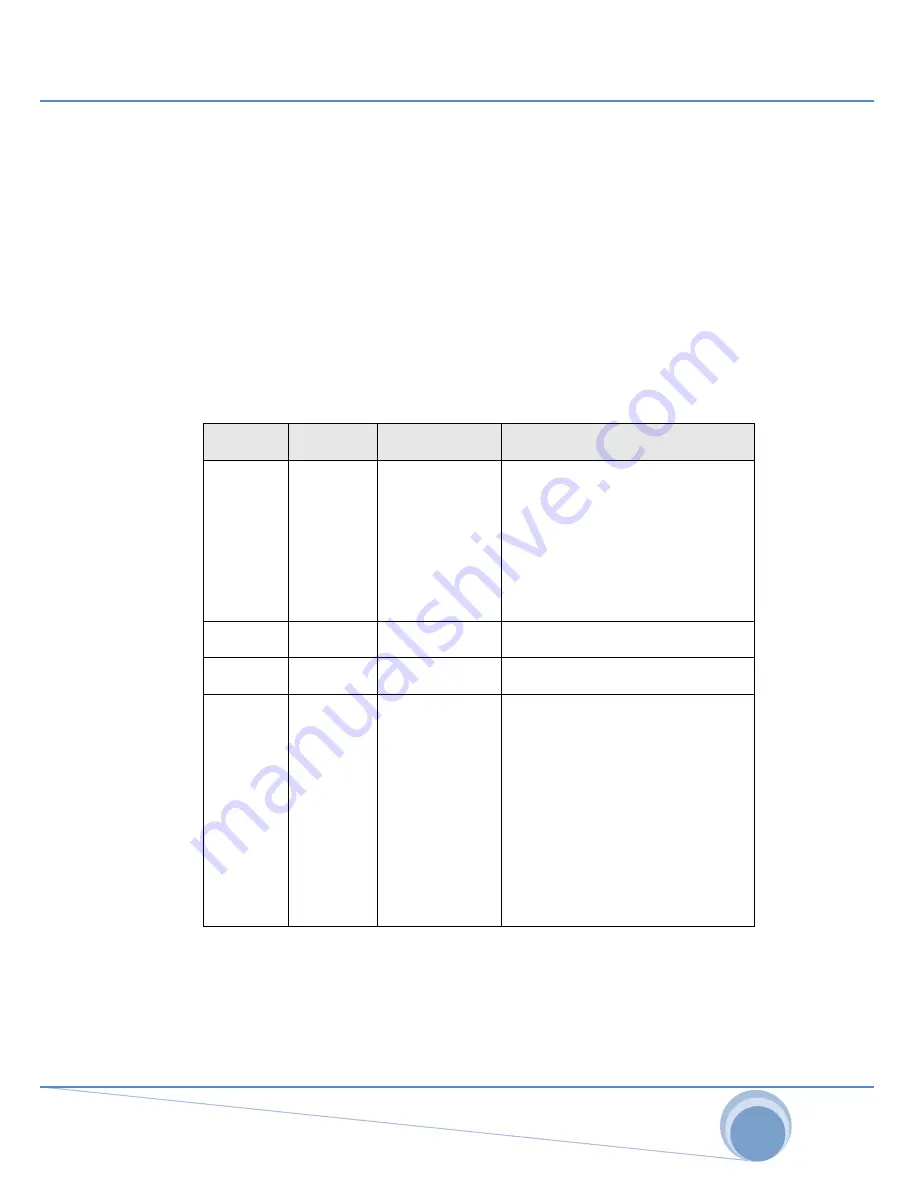
 

LED  Status 
/ Color 

Printer 
Status 

Possible Cause


Recovery Procedure 

OFF 

No 
response 

No power 

* Switch on the power switch.


*  Check  if  the  green  LED  is  lit  on 
power  supply.  If  it  is  not  lit  on, 
power supply is broken. 
*  Check  both  power  connections 
from  the  power  cord  to  the  power 
supply  and  from  the  power  supply 
to the printer power jack if they are 
connected securely. 

Solid 
Green 

ON 

The 

printer 

is 

ready to use 

* No action necessary. 

Green  with 
blinking 

Pause 

The 

printer 

is 

paused 

* Press the FEED button to resume 
for printing. 

Red 

with 

blinking 

Error 

The  out  of  label 
or  ribbon  or  the 
printer  setting  is 
not correct 

1. Out of label or ribbon 
* Load a roll of label and follow the 
instructions  in  loading  the  media 
then  press  the  FEED  button  to 
resume for printing. 
* Load a roll of ribbon and follow the 
instructions  in  loading  the  ribbon 
then  press  the  FEED  button  to 
resume for printing. 
2. Printer setting is not correct 
* Initialize the printer by instructions 
in  “Power  on  Utility”  or  “Diagnostic 
Tool”. 


Note: 

Printer  status  can  be  easily  shown  on  the  Diagnostic  Tool.  For  more  information 

about the Diagnostic Tool, please refer to the instruction in the software CD disk.


Summary of Contents for LabelMax SP2

Page 1: ...LabelMax SP2 User Manual...

Page 2: ...LOADING LABEL STOCK 10 4 POWER ON UTILITIES 12 4 1 RIBBON AND GAP BLACK MARK SENSOR CALIBRATION 12 4 2 GAP BLACK MARK CALIBRATION SELF TEST AND DUMP MODE 13 4 3 SELF TEST 14 4 4 DUMP MODE 15 4 5 PRINT...

Page 3: ...03 IEC 61000 4 Series EN61000 3 2 2006 EN61000 3 3 1995 A1 2001 FCC Part 15 Class B UL CUL C Tick CFR 47 Part 15 CISPR 22 3rd Edition 1997 Class B ANSI C63 4 2003 Canadian ICES 003 T V GS EN60950 2000...

Page 4: ...aging and printer upon receiving the LabelMax SP2 Please retain the packaging materials in case you need to reship the printer 2 2 Equipment Checklist LabelMax SP2 SignMax DVD Dongle USB port cable Ex...

Page 5: ...view 1 2 3 4 5 6 1 USB Interface 2 Centronics Interface 3 RS 232C DB 9 Interface 4 Power Jack 5 Power Switch 6 Rear Paper Guide Fig 2 Rear view Top Cover Open LED Indicator Feed Button Printer Top Rib...

Page 6: ...itch is off Connect the printer to the computer with the USB cable Plug the power cord into the power supply connector at the rear of the printer and then plug the power cord into a properly grounded...

Page 7: ...printer towards you Lift up the top gradually There are two stop positions for the top cover Position 1 and 2 are indicated on the label below Note To hold the cover open at position 1 you must lift t...

Page 8: ...sides Note DO NOT place your hands between top cover and lower cover while close the top cover Fig 2 Top cover is fully open and ready to close Fig 3 Use both hands to close the top cover Do not forc...

Page 9: ...r Push down the Ribbon Access Cover to unlatch and open the cover Place a paper core onto the Ribbon Rewind Spindle Mount the Ribbon Rewind Spindle paper core on the front hubs Install a ribbon on the...

Page 10: ...y releasing the green top cover open levers located on each side of the printer and lifting the top cover A top cover support at the rear of the printer will hold the printer top cover open Fig 7 Pull...

Page 11: ...printer top cover lift the cover to the ultimate open angle then use both hands to close the cover gently Close the printer top cover slowly and make sure the cover latches securely Note Make sure ha...

Page 12: ...alibrate the gap sensor 4 1 Ribbon and Gap Black Mark Sensor Calibration Gap black mark sensor sensitivity should be calibrated at the following conditions A brand new printer Change label stock Print...

Page 13: ...int job Please follow the steps below to calibrate the sensor 1 Turn off the power switch 2 Hold on the button while turning on the power switch 3 Release the button when LED becomes amber and blinkin...

Page 14: ...er element printer configurations and available memory space Self test printout Print head check pattern Model name and F W version Printed mileage meter Firmware checksum Serial port configuration Co...

Page 15: ...ng The left side characters are received from your system and right side data are the corresponding hexadecimal value of the characters It allows users or engineers to verify and debug the program Fig...

Page 16: ...mber red 5 blinks amber 5 blinks green 5 blinks green amber 5 blinks red amber 5 blinks solid green Printer configuration will be restored to defaults as below after initialization Parameter Default s...

Page 17: ...lowing Amber red 5 blinks amber 5 blinks green 5 blinks green amber 5 blinks red amber 5 blinks solid green 4 7 Set Gap Sensor as Media Sensor and Calibrate the Gap Sensor Please follow the steps as b...

Page 18: ...head when changing a new label roll Platen Roller 1 Switch the power off 2 Rotate the platen roller and wipe it thoroughly with 100 ethanol and a cotton swab or lint free cloth Clean the platen rolle...

Page 19: ...connections from the power cord to the power supply and from the power supply to the printer power jack if they are connected securely Solid Green ON The printer is ready to use No action necessary Gr...

Page 20: ...ay go wrong Please do the initialization and gap black mark calibration Paper Jam Gap black mark sensor sensitivity is not set properly sensor sensitivity is not enough Calibrate the gap black mark se...

Page 21: ...his illuminates that the system is downloading data from PC to memory and the printer is paused Amber This illuminates that the system is clearing data from printer Red Solid This illuminates printer...

Reviews: