background image

En  25

4-2

   Screen Setup

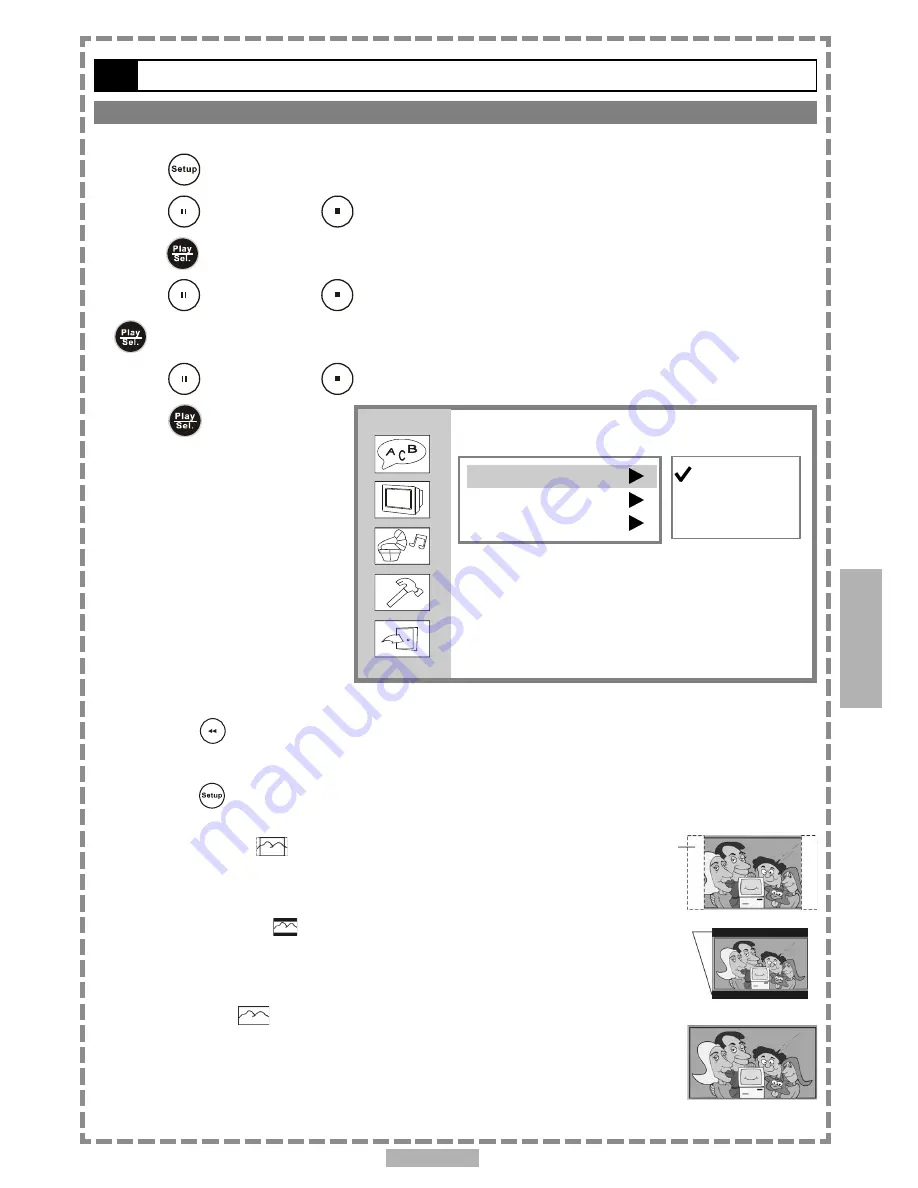
TV Type Setting

The kind of TV set (4:3 or 16:9) connected to the player and a wide-screen picture type for a 4:3 TV can be selected.

1

Press 

 <SETUP> in the stop mode.

2

Press 

 <UP> button / 

 <DOWN> button to select “Screen Setup”, and then

     press 

 <PLAY/SEL.>.

3

Press 

 <UP> button / 

 <DOWN> button to select “TV Type”, and then press


 <PLAY/SEL.>.

4

Press 

 <UP> button / 

 <DOWN> button to select a preferred TV display.

5

Press 

 <PLAY/SEL.>.

*To return to the SETUP MENU screen

Press 

 <LEFT> 

button.

*To finish the setup operation

Press 

 <SETUP> 

to exit from SETUP MENU screen.

4:3 Pan Scan


Select

 4:3 PS

 for a conventional size TV set.


Video material formatted in the pan

&

 scan style has the left and right edges trimmed.

4:3 Letter Box


Select 

4:3 LB

 for a conventional size TV set.


Black bands appear at top and bottom

of screen (letter-box style).

16:9 Wide 

Select 

16:9 

for a wide-screen TV set. Played in “FULL” size.

Setting the wide-screen TV to “FULL” mode is also necessary.
Each screen shows an example when the video material for a wide-screen
is played.

4

Setup

Screen Setup

TV Type


TV System


Video Output


4:3  PS
4:3  LB
16:9

Summary of Contents for PL607

Page 1: ...82 182 00110 Matsui PL607 Portable DVD Player User Guide Playable Disk Format DVD VCD CD CD R CD RW English ...

Page 2: ...formation 12 Changing Audio Soundtrack Language 12 Hide or Display Subtitles 13 Changing Subtitle Language 13 Viewing From Another Angle 13 To Mute the DVD Player 14 Using a DVD Menu 14 Using the Menu Function 14 Chapter 2 Audio CD 2 1 Audio CD Playback 15 Basic Playback 15 Stopping Playback 15 Rapid Advance Rapid Reverse 15 Skipping Ahead or Back to Tracks 16 Pause Playback 16 2 2 Information Aud...

Page 3: ... Parental Control Setting DVD 31 Password Setting DVD 32 Angle Mark Setting DVD 33 Default Setting 34 4 5 LCD Setup 35 Panel Setting 35 Color Setting 35 Brightness Setting 36 Panel Close Setting 36 Chapter 5 For Your Reference 5 1 Troubleshooting 37 5 2 Disc Handling and Maintenance 38 5 3 Definition of Terms 39 5 4 Specifications 40 NOTICE You may experience distortion on image when using a new b...

Page 4: ...Management Information This unit is designed and manfactured to respond to the Region Management Information recorded on DVD discs If the region number of a disc does not correspond to the region number of this unit it will not be able to play the disc The region number of this product is 2 Icon used on DVDs example Region code indicator Screen aspect ratio Stereo sound format DVD length Languages...

Page 5: ... Hazard of electric shock Do not use this product near water or in rainy moist situations Objects and Liquid Never allow objects of any kind or liquids to be pushed spilled into this product through openings as they may come into contact with dangerous voltage or other hazards Do not place objects filled with liquids such as vases on the unit Condensation Moisture will form in the operating sectio...

Page 6: ...uct ask the service technician to perform safety checks to determine that the product is in safe operating order Ventilation To ensure proper ventilation and proper operation never cover the unit with a cloth or other material and make sure there is a gap of at least 10mm around the outside of the unit Naked flames Keep the unit away from naked flame sources such as fire and candles etc and do not...

Page 7: ...TV connected Some DVD discs have the material recorded in the PAL and NTSC systems Refer to the table below to select the correct disc type for the type of connected TV Connecting to the multi system TV Connecting to a NTSC TV Connecting to a PAL TV ...

Page 8: ...ack directly or charge it while the battery pack attached to the portable DVD player Note When using a new battery for the first time or using a battery that has not been used for over a week it takes 4 6 hours to be fully charged Battery release button Battery charge indicator DC IN jack Battery connectors Charge Time hr DVD Playback Time hr NiMH 3800mAh 6S1P Battery Pack Information Charge Playb...

Page 9: ... the portable DVD player as in figure B Note 1 Please turn Power off when attaching or removing the battery pack 2 If you want to remove the battery pack press battery release button then slowly remove it from the portable DVD player STEP 2 Connect the AC adapter 12V 1 25A to the DC IN jack on the right side of the portable DVD player and a household power outlet STEP 3 The battery charge indicato...

Page 10: ...erred title NOTE To select a title input the number i e 1 for chapter 1 10 for chapter 10 and etc 6 Press PLAY SEL The player now starts playback the selected item Stopping Playback and Returning to The Menu Screen If a Menu Screen Is Available on The Disc Press MENU The portable DVD player stops playback and then displays the menu screen After operation When the portable DVD player is not in use ...

Page 11: ...o Chapters You can skip a specific chapter or track to playback Skipping Ahead Press NEXT during playback Skips a chapter each time you press the button Skipping Back Press PREVIOUS during playback When you press the button once midway through a chapter the portable DVD player returns to the beginning of the chapter to playback The player skips a chapter each time you press the button Still Pictur...

Page 12: ...er information will show on the screen To stop displaying scene information Press INFO a number of times until the information disappears Changing Audio Soundtrack Language You can change the audio language from the one selected at the initial settings to a different language This operation functions only with discs on which multiple audio soundtrack languages are recorded 1 Press AUDIO during pla...

Page 13: ...ases the subtitle language may not change immediately to the selected one For your reference When the preferred subtitle language is not selected even after pressing the button several times it may indicate that the language is not available on the disc When you turn on or remove the disc the portable DVD player will playback the subtitle language which is selected at the initial setting If you se...

Page 14: ... audio and subtitle language Although the DVD menu s contents and operation vary from disc to disc the following explains basic operation when this feature is used 1 Press TITLE in stop mode The DVD menu available on the disc now appears 2 Press to select the preferred item 3 Press PLAY SEL You now enter to the selected item To enter other menu screen Repeat steps 2 and 3 To return to the previous...

Page 15: ...er position 4 Close the disc cover For audio CDs without playback control The portable DVD player starts to playback For audio CDs provided with playback control A menu appears after a few seconds Stopping Playback Press STOP once to pre stop Press STOP twice to stop Rapid Advance and Rapid Reverse Press F BWD or F FWD during playback Normal playback is resumed when you press PLAY SEL The speed of...

Page 16: ...s a track each time the button is pressed Pause Press PAUSE once during playback The player will pause playback To return to normal playback Press PLAY SEL 2 1 Audio CD Playback continued 2 2 Information Audio CDs Displaying the Information of the Playing Track Press INFO during playback Press INFO a number of times the elapsed time track number and other information will show on the screen To sto...

Page 17: ...he picture then press PLAY SEL The portable DVD player will begin the slide show from the selected picture To pause slide show Press PAUSE the slide show will pause To stop slide show Press STOP then enter Thumbnail mode To resume slide show Press PLAY SEL again Slide Show 1 Press NEXT to view the next picture or PREVIOUS to view the previous picture 2 Press RIGHT button or LEFT button to rotate t...

Page 18: ...iewing 2 Press to select the picture in thumbnail If you want to view the selected picture in its original size press PLAY SEL When you view the picture in its original size you can press STOP to view the pictures in thumbnail 3 Press NEXT or PREVIOUS to view the next or previous thumbnail page 3 1 Playing Kodak Picture CDs continued 3 ...

Page 19: ...he screen And press the number button corresponding to the order of the picture then press PLAY SEL The portable DVD player will begin the slide show from the selected picture To pause slide show Press PAUSE the slide show will pause To stop slide show Press STOP then enter the File Manager To resume slide show Press PLAY SEL again File Manager 1 Under File Manager Menu press to choose the preferr...

Page 20: ...ayback Press PAUSE To stop playback Press STOP then enter to the File Manager To resume playback Press PLAY SEL again ThumbnailMode 1 Press TITLE to enter Thumbnail mode While in Thumbnail mode there are 20 pictures per page for viewing 2 Press to select the picture in thumbnail If you want to view the selected picture in its original size press PLAY SEL When you view the picture in its original s...

Page 21: ...nd then press PLAY SEL 3 Press UP button DOWN button to select OSD and then press PLAY SEL 4 Press UP button DOWN button to select the preferred language 5 Press PLAY SEL 4 1 Language Setup Setup To return to the SETUP MENU screen Press LEFT button To finish the setup operation Press SETUP to exit from SETUP MENU screen 4 Language Setup OSD Menu Audio Subtitle English French German Italian Spanish...

Page 22: ...Language Setup and then press PLAY SEL 3 Press UP button DOWN button to select Menu and then press PLAY SEL 4 Press UP button DOWN button to select the preferred language 5 Press PLAY SEL To return to the SETUP MENU screen Press LEFT button To finish the setup operation Press SETUP to exit from SETUP MENU screen Setup 4 Language Setup OSD Menu Audio Subtitle English Chinese Japanese French German ...

Page 23: ...press PLAY SEL 4 Press UP button DOWN button to select the preferred language 5 Press PLAY SEL ORIGINAL The top priority language of each disc will always playback first To return to the SETUP MENU screen Press LEFT button To finish the setup operation Press SETUP to exit from SETUP MENU screen For your reference If the language selected is not recorded on the disc the portable DVD player will pla...

Page 24: ...ton to select Subtitle and then press PLAY SEL 4 Press UP button DOWN button to select the preferred language 5 Press PLAY SEL To return to the SETUP MENU screen Press LEFT button To finish the setup operation Press SETUP to exit from SETUP MENU screen For your reference If the language selected is not recorded on the disc the portable DVD player will playback the top priority language of the disc...

Page 25: ...U screen Press LEFT button To finish the setup operation Press SETUP to exit from SETUP MENU screen 4 3 Pan Scan Select 4 3 PS for a conventional size TV set Video material formatted in the pan scan style has the left and right edges trimmed 4 3 Letter Box Select 4 3 LB for a conventional size TV set Black bands appear at top and bottom of screen letter box style 16 9 Wide Select 16 9 for a wide s...

Page 26: ...upports both PAL and NTSC 1 Press SETUP in the stop mode 2 Press UP button DOWN button to select Screen Setup and then press PLAY SEL 3 Press UP button DOWN button to select TV System and then press PLAY SEL 4 Press UP button DOWN button to select the appropriate TV system for your clearest view 5 Press PLAY SEL To return to the SETUP MENU screen Press LEFT button To finish the setup operation Pre...

Page 27: ...PLAY SEL 3 Press UP button DOWN button to select Video Output and then press PLAY SEL 4 Press UP button DOWN button to select the preferred video output setting 5 Press PLAY SEL To return to the SETUP MENU screen Press LEFT button To finish the setup operation Press SETUP to exit from SETUP MENU screen 4 2 Screen Setup continued 4 Setup Screen Setup TV Type TV System Video Output S Video P SCAN ...

Page 28: ...eo output setting make sure your TV set supports P Scan input feature and the YUV cable is properly connected to your TV and the portable DVD player If your TV doesn t support P Scan feature press STOP Troubleshooting What if the screen turns black while operating Solution Press Mode to switch to S Video mode Screen Setup TV Type TV System Video Output S Video P SCAN Your TV support P Scan YES Pre...

Page 29: ...then press PLAY SEL 4 Press UP button DOWN button to select the preferred digital out setting 5 Press PLAY SEL Setup Audio Setup Digital Out Analog Out SPDIF PCM SPDIF RAW Off To return to the SETUP MENU screen Press LEFT button To finish the setup operation Press SETUP to exit from SETUP MENU screen For your reference If you have a Dolby Digital 5 1 or DTS capable amplifier you must set the audio...

Page 30: ...LAY SEL 3 Press UP button DOWN button to select Analog Out and then press PLAY SEL 4 Press UP button DOWN button to select the preferred analog out setting 5 Press PLAY SEL Setup To return to the SETUP MENU screen Press LEFT button To finish the setup operation Press SETUP to exit from SETUP MENU screen 4 Audio Setup Digital Out Analog Out 2 Channel ...

Page 31: ...word 0000 You need to enter 0000 to set the rating for the first time when purchasing your DVD from the store 5 Press UP button DOWN button to select the preferred ratings 6 Press PLAY SEL To return to the SETUP MENU screen Press LEFT button To finish the setup operation Press SETUP to exit from SETUP MENU screen For your reference You can use the parental control lock ONLY with DVD discs featured...

Page 32: ...lect Password and then press PLAY SEL 4 Enter your old password and then press PLAY SEL Factory pre set password 0000 5 Enter your new password and then press PLAY SEL 6 Re enter your password to verify it and then press PLAY SEL To return to the SETUP MENU screen Press LEFT button To finish the setup operation Press SETUP to exit from SETUP MENU screen Setup Custom Setup Parental Ctrl Password An...

Page 33: ...elect Angle Mark and then press PLAY SEL 4 Press UP button DOWN button to select On or Off and then press PLAY SEL NOTE Pressing the ANGLE button will change camera angles for movies that support this feature regardless of whether the ANGLE MARK feature is On or Off To return to the SETUP MENU screen Press LEFT button To finish the setup operation Press SETUP to exit from SETUP MENU screen Setup 4...

Page 34: ... 3 Press UP button DOWN button to select Default and then press PLAY SEL 4 Press RIGHT button to select Read and then press PLAY SEL EXCEPTION The viewer rating and the password setting will NOT be changed even though you re set to the default setting To return to the SETUP MENU screen Press LEFT button To finish the setup operation Press SETUP to exit from SETUP MENU screen 4 Custom Setup Parenta...

Page 35: ...ion shows on the screen 2 Press LCD a number of times to select Color 3 Press LEFT button or RIGHT button to choose the preferred color setting The panel will change to the selected setting To finish the setup operation Press LCD again until the LCD setting information disappears P P P P Panel anel anel anel anel Nor Nor Nor Nor Normal mal mal mal mal Panel 16 9 Panel 16 9 Panel 16 9 Panel 16 9 Pa...

Page 36: ...ht 1 Bright 1 Bright 1 Bright 0 Bright 0 Bright 0 Bright 0 Bright 0 Bright 1 Bright 1 Bright 1 Bright 1 Bright 1 Bright 2 Bright 2 Bright 2 Bright 2 Bright 2 Bright 3 Bright 3 Bright 3 Bright 3 Bright 3 4 Panel Close Setting 1 Press LCD the LCD setting information shows on the screen 2 Press LCD a number of times to select Close 3 Press LEFT button or RIGHT button to choose the preferred panel set...

Page 37: ...or The disc format is not correct for the TV set used PAL NTSC in picture No rapid advance or rapid reverse Some discs may have sections which prohibit rapid advance or rapid reverse playback No 4 3 16 9 picture Choose the correct setup TV DISPLAY item which matches the TV set used Picture is distorted during rapid The picture will be somewhat distorted at times this is normal advance or rapid rev...

Page 38: ...lar motion circular scratches are likely to occur which will cause noise If the disc is brought from a cold to a warm environment moisture may form on the disc Wipe this moisture off with a soft dry lint free cloth before using the disc Improper disc storage You can damage discs if you store them in the following places Areas exposed to direct sunlight Humid or dusty areas Areas directly exposed t...

Page 39: ...recorded DVD has a structure consisting of two 0 6 mm thin discs which are adhered to each other Since the thinner the disc the higher the density at which the information can be recorded a DVD disc has a greater capacity than a single 1 2 mm thick disc Since the two thin discs are adhered to each other there is the potential to achieve double sided play sometime in the future for even longer dura...

Page 40: ...gital Output Coaxial x 1 Headphone Jack Headphone Jack x 1 Line Voltage AC 100 240 VAC 10 50 60 Hz Adapter Power Consumption 15W 12V 1 25A Remote Control DC 3V Infra red Dimensions 212 mm L x 158 mm W x 41 mm H Weight 735g Partmaster Direct can provide accessories spares batteries and replacement parts with Next Day Delivery available upon request Please call 0870 600 1338 UK customers only Calls ...

Reviews: