background image

III

9.5 

Console Mast Replacement ....................................................................................... 33

9.6 

Seat Pad Replacement .............................................................................................. 34

9.7 

Back Pad Replacement.............................................................................................. 35

9.8 

HR Handlebar Replacement ...................................................................................... 36

9.9 

HR Grips Replacement .............................................................................................. 37

9.10 

Upper Seat Frame Replacement  .............................................................................. 38

9.11 

Lower Seat Frame Replacement ............................................................................... 39

9.12 

Seat Adjustment Handle Replacement ...................................................................... 41

9.13 

Rear Shrouds Replacement ....................................................................................... 42

9.14 

Pedal Replacement  ................................................................................................... 43

9.15 

Front Shroud Replacement ........................................................................................ 44

9.16 

Lower Control Board Replacement ............................................................................ 45

9.17 

Battery Replacement .................................................................................................. 46

9.18 

Drive Belt Replacement .................................................................................................. 47

9.19 

Generator Belt Replacement .......................................................................................... 48

9.20 

Generator Replacement .................................................................................................. 49

9.21 

Pulley Axle Set Replacement.......................................................................................... 50

9.22 

Crank Axle Set Replacement .......................................................................................... 52

9.23 

Testing the Bike ............................................................................................................... 53

CHAPTER 10: BIKE SPECIFICATIONS AND ASSEMBLY GUIDE

10.1 

R5x-03 Bike Specifications ........................................................................................ 54

10.2 

Fasteners and Assembly Tools .................................................................................. 55

10.3 

Assembly Instructions  ............................................................................................... 56

10.4 

Adjusting the Pedal Straps and Seat ......................................................................... 60

10.5  

Leveling the Bike ........................................................................................................ 61

10.6 

TV Bracket Installation ............................................................................................... 62


CHAPTER 11: SOFTWARE UPGRADE GUIDE

11.1 

Software Upgrade Procedure..................................................................................... 66

TABLE OF CONTENTS

Summary of Contents for R5X-03

Page 1: ...R 5 X 0 3 B I K E S E R V I C E M A N U A L ...

Page 2: ... 11 5 2 Manager Mode Overview 11 CHAPTER 6 ENGINEERING MODE 6 1 Using Engineering Mode 12 CHAPTER 7 SERVICE MODE 7 1 Using Service Mode 13 CHAPTER 8 TROUBLESHOOTING 8 1 Electrical Diagram 14 8 2 Error Codes on the Console 15 8 3 LCB LED Indicators 16 8 4 Display Power Issues 17 8 5 Error 0x04A0 18 8 6 Keypad Issues 19 8 7 Resistance Issues 20 8 8 Pedal Slipping 21 8 9 Noise Issues 21 8 10 Heart Ra...

Page 3: ...Board Replacement 45 9 17 Battery Replacement 46 9 18 Drive Belt Replacement 47 9 19 Generator Belt Replacement 48 9 20 Generator Replacement 49 9 21 Pulley Axle Set Replacement 50 9 22 Crank Axle Set Replacement 52 9 23 Testing the Bike 53 CHAPTER 10 BIKE SPECIFICATIONS AND ASSEMBLY GUIDE 10 1 R5x 03 Bike Specifications 54 10 2 Fasteners and Assembly Tools 55 10 3 Assembly Instructions 56 10 4 Ad...

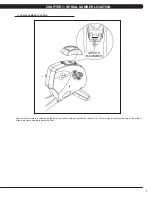
Page 4: ...CATION A serial number plate is located below the bottom of the console mast beneath a rubber boot There is also a serial number tag on the middle of the main frame pointed towards the floor CHAPTER 1 SERIAL NUMBER LOCATION ...

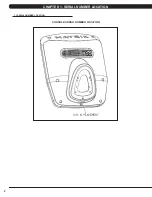
Page 5: ...2 CONSOLE SERIAL NUMBER LOCATION 1 1 SERIAL NUMBER LOCATION CHAPTER 1 SERIAL NUMBER LOCATION ...

Page 6: ...p hands away from moving parts If the item cannot be reached contact a Matrix authorized dealer for assistance Never operate the unit if it is damaged not working properly when it has been dropped or has been dropped in water Keep hands and feet clear at all times from moving parts to avoid injury Do not use this product outdoors near swimming pools or in areas of high humidity Do not operate wher...

Page 7: ... this means that each outlet you plug Bikes into should not have anything else running on that same circuit besides other Bikes up to 3 per 15 amp circuit and 4 per 20 amp circuit The easiest way to verify this is to locate the main circuit breaker box and turn off the breaker s one at a time Once a breaker has been turned off the only thing that should not have power to it are the Bikes in questi...

Page 8: ...ipment free from dust and dirt DO NOT use any equipment that is damaged or has worn or broken parts Use only replacement parts supplied by Matrix Fitness Systems MAINTAIN LABELS AND NAMEPLATES Do not remove labels for any reason They contain important information If unreadable or missing contact Matrix Fitness Systems for a replacement at 866 693 4863 or www matrixfitness com MAINTAIN ALL EQUIPMEN...

Page 9: ...MS 1 Look and listen for loose fasteners unusual noises and any other indications that the equipment may be in need of service 2 Clean the bike before and after each use including a Use a damp soft cloth with water or mild liquid detergent to clean all exposed surfaces DO NOT use ammonia chlorine or any acid based cleaners NOTE Spray cleaner onto a cloth before using never spray cleaner directly o...

Page 10: ...nd time adjustment STOP Ends workout and shows workout summary data NUMBER KEYPAD Workout data input for workout setup Level adjustment during workout COOL DOWN Puts bike into Cool Down mode FAN Allows for fan speed selection fan has 3 operating speeds TOGGLE DISPLAY Allows user to select what information is displayed on the console CHAPTER 4 CONSOLE OVERLAY AND WORKOUT DESCRIPTION ...

Page 11: ...hen the program will start 4 3 WORKOUT SETUP STEPS FAT BURN ROLLING HILLS The Rolling Hills program is a level based program that automatically adjusts the resistance level to simulate real terrain 1 Start pedaling and press the ROLLING HILLS key 2 Select Level by using the UP or DOWN LEVEL keys and press ENTER 3 Select Time by using the UP or DOWN LEVEL keys and press ENTER 4 Select Weight by usi...

Page 12: ...wards of 30 minutes for very fit individuals Once the test ends a recovery period cool down will begin and the user s results are calculated and displayed Results are based on the number of stages completed Incline will not be adjustable during the test 1 Start pedaling and press the FITNESS TEST key 2 Select Age by using the UP or DOWN LEVEL keys and press ENTER 3 Select Gender by using the UP or...

Page 13: ...ors in any program to view your current heart rate 1 Start pedaling and press the HEART RATE key 2 Select Age by using the UP or DOWN LEVEL keys and press SELECT 3 Select Target HR Percentage by using the UP or DOWN LEVEL keys and press SELECT 4 Select Time by using the UP or DOWN LEVEL keys and press SELECT 5 Select Weight by using the UP or DOWN LEVEL keys and press SELECT 6 The display will rea...

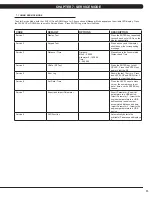
Page 14: ...orkout time when GO is pressed or when no time is selected during program set up Default Level 1 1 20 Starting resistance when GO is pressed or when no resistance is selected during program set up Default Age 30 10 100 Starting age when GO is pressed or when no age is selected during program set up Default User Weight 150 lbs 75 kg 80 lbs 36 kg 400 lbs 181 kg Weight used for program calorie expend...

Page 15: ...racters 2 layers are used to enter the serial number First Layer PPPPP V PPPPP is the product name V is the version If the version is A just leave this blank Second Layer YY MM nnnnn YY is the year 11 12 MM is the month e g 08 09 10 nnnnn is the actual serial number Use the UP DOWN LEVEL keys to navigate the layers and the number keys to input the serial number The product name is dependent on the...

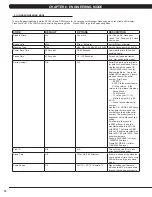
Page 16: ...ually sets the Accumulated Distance and Time Service 4 CSafe RF Test Press the ENTER key to test CSAFE Press the ENTER key again to test the RF Service 5 Error Log Shows the last 10 errors Press and LEVEL UP and DOWN for 3 seconds to clear the errors Service 6 Set Date Time Press the LEVEL keys to move cursor the number keys to set date time and the ENTER key to save Service 7 Export and Import Pa...

Page 17: ...14 8 1 ELECTRICAL DIAGRAMS CHAPTER 8 TROUBLESHOOTING ...

Page 18: ...r 8V or over 15V Check the wire connections at the battery Replace the battery 0x0441 B When the UCB implements a command the LCB is not receiving this command Check the machine type in Engineering Mode Check the connections at the UCB and LCB 0x04A0 C Digital Communication Failure LCB has no return message for the UCB for 3 seconds Check the console cable connections at the UCB and LCB Replace th...

Page 19: ...peration LED 7 Status 2 Resistance value in middle 1 2 VCC LED 8 Status 3 Digital Communication LED 9 12V Console Power WITHOUT AC PLUG NORMAL LED 2 LED 9 On LED 1 Off No AC plug detected LED 5 On Generator power detected WITH AC PLUG NORMAL LED 2 LED 9 On LED 1 On AC plug detected LED 5 Off No Generator power detected LED 1 LED 5 CHAPTER 8 TROUBLESHOOTING ...

Page 20: ...l present replace the generator If LED 8 is OFF Bad communication between UCB and LCB Reconnect the console cable at the LCB and UCB and check for kinks If LED 9 is OFF LCB is not providing 12V power to the UCB Replace the LCB SOLUTION IF LEDS ARE NORMAL 1 If the LEDs are lit normally replace the UCB and console cable 2 if the issue is still present after the UCB and console cable are replaced rep...

Page 21: ... No AC power cord plugged in Normal for an unpowered unit If LED 8 is OFF Bad communication between UCB and LCB Reconnect the console cable at the LCB and UCB and check for kinks SOLUTION IF LEDS ARE NORMAL 1 If the LEDs are lit normally replace the UCB and console cable 2 if the issue is still present after the UCB and console cable are replaced replace the LCB LED 1 LED 8 8 5 TROUBLESHOOTING ERR...

Page 22: ... ENTER c Test the affected keypad If the keypad works in the keypad test it may not be a functioning key in the program used for testing it 2 Check the connections of the keypad at the UCB a Remove the console from the console mast b Remove the 6 screws holding the back of the console to the front Figure A c Inspect the keypad ribbon cable connection at the UCB Figure B d Even if the keypad ribbon...

Page 23: ...ng variable power a Insert the probes from a multi meter into the 1 2 2 3 and 1 3 wires on the generator wire harness connector Figure A b When pedaling the output voltage from the generator should vary depending on the RPM The generator should output 120 VAC at 94 RPM 3 If the generator does not have variable power replace the generator 4 If the generator does have variable power replace the LCB ...

Page 24: ...UBLESHOOTING PEDALS SLIPPING 8 9 TROUBLESHOOTING NOISE ISSUES KNOCKING OR CREAKING NOISE POSSIBLE CAUSES 1 The pedal is on the crank too loosely 2 The crank or axle is worn out 3 The belt tension is not enough or the belts are too dirty SOLUTION 1 Retighten the pedal on the crank 2 Replace the crank or axle as needed 3 Remove the covers and check the belt tension a Tighten the drive belt tension i...

Page 25: ...console from the unit and verify continuity of the HR grip wiring With a multi meter set for ohms place one prong on the HR grip wiring coming up the console mast Figure C and the other on the appropriate plate match red with red and white with white a An ohm reading of less than 1 should be received If it is higher replace the HR grip wiring 3 Perform a continuity check on the console See Service...

Page 26: ...Figure B c While holding pressure with the screwdriver fully tighten the nylok nut to hold the roller bracket in place Figure C d Once the front roller brackets are tight repeat procedure with the rear roller brackets e Once the roller brackets are tightened test the seat movement for smooth travel NOTE If the seat sticks or is hard to move the pressure on the roller brackets may need to be loosen...

Page 27: ...uld look similar to Figure B If your equipment looks different contact Matrix or the manufacturer of your TV equipment if known 3 Verify how your TV is mounted compare your machine to Figure C which shows an external 15 TV directly mounted to a unit with a 5x console 4 For Matrix produced and mounted equipment you can use the information outlined in this section to help with any connection and pow...

Page 28: ...does clear your picture check the internal cables and fittings inside your machine Make sure you have no damage kinks cuts etc and no stray wires or poor fittings on the ends of the cables anywhere that the coax cable is connected Figures C D E Fittings should have a clean flush connector and no stray aluminum strands touching the center conductor Replace or repair any suspect cables 4 If nothing ...

Page 29: ... at the console Figure C 3 After you have verified all connections are secure and a problem still exists verify power at the outlet Figure D If the outlet is not outputting 120 Volts check fitness room power 4 If internal TV power wire connections are good verify 12 Volts power at the TV power wire where it plugs into the TV wire in Figure B shown with multi meter in Figure E If 12 Volts are prese...

Page 30: ...he TV controller wire at the TV Figure B 4 If the TV does not power on with the TV keypad attempt to power on the TV using the small handheld remote that came with the TV Figure C Used for changing menu and other settings If the TV will function with the handheld remote replace the TV controller wire If the TV will not function with handheld remote it is likely an issue with the TV itself contact ...

Page 31: ... from the defective console and remove the console Figure B 3 Reinstall the wire connections to the new console 4 Carefully push the wires into the console and mast until they are clear of the console mast connection and attach the console to the mast using the 4 screws 5 Test the bike for function as outlined in Section 9 23 CHAPTER 9 PART REPLACEMENT GUIDE ...

Page 32: ...res A B 2 Remove the 4 screws holding the heart rate handlebar to the console mast being careful to support the handlebar Figure C 3 Remove the defective handlebar Figure D 4 Reverse Steps 1 3 to install a new handlebar FIGURE A FIGURE B FIGURE C FIGURE D CHAPTER 9 PART REPLACEMENT GUIDE ...

Page 33: ...LDER REPLACEMENT 1 Remove the 2 screws holding the cup holder to the frame Figure A 2 Remove the cup holder Figure B 3 Reverse Steps 1 2 to install a new cup holder FIGURE A FIGURE B CHAPTER 9 PART REPLACEMENT GUIDE ...

Page 34: ...onnect the cord from the machine 2 Remove the console as outlined in Section 9 1 3 Remove the back cover of the console Figure A 4 Unplug and remove the faulty overlay Figure B 5 Clean the console area with alcohol to remove any left over adhesive Figure C 6 Remove the protective film over the display window of the overlay Figure D FIGURE A FIGURE B FIGURE C FIGURE D CHAPTER 9 PART REPLACEMENT GUI...

Page 35: ... the console Figure G 10 Press down on the corners of the overlay to keep it in place then remove the protective film Figure H I 11 Once the overlay is in the correct position press down on the overlay with a cloth to adhere it to the console plastic Figure J 12 Use the same procedure to replace any additional faulty overlays NOTE Overlays can not be reused 13 Test the bike for function as outline...

Page 36: ...ve the 4 screws holding the console mast to the frame Figure B 5 Pull the wires out the bottom of the console mast and remove the mast 6 Reverse Steps 1 5 to install a new console mast NOTE When installing a new console mast be sure to pull the console wires up through the new mast prior to installing the 4 screws into the frame 7 Test the bike for function as outlined in Section 9 23 FIGURE A FIG...

Page 37: ...MENT FIGURE B FIGURE A 1 Remove the 4 screws holding the seat pad to the seat frame Figure A 2 Lift the seat pad away from the seat frame Figure B 3 Reverse Steps 1 2 to install a new seat pad CHAPTER 9 PART REPLACEMENT GUIDE ...

Page 38: ...c cover onto the back of the seat pad and remove it Figure A 2 Remove the 4 screws holding the back pad onto the seat frame Figure B 3 Remove the back pad Figure C 4 Reverse Steps 1 3 to install a new back pad FIGURE A FIGURE B FIGURE C CHAPTER 9 PART REPLACEMENT GUIDE ...

Page 39: ...iring exposed when the seat pad is removed Figure A 4 Remove the 3 screws holding the heart rate handlebars to the seat frame Figure B 5 Remove the heart rate handlebars from the frame Figure C 6 Reverse Steps 1 5 to install a new heart rate handlebar 7 Test the bike for function as outlined in Section 9 23 FIGURE A FIGURE B FIGURE C CHAPTER 9 PART REPLACEMENT GUIDE ...

Page 40: ...the HR grip can be split into 2 pieces Figure B 3 Disconnect the keypad overlay and the HR plate wiring and remove the old HR grip Figure C 4 Reverse Steps 1 3 to install new HR grips The white wire should be on the back side HR plate the red wire on the front Figure D 5 Test the Bike for function as outlined in Section 9 23 FIGURE A FIGURE B FIGURE C FIGURE D ...

Page 41: ...emove the HR handlebar as outlined in Section 9 8 4 Remove the 4 screws holding the upper seat frame to the lower seat frame Figure A 5 Remove the upper seat frame from the lower seat frame Figure B 6 Reverse Steps 1 5 to install a new seat frame 7 Test the bike for function as outlined in Section 9 23 FIGURE A FIGURE B CHAPTER 9 PART REPLACEMENT GUIDE ...

Page 42: ...remove the seat position plate Figures A B 4 Disconnect the HR wiring that is exposed when the seat pad is removed and slide it out the hole in the frame so it does not restrict the seat movement Figures C D 5 Remove the 4 screws holding the upper seat frame onto the lower seat frame and remove the upper seat frame Figures E F FIGURE A FIGURE B FIGURE C FIGURE D FIGURE E FIGURE F CHAPTER 9 PART RE...

Page 43: ...rack Figure H 8 Remove the end cap Figure I 9 Depress the seat position lever and pull the lower seat frame off of the seat track Figure J 10 Reverse Steps 1 9 to install a new lower seat frame 11 Test the bike for function as outlined in Section 9 23 FIGURE G 9 11 LOWER SEAT FRAME REPLACEMENT CONTINUED FIGURE H FIGURE J FIGURE I CHAPTER 9 PART REPLACEMENT GUIDE ...

Page 44: ...ing the seat adjustment handle to the seat frame Figure A 2 Remove the seat adjustment handle Figure B 3 Reverse Steps 1 2 to install a new seat adjustment handle 4 Test the bike for function as outlined in Section 9 23 FIGURE A FIGURE B CHAPTER 9 PART REPLACEMENT GUIDE ...

Page 45: ...ame and left shroud and remove it Figure A 2 Remove the 6 screws holding the left side shroud to the frame and remove it Figure B 3 Figure C shows the bike with both rear shrouds removed 4 Reverse Steps 1 2 to install a new rear shroud FIGURE A FIGURE B FIGURE C CHAPTER 9 PART REPLACEMENT GUIDE ...

Page 46: ... crank Figure A NOTE For the right side pedal the threads are normal For the left side pedal the threads are reversed the pedal turns off counterclockwise 2 Remove the pedal Figure B 3 Reverse Steps 1 2 to install a new pedal FIGURE A FIGURE B CHAPTER 9 PART REPLACEMENT GUIDE ...

Page 47: ...he frame and the left shroud and remove it Figure A NOTE You will need to angle the shrouds so that the crank passes through the hole in the shroud 3 Remove the 5 screws holding the left side front shroud to the frame and remove it Figure B 4 Reverse Steps 1 3 to install a new front shroud FIGURE A FIGURE B CHAPTER 9 PART REPLACEMENT GUIDE ...

Page 48: ...nd remove the lower board 4 Reverse Steps 1 3 to install a new lower board Figure C shows the electrical connections to the lower board 5 Test the bike for function as outlined in Section 9 23 FIGURE A FIGURE B FIGURE C 3 Pin Connector from the Generator 2 Pin Connector from the Resistor 7 Pin Connector from the Console 2 Pin Connector from the AC power source 2 Pin Connector from the Battery CHAP...

Page 49: ... 11 2 Disconnect the 2 wires from the battery Figure A 3 Remove the wing nut on the battery bracket Figure B 4 Swivel the battery bracket out of the way and remove the battery Figure C 5 Reverse Steps 1 4 to install a new battery FIGURE C FIGURE B FIGURE A CHAPTER 9 PART REPLACEMENT GUIDE ...

Page 50: ...emove the tension from the belt Figure B 4 Remove the belt Figure C 5 Reverse Steps 1 4 to install a new drive belt NOTE Be sure to reattach the tension spring If more tension is needed on the drive belt multiple holes are available for the spring attachment Figure D 6 Test the bike for function as outlined in Section 9 23 FIGURE A FIGURE B FIGURE C FIGURE D CHAPTER 9 PART REPLACEMENT GUIDE ...

Page 51: ...ce the tension has been removed the generator belt can be walked off of the pulley Figure C 4 Pull the generator out of the frame towards the front of the unit and remove the generator belt Figure D 5 Reverse Steps 1 4 to install a new generator belt NOTE Re tension the new generator belt to 85 lbf 6 Test the bike for function as outlined in Section 9 23 FIGURE A FIGURE B FIGURE C FIGURE D CHAPTER...

Page 52: ...rator belt Figure B 3 Once the tension has been removed the generator belt can be walked off of the pulley Figure C 4 Pull the generator out of the frame towards the front of the unit and remove the generator belt Figure D 5 Reverse Steps 1 4 to install a new generator 6 Test the bike for function as outlined in Section 9 23 FIGURE A FIGURE B FIGURE C FIGURE D CHAPTER 9 PART REPLACEMENT GUIDE ...

Page 53: ...uts holding the generator to the frame Figure A and remove the nuts putting tension on the generator belt Figure B 4 Once the tension has been removed walk the generator belt off of the pulley Figure C 5 Remove the C clip holding the bearing in place on the right side of the frame Figure D FIGURE A FIGURE B FIGURE C FIGURE D CHAPTER 9 PART REPLACEMENT GUIDE ...

Page 54: ...n the pulley axle assembly with a large channel lock pliers or a pipe wrench Figure F 8 Once the large nut is removed the pulley axle set can be removed from the left side of the frame Figure G 9 Reverse Steps 1 8 to install a new pulley axle set 10 Test the bike for function as outlined in Section 9 23 CHAPTER 9 PART REPLACEMENT GUIDE ...

Page 55: ...Bend the tabs of the nut on the left side of the frame so that this nut will turn Figure B 5 Use a 32 mm wrench to remove the crank axle nuts Figure C NOTE This nut is reverse threaded 6 Once the nuts are removed the crank axle can be removed from the right side of the frame 7 Reverse Steps 1 6 to install a new crank axle set 9 Test the bike as outlined in Section 9 23 FIGURE A FIGURE B FIGURE C C...

Page 56: ...P or DOWN LEVEL key and press ENTER to save f Press and hold the STOP key for 3 5 seconds to return to normal function 2 If the unit has an add on TV program the TV channels see Entertainment Owner s Manual 3 Without hitting start or entering any program modes sit on the bike and hold the handlebars while pedaling to simulate exercising While moving listen for any odd noises or squeaks 4 After sto...

Page 57: ...s Virtual Active Ready No Asset Management Ready Yes TECHNICAL DATA Resistance Technology JID Brushless Generator Power Requirements Self Powered or Optional 120V 60Hz AC Minimum Watts 2 powered 31 self powered Overall Dimensions L x W x H 63 2 x 28 8 x 54 6 161 x 73 x 139 cm Maximum User Weight 400 lbs 181 4 kg Unit Weight 167 lbs 75 7 kg Shipping Weight 204 lbs 92 6 kg Transport Wheel Yes USER D...

Page 58: ...ON HEAD SCREW M5 X 20L WHITE 8 Z21 BUTTON HEAD SCREW M8 X 20L BLACK 8 Z22 FLAT WASHER BLACK 8 Z23 SPRING WASHER BLACK 4 Z31 BUTTON HEAD SCREW M8 X 15L YELLOW 4 Z32 FLAT WASHER YELLOW 4 Z33 SPRING WASHER YELLOW 2 Z34 BUTTON HEAD SCREW M8 X 25L YELLOW 4 Z41 BUTTON HEAD SCREW M8 X 15L RED 4 Z42 BUTTON HEAD SCREW M8 X 50L RED 4 Z43 FLAT WASHER RED 8 Z44 SPRING WASHER RED 3 Z45 BUTTON HEAD SCREW M8 X 1...

Page 59: ...56 10 3 ASSEMBLY INSTRUCTIONS STEP 1 STEP 2 AFTER THESE ASSEMBLY STEPS ARE COMPLETE BE SURE TO SETUP AND TEST THE UNIT AS OUTLINED IN SECTION 9 23 CHAPTER 10 BIKE SPECIFICATIONS AND ASSEMBLY GUIDE ...

Page 60: ...57 10 3 ASSEMBLY INSTRUCTIONS CONTINUED STEP 3 CHAPTER 10 BIKE SPECIFICATIONS AND ASSEMBLY GUIDE ...

Page 61: ...58 STEP 4 10 3 ASSEMBLY INSTRUCTIONS CONTINUED STEP 5 CHAPTER 10 BIKE SPECIFICATIONS AND ASSEMBLY GUIDE ...

Page 62: ...59 FINAL ASSEMBLY 10 3 ASSEMBLY INSTRUCTIONS CONTINUED CHAPTER 10 BIKE SPECIFICATIONS AND ASSEMBLY GUIDE ...

Page 63: ...timum position will allow movement through the bottom of the stroke without locking the knees or shifting in the seat The knees should have a slight bend at the point of fullest leg extension If the seat needs to be adjusted lift the spring loaded seat lever on the right side of the seat to make adjustments Slide the seat forward or backward to its desired location Release the spring loaded seat l...

Page 64: ...ing indicates that your bike needs to be leveled Determine which leveler is not resting completely on the floor Loosen the nut with one hand to allow the leveler to rotate Rotate the left or right leveler and repeat the adjustment as necessary until the bike is stable Lock the adjustment by tightening the nut against the rear foot support CHAPTER 10 BIKE SPECIFICATIONS AND ASSEMBLY GUIDE ...

Page 65: ...e from the Bike 3 Remove the 4 screws holding the 2 halves of the console together and split the console Figures A B 4 Peel up the existing lower overlay that says Target Heart Rate Zone on it Figure C 5 Unplug the old overlay from the UCB and remove it Figure D 6 Install the new Entertainment overlay onto the console in place of the old overlay Figure E FIGURE B FIGURE D FIGURE C FIGURE A FIGURE ...

Page 66: ...Install the rubber pad from the TV bracket kit over the hole in the console mast Figures H I 9 Connect the coax cable to the one coming up the console mast and push the TV power wire into the console mast so that it is accessible Figure J 10 Connect the TV bracket to the console mast using the 4 screws that were holding the logo in place Figure K FIGURE K FIGURE J FIGURE I FIGURE H FIGURE G FIGURE...

Page 67: ...12 Insert the spring pin into the hole at the top of the TV bracket Figure M 13 Install the rabbit ears onto the console mast using the bolt nut from the TV bracket kit Figure N NOTE Make sure that the rabbit ears are installed so that the spring pin is restricting the range of motion Figure O 14 Mount the TV to the bracket using 4 screws Figure P FIGURE O FIGURE N FIGURE M FIGURE L FIGURE P ...

Page 68: ...x cable into the TV Figure R 17 Plug the TV controller wire into the TV and the back of the console Figures S T 18 Install the back cover onto the TV with 4 screws Figure U 19 Run a coax cable to the base of the unit and plug it in Figure V The TV is now installed and should be programmed see TV manual FIGURE V FIGURE U FIGURE T FIGURE S FIGURER FIGURE Q ...

Page 69: ... the USB drive the path should read MATRIX FW UCB Figure A 6 Insert the USB drive into the USB port on the console Figure B 7 From the standard display picture press ENTER 9 0 0 1 ENTER on the keypad Press the LEVEL UP or DOWN keys to choose the correct software if more than one version is on the USB drive Once the correct software is shown Figure C press ENTER and the upgrade procedure will run 8...

Page 70: ...67 NOTES ...

Page 71: ...68 MATRIX FITNESS SYSTEMS CORP 1610 LANDMARK DRIVE COTTAGE GROVE WI 53527 USA TOLL FREE 866 693 4863 www matrixfitness com FAX 608 839 1717 KO REV 1 ...

Reviews: