RL138 4 Rev.
05/16/03
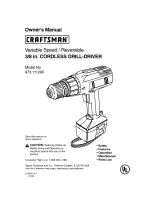
Nipple
Leader Hose
Whip Hose
Nipple
Filter
Air Supply
Regulator
Quick Coupler
Oiler
Drain Daily
Do Not Install
Quick Coupling
Here
Operating Instructions • Warning Information • Parts Breakdown
Variable Speed
Trigger
Forward/Reverse
Lever
Air Inlet
Operation...
Locate center of new hole by using a center punch.
Place drill bit tip in punch mark. Hold drill square with
work and start motor. Apply steady, even pressure. Do
not force. Too much pressure can cause bit to break or
overheat. Too little pressure will keep bit from cutting
and cause it to overheat. Reduce pressure just before
bit cuts through the work. When bit has penetrated
work and is spinning freely, take it from the work while
the motor is running, then turn off drill. If the drill jams
in the work, release throttle immediately. Disconnect the
drill before removing bit and determining cause of trou-
ble. Do not attempt to free the bit by starting and
stopping the motor.
MATCO TOOLS™ 1 YEAR LIMITED
WARRANTY FOR AIR TOOLS
Matco warrants its air tools for a period of 1 year to
the consumer. We will repair any air tool covered
under this warranty which proves to be defective in
material or workmanship during the warranty period.
In order to have your tool repaired, return the tool to
any Matco Authorized Warranty Center, freight
prepaid. Please include a copy of your proof of
purchase and a brief description of the problem. The
tool will be inspected and if any part or parts are
found to be defective in material or workmanship, they
will be repaired free of charge and the repaired tool
will be returned to you freight prepaid.
This warranty gives you specific rights. You may also
have other rights which vary from state to state.
The foregoing obligation is Matco's sole liability
under this or any implied warranty and under no
circumstances shall Matco be liable for any incidental
or consequential damages.
Note: Some states do not allow the exclusion or
limitation of incidental or consequential damages
so the above limitation or exclusion may not apply
to you.
Air Supply...
Tools of this class operate on a wide range of air
pressures. It is recommended that air pressure of these
tools measure 90 PSI at the tool while running free.
Higher pressure (over 90 psig; 6.2 bar) raises
performance beyond the rated capacity of the tool
which will shorten the tool’s life because of faster wear
and could cause injury.
Always use clean, dry air. Dust, corrosive fumes
and/or water in the air line will cause damage to the
tool. Drain the air tank daily. Clean the air inlet filter
screen on at least a weekly schedule. The recommended
hookup procedure can be viewed in the above figure.
The air inlet used for connecting air supply, has
standard 1/4" NPT . Line pressure should be increased
to compensate for unusually long air hoses (over 25
feet). Minimum hose diameter should be 3/8" I.D. and
fittings should have the same inside dimensions and be
tightly secured.
Lubrication...
Lubricate the air motor daily with quality air tool oil. If
no air line oiler is used, run a teaspoon of oil through
the tool. The oil can be squirted into the tool air inlet
or into the hose at the nearest
connection to the air supply,
then run the tool.
The amount of oil
to be used is 1 ounce.
Overfilling will cause
a reduction in the
power of the tool.