2. Changing
Language
3. WLAN Setup
4. Register & Update
4. Register & Update(Cont.)
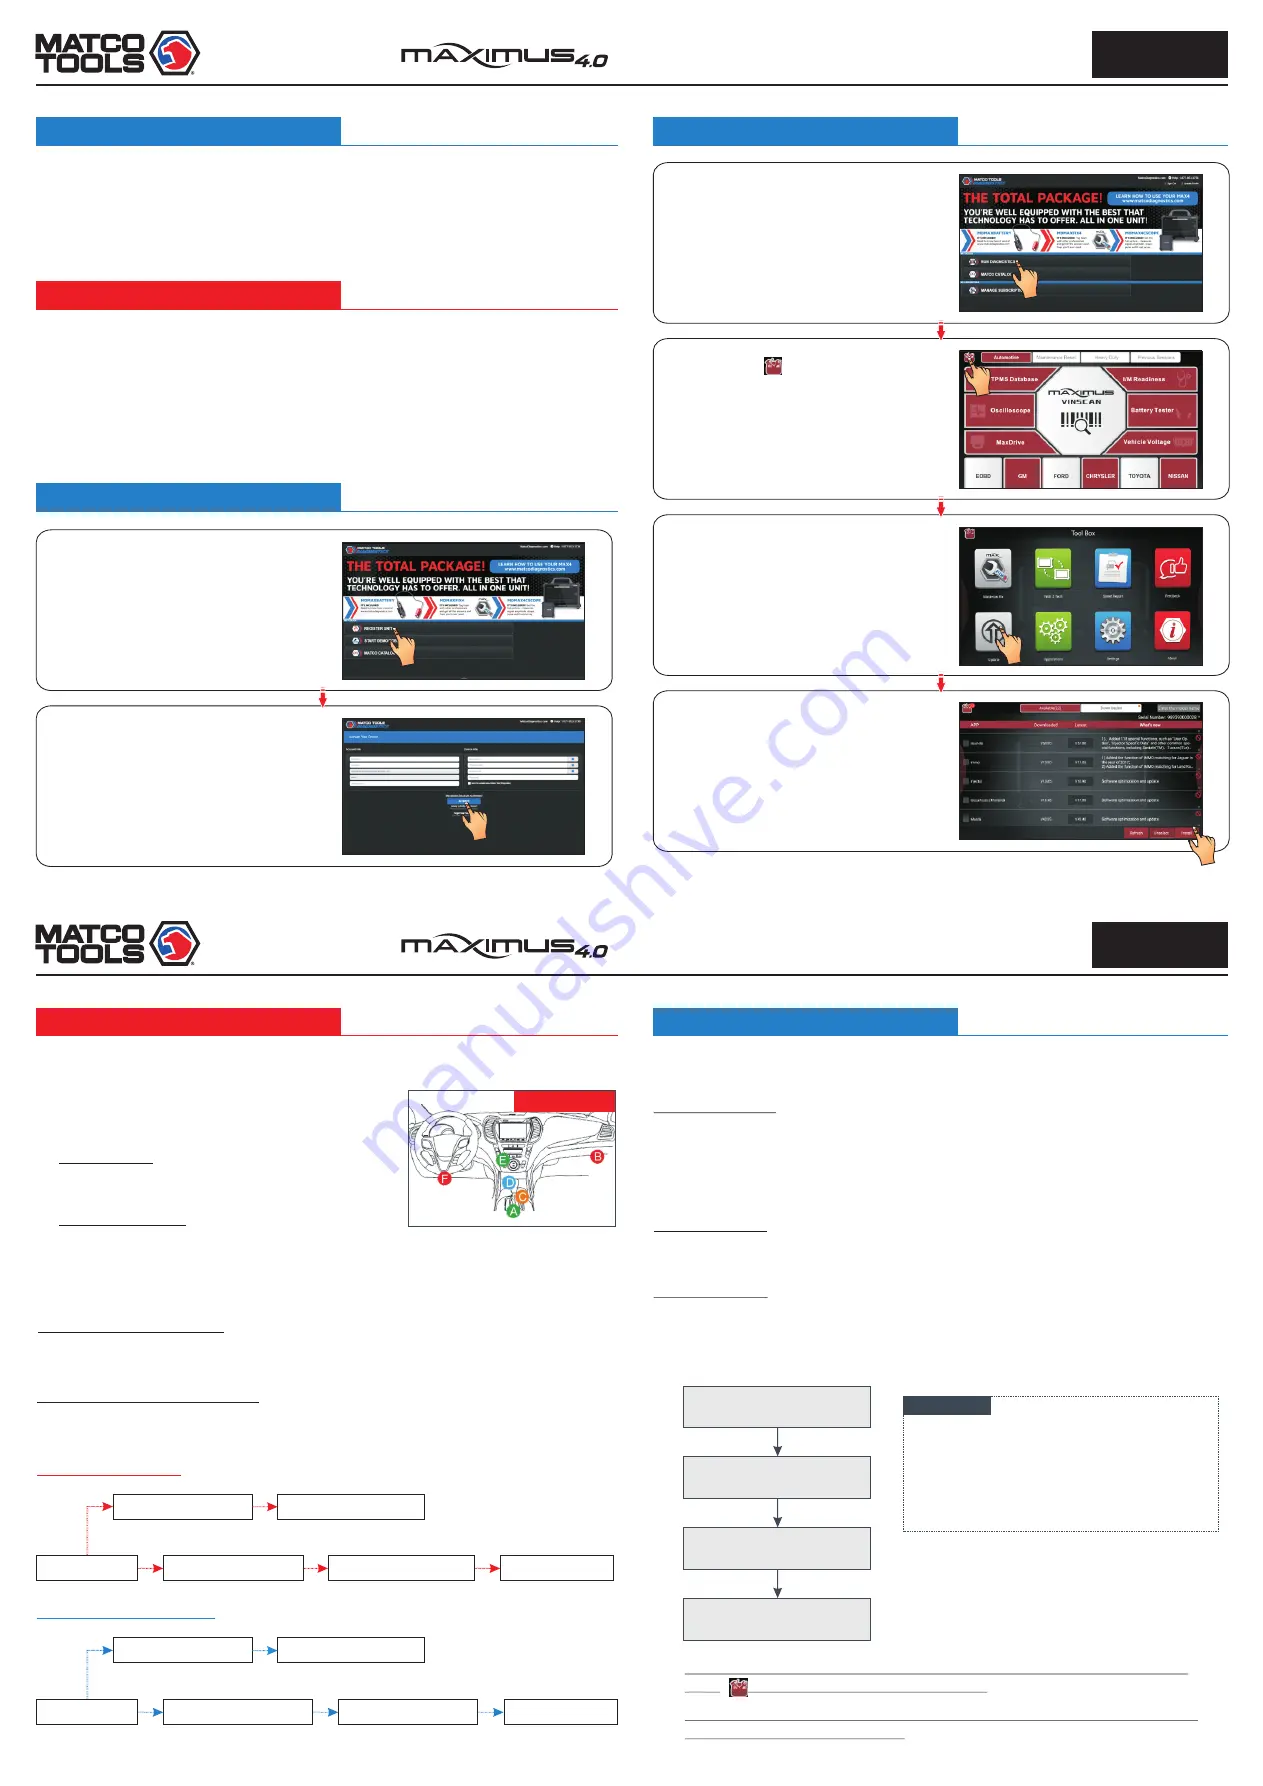
Step 1:
On the Home screen, tap on
“Maximus 4.0” to run the App, the
following screen displays. Tap on
“REGISTER UNIT”.
Step 3:
Tap on “RUN DIAGNOSTICS”
button to launch diagnostics.
Step 5:
Tap on “UPDATE” button (*Note:
Red dot means new software is available).
Step 2:
Tap on “ACTIVATE” button after
information* is entered.(*Note: Serial
number is a 12-digit number starting with
98 – you can find it on the back of your tool.
Verification code is an 8-digit number
stored in the Private & Confidential sheet.
Activation code is printed on the receipt, or
ask your dealer for it.)
Step 6:
Make sure all brands are selected,
tap on “Install”.
Tap on “OK” button when update is
complete. (*Note: Download and
installation will take approximately 10
minutes depending on the internet
connection.)
Step 4:
Tap on on the top left-hand
corner.
Maximus 4.0 supports multiple languages. To change the language of the tool, please do the
following:
1. On the home screen, tap on Settings -> Language & Input -> Languages.
2. Tap on “Add a language”, and then choose the desired language from the list.
3. Tap and hold the desired language and drag it to the top of the screen and then release it,
the system will change into the target language.
Once you're online, you can register your tool, update the diagnostic software and APK, surf
the Internet and send email on your network. Follow the steps below to proceed:
->
, the tablet
, the tablet
1. On the home screen, select Settings
WLAN
.
2
.
Slide
the
WLAN
switch
to
ON
will
start
searching
for
all
available
wireless
networks.
3
.
Select
a
wireless
network. If
the
chosen
network
is
open
will
connect
automatically. If
the
selected
network
is
encrypted,
a
network
password
will
need
to
be
entered
.
2101068-16
Quick Start Guide
MDMAX4
Note:
To enjoy more capabilities and functions, it is
recommended you check for updates on a
frequent basis and keep synchronized with the
latest available software.
Preparation
Before diagnosing, please make sure the following:
s
Switch the ignition on.
s
~ 14V or 18V ~ 30V
.
s
Throttle should be in a closed position.
Vehicle
battery
voltage
range
should
be
11V
Note: For more detailed operations, please refer to the In-App User Manual stored
under “ (Toolbox)” -> “About” -> “User Manual”.
Pictures illustrated herein are for reference purpose only and this Quick Start Guide
is subject to change without notice.
Maximus 4.0 supports three kinds of diagnosis approaches: Smart Diagnosis (MaxVIN),
Manual Diagnosis and Remote Diagnosis.
Maximus VINSCAN:
Through simple Wi-Fi communication between the Maximus 4.0 tablet and VCI dongle, you
can easily get the VIN (Vehicle Identification Number) information of the currently identified
vehicle. Once the VIN is successfully identified, the system will retrieve it from the remote
server and then guide you to vehicle information page without the necessity of step-by-step
manual menu selection (Early model may need manual selection.).
Remote Diagnosis:
This option aims to help repair shops or professional technicians launch instant messaging
and remote diagnosis, making the repair job getting fixed faster.
Manual Diagnosis:
In this mode, you have to diagnose a vehicle by performing the menu-driven command
manually.
For new users, please follow the operation chart shown below to get familiar with and start
using this tool.
5. Vehicle Connection
6. Start Diagnostics
Launch Maximus 4.0
App
Select vehicle
Select software version
and touch on “OK”
Follow the prompts
on the screen
1). OBD II Vehicle Connection
the vehicle’s OBD II DLC port.
Connect one end of the OBD II extension cable to the OBD-16 connector, and the other end to
A. For Passenger Cars:
B. For Commercial Vehicles:
2). Non-OBD II Vehicle Connection
VCI Dongle
VCI Dongle
OBD I Adapter
Battery Cable Clamps
Battery Cable Clamps
OBD II Extension Cable
Non-16pin Connector
To
Vehicle
’
s
Battery
To
Vehicle
’
s
Battery
Adapter Cable
To Vehicle’s DLC
To Vehicle’s DLC
If the power supply on vehicle diagnostic socket is insufficient or the power pin is damaged,
you can get power in the following ways:
1. Locate Vehicle’s DLC Port
The DLC (Data Link Connector) is typically a connector
where diagnostic code readers interface with the
vehicle's on-board computer.
For commercial vehicles, it is generally located in the
driver's cab.
For passenger cars, it is usually located on driver’s side,
about 12 inches away from the center of dashboard. See
Figure DLC Location.
2. Vehicle Connection
DLC Location
If the DLC cannot be found, refer to the vehicle’s service manual for the exact location.
2101068-16
Quick Start Guide
MDMAX4


