background image

headline bars

continuation tabs

notes

warnings

headline bars

continuation tabs

notes

warnings

model no. 054-4281-8  |  contact us 1-800-689-9928

14

OPERATION INSTRUCTIONS
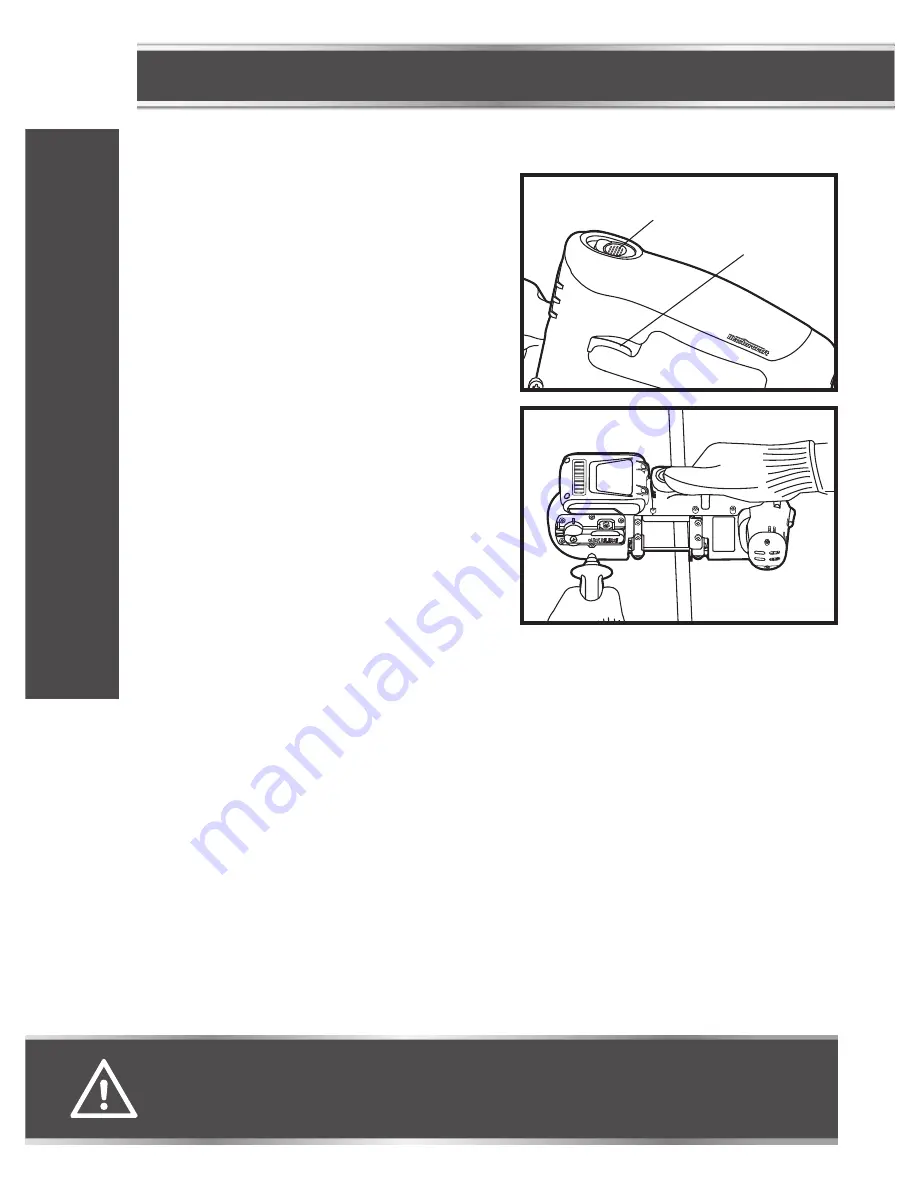
TRIGGER SWITCH 

(fig 6)

1.  To turn the band saw ON, push the lock-off button 

forward and depress the trigger switch.

2.  To turn it OFF, release the trigger switch.

CUTTING

Always hold the band saw handle with one hand 
and the auxiliary handle with another on the motor 
housing (fig 7).

1.  Mount the material to be cut solidly in a vise or other 

clamping device.

2.  Bring the material guide into contact with the 

workpiece. Turn the saw ON.

3.  When saw reaches full speed, slowly and gently tilt 

the main body of the tool to bring the band saw blade 
into contact with the workpiece. It is important to keep 
at least two teeth in the cut. Do not apply additional 
pressure in excess of the weight of the main body of 
the tool. Carefully avoid bringing the band saw blade 
suddenly and heavily into contact with the upper 
surface of the workpiece. This will cause serious damage to the band saw blade. To obtain maximum service 
life of the band saw blade, ensure there is no sudden impact at the beginning of the cutting operation.

4.  End pieces which would be heavy enough to cause injury when they drop, after cut-off, should be supported. 

Safety shoes are strongly recommended. End pieces may be hot.

5.  Hold the saw firmly in both hands so that the saw does not fall against clamped or supported material when 

the cut is completed.

6.  It is important to keep at least two teeth in the cut. Select the proper cutting position for your workpiece by 

referring to the figure 8.

WARNING!

•  Never attempt to use this tool by resting it upside down on a work surface and bringing the material to the 

tool. Always securely clamp the workpiece and bring the tool to the workpiece, securely holding the tool 
with two hands.

FPO

fig 7

OPERA

TING INSTRUCTIONS

fig 6

Trigger 

switch

Lock-off button

Summary of Contents for 054-4281-8

Page 1: ...model no 054 4281 8 20V max LITHIUM ION CORDLESS BAND SAW IMPORTANT Read and understand this instruction manual thoroughly before using the product INSTRUCTION MANUAL...

Page 2: ...continuation tabs notes warnings...

Page 3: ...ance 16 Troubleshooting 17 Parts List 18 Warranty 20 NOTE If any parts are missing or damaged or if you have any questions please call our toll free helpline at 1 800 689 9928 SAVE THESE INSTRUCTIONS...

Page 4: ...6 732 mm Width 1 2 12 5 mm Thickness 0 02 0 5 mm Blade tooth 14 18 TPI Cutting capacity Round piece diameter 2 1 2 6 4 cm Rectangular piece 2 1 2 x 2 1 2 6 4 x 6 4 cm Tool weight without battery 6 lb...

Page 5: ...ool should only be serviced by a qualified service technician For more information call the toll free helpline at 1 800 689 9928 READ ALL INSTRUCTIONS THOROUGHLY SAVE THESE INSTRUCTIONS GENERAL POWER...

Page 6: ...common sense when operating a power tool Do not use a power tool while you are tired or under the influence of drugs alcohol or medication A moment of inattention while operating power tools may resul...

Page 7: ...with sharp cutting edges are less likely to bind and are easier to control Use the power tool accessories tool bits etc in accordance with these instructions taking into account the working conditions...

Page 8: ...loss of control Do not use a damaged blade Before each use inspect the blade for cracks chips or other damage Replace a damaged blade immediately Do not apply cutting lubricants or oil to the blade of...

Page 9: ...ols and their definitions are as follows V Volts A Amperes Hz Hertz W Watts min Minutes Alternating current Direct current n0 No load speed Class II Construction min Revolutions or reciprocation per m...

Page 10: ...and safety requirements For optimum performance and safety read the following operating instructions carefully before using KEY PARTS DIAGRAM WARNING Remove the cordless band saw from the package and...

Page 11: ...art The following table is intended as a general guide only Determine the type of material and dimension of the workpiece and select the most appropriate band saw blade Blade Decsription Teeth per inc...

Page 12: ...ick release knob clockwise until it stops this will release the tension on the blade 4 Turn the saw over and place it on a workbench or table with the motor housing to the right 5 Carefully remove the...

Page 13: ...hown in Figure 5 5 Make sure that the blade is fully inserted into the guide rollers and positioned squarely against the pulleys 6 Rotate the quick release knob counter clockwise until it stops to loc...

Page 14: ...ol Carefully avoid bringing the band saw blade suddenly and heavily into contact with the upper surface of the workpiece This will cause serious damage to the band saw blade To obtain maximum service...

Page 15: ...Never use liquid coolants with portable band saws Use of liquid coolants will cause buildup on blades and reduce performance If excessive vibration occurs during the cut turn the band saw off Ensure...

Page 16: ...tion To remove the saw blade 3 Unscrew the screw on the pulley with a hex key M8 4 Take out the pulley from the tool 5 Take off the gasket on the pulley and replace it with a new one 6 Replace the pul...

Page 17: ...sible Causes Solution The band saw does not work The battery is depleted Charge the battery If the problem remains unsolved after performing the checks described above call the toll free helpline at 1...

Page 18: ...054 4281 8 contact us 1 800 689 9928 18 EXPLODED VIEW 23 19 22 22 22 20 19 17 16 15 14 4 12 1 2 3 5 6 4 7 8 9 10 11 24 24 25 21 26 27 22 28 41 4 40 38 37 39 49 26 29 30 29 26 28 48 47 35 46 45 44 23 1...

Page 19: ...ceptacle Assembly 40 5650007000 Spring Washer 14 3321615000 Right Handle 41 5620411000 Screw 15 5610034000 Tapping Screw 42 3124568000 Decorate Cover 16 5610220000 Thread Forming Screw 43 3124505000 M...

Page 20: ...urchase date must be provided b this warranty will not apply to any product or part thereof which is worn or broken or which has become inoperative due to abuse misuse accidental damage neglect or lac...

Page 21: ...be transferred Neither the retailer nor the manufacturer shall be liable for any other expense loss or damage including without limitation any indirect incidental consequential or exemplary damages a...

Page 22: ......

Reviews: