background image

15

• Never attempt to repair or perform maintenance on 

the appliance until the main electrical power has been 

disconnected. Turning the appliance control "OFF" 

does not remove electrical power from the unit's wiring.

• Replace all parts and panels before operating.

!

WARNING

Electrocution Hazard

TROUBLESHOOTING

Before You Call for Service

If the appliance appears to be malfunctioning, read through 

this manual first. If the problem persists, check the trouble

-

shooting guide below. Locate the problem in the guide and 

refer to the cause and its remedy before calling for service. 

The problem may be something very simple that can be 

solved without a service call. However, it may be required 

to contact your dealer or a qualified service technician.

Problem

Possible Cause

Remedy

Appliance not cold enough

(See “Set temperature" on page 10)

•  Control set too warm

•  Content temperature not stabi-

lized.

•  Excessive usage or prolonged 

door openings.

• 

Airflow to front grille blocked.


•  Door gasket not sealing properly.

•  Adjust temperature colder. Al-

low 24 hours for temperature to 

stabilize.

•  Allow temperature to stabilize for 

at least 24 hours.

• 

Airflow must not be obstructed to 

front grille. See “clearances” on 

       page 4.

•  Replace door gasket.

Appliance too cold

(See “Set temperature” on page 10)

•  Control set too cold

•  Door gasket not sealing properly.

•  Adjust temperature warmer. 

       Allow 24 hours for temperature to 

      stabilize.

•  Replace door gasket.

No interior light.

•  Failed light bulb.

•  Replace light bulb, see page 13.

Light will not go out when door is 

closed

•  Display light is turned on. (Glass 

door models only.

•  Door not activating light switch.

•  Failed light switch

•  Turn off display light, shut door.

•  Appliance not level, level appli-

ance, (See page 4, “leveling legs”)

• 

Contact a qualified service techni

-

cian.

Noise or Vibration

•  Appliance not level

•  Fan hitting tube obstruction.

•  Level appliance, see “Leveling 

Legs” on page 4.

• 

Contact a qualified service techni

-

cian.

Appliance will not run.

•  Appliance turned off

•  Power cord not plugged in.

•  No power at outlet.

•  Turn appliance on. See “Starting 

your refrigerator” on page 10.

•  Plug in power cord.

•  Check house circuit.

!

CAUTION

In the unlikely event you lose cooling in your unit, 

do not 

unplug the product from the electric supply

, but do call 

a qualified service technician immediately. It is possible 

that the loss of cooling capacity is a result  of excessive 

frost build-up on the evaporator cooling coil. In this case, 

removing power to the unit will result in the melting of this 

excessive quantity of ice, which could generate melt water 

that exceeds the capacity of the defrost drain system and 

could result in water damage to your home. The end-user 

will be ultimately responsible for any water damage caused 

by prematurely turning the unit off without appropriately 

managing the excess water run-off.

Summary of Contents for ML15WSG0 Series

Page 1: ...et d entretien Note Wine Cellars are designed exclusively for the storage of wine Wine Cellars cannot attain storage temperatures suitable for fresh food storage Remarque Les celliers sont con ues ex...

Page 2: ...eveling the appliance 4 Electrical connection 5 Installing the anti tip device 6 Product dimensions 8 Using your Electronic control 10 Starting your refrigerator 10 Turning your refrigerator ON or OFF...

Page 3: ...on If there is damage the packaging will be needed as proof of damage in transit Afterwards please dispose of all items responsibly Note to Customer This merchandise was carefully packed and thoroughl...

Page 4: ...s important this area not be obstructed and the grille openings kept clean Marvel does not recommend the use of a custom made grille as air flow may be restricted See Figure 2 Leveling Legs Adjustable...

Page 5: ...d This product is factory equipped with a power supply cord that has a three pronged grounded plug It must be plugged into a mating grounding type receptacle in accor dance with the National Electrica...

Page 6: ...i tip bracket line up with the end of the 211 2 54 6 cm line Rear of cabinet line 5 Fasten the anti tip bracket to the floor using the supplied screw See Figure 8 6 Slide the cabinet back into positio...

Page 7: ...the floor mounted anti tip bracket is used the mini mum adjusted height of the cabinet is increased by 3 8 9 mm Figure 8a V notches in bracket V notches in bracket Figure 8 211 2 54 6 cm Front of cabi...

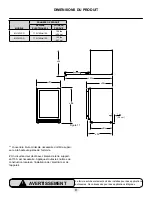
Page 8: ...4 cm 2521 32 65 2 cm 22 55 9 cm DOOR STYLE G Glass Frame Door Figure 9 Figure 9a If necessary to gain clearance inside the rough in opening a hole can be cut through the adjacent cabi net and the powe...

Page 9: ...1 kg WARNING Floor mount Anti tip Bracket must be installed for freestand ing applications Not required for built in applications Minimum rough in opening required is to be larger than the adjusted he...

Page 10: ...of content loaded and number of door opening and closings For best results allow refrigerator to pull down to desired set temperature before loading Once contents are loaded allow at least 48 hours f...

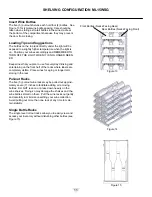
Page 11: ...and entertaining on the front half of the racks where labels are completely visible Place wines for aging or longer term storing in the rear Pull out Racks The five 5 pull out wine racks may be pulle...

Page 12: ...hat you plan to use for everyday drinking and entertaining on the front half of the racks where labels are completely visible Place wines for aging or longer term storing in the rear Pull out Racks Th...

Page 13: ...uuming or mop ping near the front of the appliance Damage to the grille can occur 3 Periodically clean the interior of the appliance as needed 4 Periodically check and or clean the front grille as nee...

Page 14: ...nce cooker dishwasher etc heating air duct or other heat sources 2 Install product out of direct sunlight 3 Ensure the front grille vents at front of appliance be neath door are not obstructed and kep...

Page 15: ...t not sealing properly Adjust temperature warmer Allow 24 hours for temperature to stabilize Replace door gasket No interior light Failed light bulb Replace light bulb see page 13 Light will not go ou...

Page 16: ...igence accident or improper use maintenance installation service repair acts of God fire flood or other natural disasters The product must be installed operated and maintained in accordance with the M...

Page 17: ...17...

Page 18: ...e without notice Such revisions do not entitle the buyer to corresponding changes improvements additions replacements or compensa tion for previously purchased products www marvelrefrigeration com 126...

Page 19: ...et d entretien Note Wine Cellars are designed exclusively for the storage of wine Wine Cellars cannot attain storage temperatures suitable for fresh food storage Remarque Les celliers sont con ues ex...

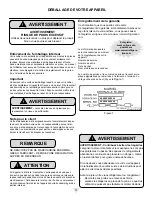
Page 20: ...i vous ne suivez pas les instructions AVERTISSEMENT Avertissements de la proposition 65 de l tat de Californie Ce produit contient au moins un produit chimique connu par l tat de Californie pour tre l...

Page 21: ...t le transit Ensuite veuillez mettre tous ces mat riaux d emballage au rebut d une fa on responsable Note pour le client Cette marchandise a t soigneusement et compl tement inspec t e avant de quitter...

Page 22: ...de l air par l changeur thermique du condenseur Des restrictions de ce flux d air vont augmenter la consommation d nergie et affecter sa capacit de refroidissement C est pourquoi il est important que...

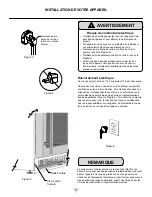
Page 23: ...est n cessaire Ce produit est quip en usine d un cordon secteur comportant une fiche avec terre trois broches Il faut la brancher dans une prise secteur correspondante avec terre en conformit avec la...

Page 24: ...u meuble et que ses encoches en V soient align es avec la fin de la ligne trac e de 211 2 po 54 6 cm Ligne l arri re de l armoire 5 Fixez la ferrure anti basculement au sol en utilisant la vis fournie...

Page 25: ...V dans la ferrure Encoches en V dans la ferrure Ligne de c t du meuble Figure 8 Ligne devant le meuble Ligne derri re le meuble Pied de mise niveau arri re Vis Figure 8a Quand la ferrure anti basculem...

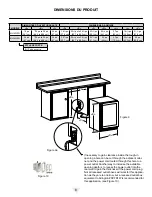
Page 26: ...47 po 119 4 cm 2521 32 po 65 2 cm 22 po 55 9 cm Figure 9 Figure 9a If necessary to gain clearance inside the rough in opening a hole can be cut through the adjacent cabi net and the power cord routed...

Page 27: ...auteur ajust e de l armoire Un circuit secteur d di avec liaison de terre support ant 15 A est n cessaire Appliquez toutes les normes de construction locales l installation de l lectricit et de l appa...

Page 28: ...rtures et de fermetures de sa porte Pour obtenir les meilleurs r sultats laissez le r frig ra teur descendre la temp rature de consigne avant de la charger Une fois le contenu charg laissez la temp ra...

Page 29: ...ns que vous pr voyez de consommer quo tidiennement ou pour une occasion sur la moiti frontale de la tablette o leurs tiquettes sont bien lisibles Placez les vins de garde ou pour consommation loign e...

Page 30: ...clairage est allum Positionnez vos vins en cons quence et N OUBLIEZ PAS D TEINDRE QUAND L CLAIRAGE N EST PLUS N CESSAIRE Conservez les vis que vous pr voyez de consommer quoti diennement ou pour une o...

Page 31: ...on arrivait essayez de la corriger le plus t t possible Minimisez le nombre d ouvertures de porte pendant la coupure du secteur afin de ne pas affecter la temp rature dans l appareil ATTENTION N utili...

Page 32: ...des prolong es r glez la consigne de l appareil la temp rature la plus haute admissible pour la conservation de son contenu 12 R glez le contr le en position d arr t off si le nettoyage de l appareil...

Page 33: ...e Rem de L appareil ne produit pas assez de froid Voyez Fixation de consigne de temp rature en page 10 Le contr le a une consigne trop chaude La temp rature du contenu n est pas encore stabilis e Util...

Page 34: ...pour corriger un quelconque d faut caus par n gligence accident ou m susage entretien installation service r paration cas de force majeure incendie inondation ou catastrophes naturelles Le produit do...

Page 35: ...17...

Page 36: ...41014822 FR Rev E 1 14 20 Toutes les sp cifications et les conceptions des produits sont sujet des changements sans pr avis De telles r visions ne donnent aucun droit pour l acheteur de produits ant r...

Reviews: