Before Calling for Service
Before calling for service, check the trouble-
shooting table on this page. This table lists possible
problems that you can remedy without difficulty to
avoid an unnecessary service call.
T R O U B L E S H O O T I N G
7
O P E R AT I O N
Start Your Appliance
Your appliance will start upon initial plug-in. The LED
will flash amber upon initial plug-in due to your unit
being powered-on at the factory to verify performance
and then powered-off. The Sentry system senses a
power outage has occurred and relays this
information to you when you initially power-up your
appliance. This is normal and pressing the
“ON/OFF” button will reset this alarm function.
If your appliance’s control has been shut-off i.e., unit
plugged in, interior lights operate, display blank,
unit must be turned on. To turn on your appliance,
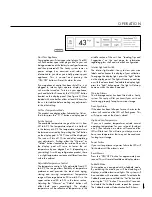
push and hold for 5 seconds, the “ON/OFF” button
located on the display panel. (See figure 3) Once
loaded with wine bottles, allow at least 48 hours for
the unit to stabilize before making any adjustments
to the initial setting.
Set Your Temperature Mode
This product can display either Fahrenheit or Celsius.
To do this press the ”°F/C“ button on display panel.
Set the Controls
The available temperature range of the unit is from
40° to 65°F. The temperature set-point is initially set
in the factory at 43°F. The temperature set-point can
be lowered or raised by first pushing the “Set” button
on the display pad. A “SET” icon will be displayed.
This icon will turn off 10 second after completing
your adjustments. Pushing either the “Warmer” or
“Colder” buttons located on the inside of the unit on
the display pad will raise or lower the set
temperature by one degree F or C (depending on
your setting). As with any refrigeration product, there
is a slight temperature variance at different locations
within the cabinet.
Adjustable Temperature Control
The temperature control is fully adjustable from 40°
to 65°F. The range allows flexibility of temperature
preferences and provides the ideal wine aging,
storing and serving temperatures. Temperature
range will average between 50 to mid 60’s in the
upper section and 40 to 50’s in the lower section.
Adjusting the “Warmer” or “Colder” buttons will
affect both zones accordingly. The display
temperature will be reflective of temperatures in the
middle section of the unit. See “Loading Tips and
Suggestions” on the next page for information
regarding glass shelf and wine rack configuration.
Interior Light and Switch
The interior light makes it easy to view your wine
labels and enhances the display of your collection.
To engage the display light, press the “Light” button
on the display panel. The light will come on and stay
on with the door closed. To disable the display light,
press the “Light” button again. The light will always
come on when the door is opened.
Warning Alarms
Your beverage center has been fitted with a Sentry
system. This sentry will let you know if your unit is not
functioning properly for optimum wine storage.
Door Ajar Alarm
If the door has been left open for over 5 minutes the
alarm will sound and the LED will flash green. This
will stop as soon as the door is closed.
High and Low Temperature
If your unit reaches temperatures outside normal
operating temperatures for your set point for about
one (1) hour duration, an alarm will sound and the
LED will flash red. This will warn you that your wines
have seen temperatures that may not be conducive
for long term storage.
Power Failure
If your unit experiences a power failure the LED will
flash amber until the alarm is reset.
Reset Alarms
Press the “ON/OFF” button for approximately one
second. This will reset all audible and display alarms.
Sabbath Mode
Your appliance is equipped with a Sabbath mode.
By activating this mode you will be disabling all
displays, audible alarms and lights. The system will
be overridden with a random control. To activate the
Sabbath mode press and hold the “Set” button while
pressing the ”°F/C“ button 7 times within 7 seconds.
To disable the Sabbath mode repeat the process.
The Sabbath mode will deactivate after 96 hours.
4
figure 3
Possible Causes/Solutions
•
Interior needs cleaning
•
Cabinet not level
•
Weak floor
•
Cabinet not level
•
Weak floor
•
Tube burned out
•
No power at outlet
•
”ON/OFF” button pressed
•
Line cord not plugged in
•
No power at electrical outlet
•
House fuse blown
•
Prolonged door openings
•
Control set too cold
•
Condenser needs cleaning
•
Too many door openings
•
Prolonged door openings
•
Hot, humid weather increases condensation
•
Control improperly set
•
Hot, humid weather increases condensation. As
humidity decreases, moisture will disappear.
•
Control improperly set
•
Control improperly set
•
Faulty thermometer
•
Relocate thermometer to center of cabinet and
recheck
•
See “Warning Alarms” on page 4
•
See “Alpha Control ‘Quick’ Reference”
•
Temperature alarm may occur after user selected
temperature set-point changes in excess of 10
degrees F, or during heavy usage conditions.
This is normal and not a fault of the appliance.
The Sentry System is monitoring the duration of
large swings in temperature to protect your
contents, and may alert you to this event. See
“Reset Alarms” section on page 4.
Problem
Odor in cabinet
Noisy operation
Cabinet vibrates
Cabinet light not working
Appliance will not run
Appliance runs too long
Moisture collects inside
Moisture collects on
outside surface
Interior too hot/too cold
Sentry System activated
Help Prevent Tragedies
Each year children die because they climb inside a
discarded refrigeration product, get trapped inside
and suffocate. Take precautions to prevent such
tragedies by removing the door, taping or chaining
it shut before discarding.


