MartinLogan crescendo User Manual Download Page 17

17

1     Set your speaker to Bluetooth mode. Use the 

speaker’s remote control to select Bluetooth, 
or repeatedly press the input button on front 
of the speaker until the front LED turns blue.

2     Sync the speaker with your digital media 

device or computer. Follow the directions that 
came with your device/computer.

3     Within your music application, you may need 

to select the speaker as the output device for 
playback. 

4     You are now ready to stream music to your 

speaker

It may be necessary to occasionally update your 
speaker’s firmware. For instructions on performing 
a firmware update visit www.martinlogan.com.

B

LUETOOTH

 C

ONNECTION

U

PDATING


THE

 F

IRMWARE

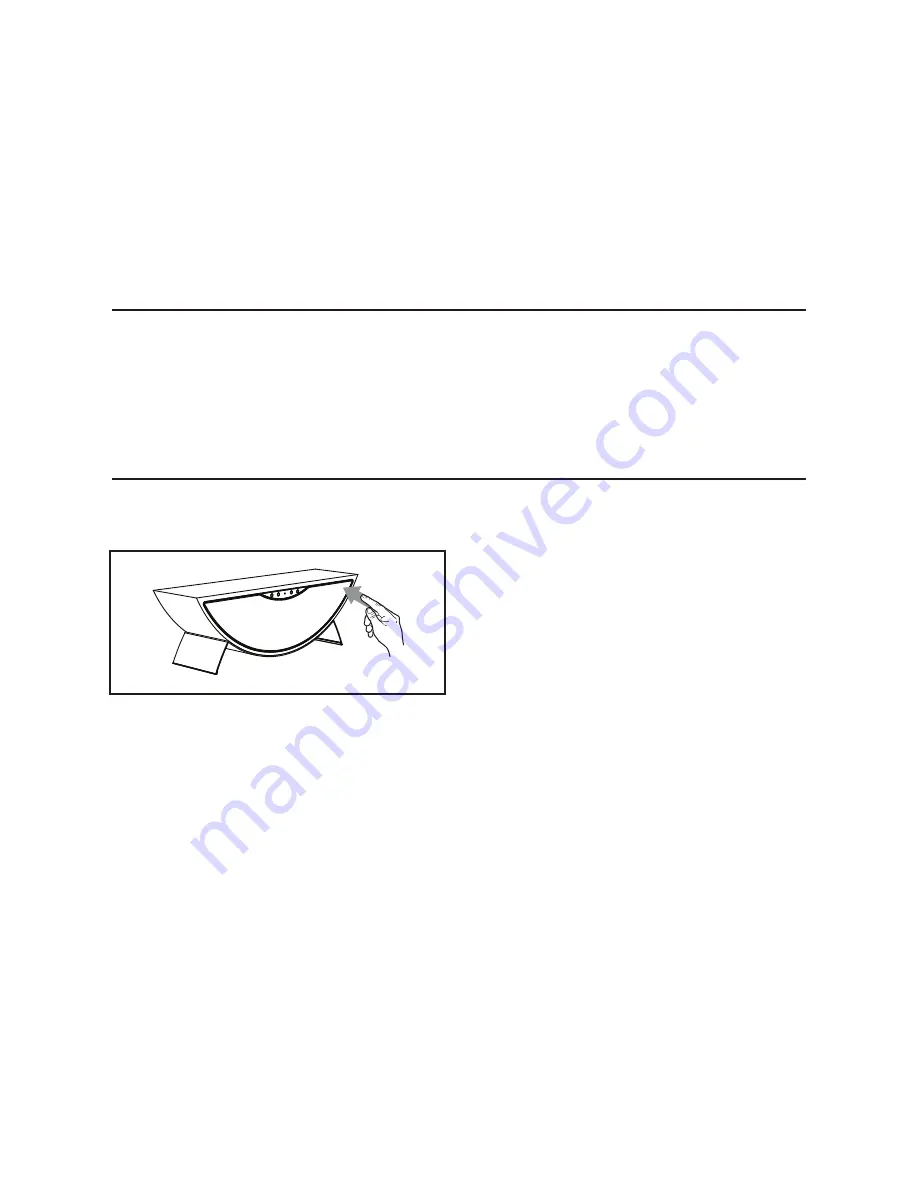
To remove the front grille from the speaker use a 
finger to firmly apply pressure to either corner of 
the grille.

R

EMOVING


THE

 F

RONT

 G

RILLE

Fig. 4

Summary of Contents for crescendo

Page 1: ...u s e r s m a n u a l crescendo _ 1 5 Am i iPod QiPhone QiPad U...

Page 2: ...ended to alert the user to the presence of potentially dangerous voltage within the product s enclo sure that may be of sufficient magnitude to constitute a risk of electric shock to persons The excla...

Page 3: ...f AC Plug Adapters is cautioned because it can allow the product to be plugged into voltages in which the product was not designed to operate If the product is equipped with a detachable power cord us...

Page 4: ...and Mac and PC with iTunes 10 2 2 or later USB works with iPhone 5S iPhone 5C iPhone 5 iPhone 4S iPhone 4 iPad 3rd and 4th generation iPad mini iPod touch 3rd through 5th generation and iPod nano 5th...

Page 5: ...Downloading Connection Settings From an Apple Device 15 Using Wi Fi to Set Up Your Speaker 15 Using Ethernet to Set Up Your Speaker s Wi Fi Connection 15 Setting Up A Permanent Ethernet Connection 16...

Page 6: ...6 c 71 inch 180 cml remote control ij fi digital optical cable 71 inch n80 cml power cord...

Page 7: ...c modes Bass mode for those moments requiring a little extra thunder and a Normal mode that restores normal levels We recommend locating the speaker on a surface that provides a wide level and stable...

Page 8: ...ital optical output or and or configure the output for 2 chan nel stereo sound Please refer to your television s manual WI FI SETUP AND STATUS The Wi Fi Setup button is used to connect to a Wi Fi Netw...

Page 9: ...e The Auxiliary input on this speaker accepts digital optical connection with the use of a mini Toslink adaptor included with this speaker Toslink to mini Toslink cables may also be available from you...

Page 10: ...an a wireless connection USB This cable allows you to connect compatible Apple devices and to use the speaker as a dock and charger This connection will also charge any non Apple devices capable of be...

Page 11: ...d by the speaker Find a volume be tween 50 75 of the device s maximum volume and use your speaker s volume control to adjust the final playback volume CONTROLS FRONT PANEL CONTROLS STANDBY MUTE This b...

Page 12: ...to the beginning of the current track Pressing the button twice skips to the beginning of the previous track NEXT TRACK Skips to the beginning of the next track PLAY PAUSE Toggles between play or pau...

Page 13: ...l often have their own volume control which is separate from the speaker s volume If you are connecting a device which allows you to adjust its volume separately we recommend that the volume on the de...

Page 14: ...om your speaker or remote control follow these steps 1 Set the speaker s input to Wireless Ethernet The front LED will be purple 2 On your computer launch iTunes version 10 or later 3 Open Preferences...

Page 15: ...device access the device s Wi Fi control panel You can also use a laptop with Wi Fi capability to complete this setup 4 Select the speaker from the list of available Wi Fi networks You may need to re...

Page 16: ...ppropriate fields 7 Click Apply 8 Upon successfully completing Wi Fi setup the Wi Fi Setup and Status LED will turn green 9 Disconnect the Ethernet cords from your computer and the speaker Reconnect y...

Page 17: ...e computer 3 Within your music application you may need to select the speaker as the output device for playback 4 You are now ready to stream music to your speaker It may be necessary to occasionally...

Page 18: ...you use your MartinLogan product in a country other than the one in which it was originally purchased we ask that you note the following 1 The appointed MartinLogan distributor for any given country i...

Page 19: ...using the Power button on back of the speaker next to the AC input Wait thirty seconds and turn the speaker back on Unplug the speaker wait thirty seconds and plug it back in Turn the speaker on and p...

Page 20: ...If necessary try con necting an alternate source component to make sure the original source component isn t the problem Sound is coming from both my speaker and my television When utilizing the speak...

Page 21: ...with 2 8 x 1 25 7 1cm x 3 2cm diaphragm 5 x 7 12 7cm x 17 8cm fiber cone with extended throw drive assembly Non resonant asymmetrical chamber format Ported 24 bit 48kHz DSP based preamplifier Class D...

Page 22: ...x 7 8 5 7 4 9 5 3 2 0 w w w m a r t i n l o g a n c o m Rev 122613 2014 MartinLogan Ltd All rights reserved P N 9900201 25 7 65 3cm 25 7 po 65 3cm 8 1 20 5cm 8 1 po 20 5cm 6 5 16 5cm 6 5 po 16 5cm 6 9...

Page 23: ...ou would like to connect to Crescendo in a different way please see the instructions in the OWNER S MANUAL 0 Power your Crescendo Insert the power cord into the AC In jock on bock of the Crescendo and...

Page 24: ...MAIL FIRST CLASS MAIL PERMIT NO 66 LAWRENCE KS POSTAGE WILL BE PAID BY ADDRESSEE MARTIN LOGAN 2101 DELAWARE ST LAWRENCE KS 66046 9702 USA 1 11 11 11 1 1 11 1 1 1 111 1 111 1 NO POSTAGE NECESSARY IF M...

Page 25: ...y _____________________________________ State Zip ________ Phone E mail 0 Check here if you would like to receive occasional email updates about news and opportunities regarding Martinlogan Register o...

Reviews: