background image

 12

MAC 575 Krypton

Rigging

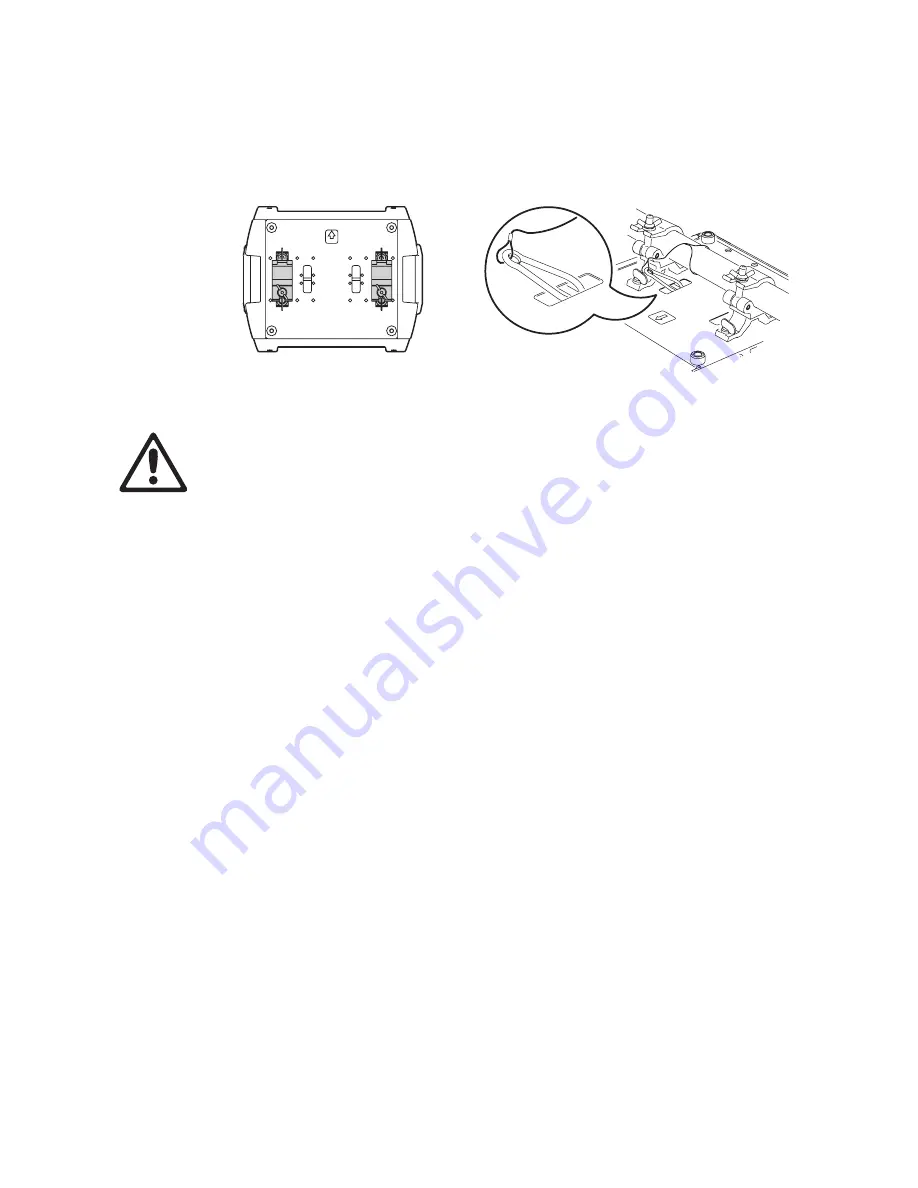
The MAC 575 Krypton can be placed on stage or clamped to a truss in any orientation using the clamp 
bracket mounting points shown in Figure 7.   

Warning!Always use 2 clamps to rig the fixture. Lock each clamp with both 1/4-turn fasteners. The 
fasteners are locked only when turned fully clockwise. 

Warning!Attach an approved safety cable to the attachment point labelled “SAFETY WIRE” in the 
base. Never use the carrying handles for secondary attachment.

To  clamp  the  fixture on  a  truss

1. Check that the rigging clamps are undamaged and can bear at least 10 times the weight of the fixture. 

Check that the structure can bear at least 10 times the weight of all installed fixtures, clamps, cables, 
auxiliary equipment, etc.

2. Bolt each clamp securely to a clamp bracket with an M12 bolt (minimum grade 8.8) and lock nut.
3. Align a clamp with 2 mounting points in the base. Insert the fasteners into the base and turn both levers 

a full 1/4-turn clockwise to lock. Install the second clamp. 

4. Block access under the work area. Working from a stable platform, hang the fixture on the truss with the 

arrow towards the area to be illuminated. Tighten the rigging clamps.

5. Install a safety wire that can bear at least 10 times the weight of the fixture. The attachment point is 

designed to fit a carabiner clamp. 

6. Check that the tilt lock is released. Verify that there are no combustible materials within 0.5 meters (20 

inches) or surfaces to be illuminated within 1.2 meters (42 inches) of the head, and that there are no 
flammable materials nearby.

7. Check that there is no possibility of heads or yokes colliding with other fixtures.

Figure 7: Clamp bracket positions and safety wire attachment point

Summary of Contents for MAC 575 Krypton

Page 1: ...MAC 575 Krypton user manual TM ...

Page 2: ...ability for any injury damage direct or indirect loss consequential or economic loss or any other loss occasioned by the use of inability to use or reliance on the information contained in this manual The Martin logo the Martin name and all other trademarks in this document pertaining to services or products by Martin Professional A S or its affiliates and subsidiaries are trade marks owned or lic...

Page 3: ... local building and electrical codes and has both overload and ground fault earth fault protection Connect this fixture to AC power either using the supplied power cable or via 3 conductor cable that is rated minimum 8 amp hard usage Suitable cable types include SJT ST STW SEO SEOW and STO Before using the fixture check that all power distribution equipment and cables are in perfect condition and ...

Page 4: ...rsons and materials Allow the fixture to cool with the lamp powered off for at least 45 minutes before handling or opening any cover Keep all combustible materials e g fabric wood paper at least 0 5 meters 20 inches away from the head Keep flammable materials well away from the fixture Ensure that there is free and unobstructed airflow around the fixture Provide a minimum clearance of 0 1 meters 4...

Page 5: ...ffects 17 Lamp power 17 Fixture reset 17 Dimming and strobe 17 Color wheels 17 Rotating gobos 18 Static gobos 18 Gobo color macros 18 Prism 18 Iris 18 Focus 18 Zoom 18 Pan and tilt 18 Pan tilt speed and effects speed channels 18 Optical configuration 20 Color wheels 20 Gobos 21 Service and maintenance 24 Tilt lock 24 Disassembly 24 Cleaning 26 Lubrication 27 Fuse replacement 27 Replacing the lamp ...

Page 6: ...Notes ...

Page 7: ...e Martin website at http www martin com Comments or suggestions regarding this document may be e mailed to service martin dk or posted to Service Department Martin Professional A S Olof Palmes Allé 18 DK 8200 Aarhus N Denmark Warning Read the safety precautions in this manual before installing and operating the fixture Unpacking The following items are included with the MAC 575 Krypton GE CSR 575 ...

Page 8: ...ect voltage if necessary If the exact local voltage is not marked on a terminal install the wire in the terminal with the next highest voltage for example if the local power voltage is 220 V install the wire in the 230 V terminal 4 Check that the shorter black wire to the ballast is connected to the screw terminal marked with the local AC power frequency Release it and connect it to the screw term...

Page 9: ...5 minutes Lamp replacement Warning Wear safety glasses and gloves when handling discharge lamps Important Do not touch the quartz bulb with bare fingers Replacement lamps are available from your Martin dealer P N 97010212 The clear quartz bulb must be clean and free of any oils from your fingers Clean the lamp with an alcohol wipe and polish it with a dry cloth particularly if you accidentally tou...

Page 10: ...me on page 14 To align the lamp Important Align the lamp carefully An excessive hot spot will damage optical components 1 Apply power and allow the MAC 575 Krypton to reset Using either a controller or the control menu strike the lamp and project an open white beam on a flat surface 2 See Figure 6 Center the hot spot vertically using the top Allen head adjustment screw A in the center of the rear ...

Page 11: ...Up to 32 devices may be connected on a serial link Terminate the link by installing a termination plug in the output socket of the last fixture The termination plug which is a male XLR plug with a 120 Ohm 0 25 Watt resistor soldered between pins 2 and 3 soaks up the control signal so it does not reflect and cause interference If a splitter is used terminate each branch of the link Some older fixtu...

Page 12: ...h clamp securely to a clamp bracket with an M12 bolt minimum grade 8 8 and lock nut 3 Align a clamp with 2 mounting points in the base Insert the fasteners into the base and turn both levers a full 1 4 turn clockwise to lock Install the second clamp 4 Block access under the work area Working from a stable platform hang the fixture on the truss with the arrow towards the area to be illuminated Tigh...

Page 13: ...lus fine control of gobo rotation pan and tilt The extended mode uses 25 channels and provides the basic mode features plus fine control of the dimmer color wheel iris focus and zoom DMX addressing is limited to channels 1 494 in basic mode and 1 488 in extended mode This makes it impossible to set the DMX address so high that you are left without enough control channels for the fixture To set DMX...

Page 14: ... t The DMX reset setting controls the behavior of the reset command When set to the command is fully enabled When set to the command is disabled to prevent accidental resets When set to the command must be sent for five seconds The special combination of DMX values listed on page 29 allows you to execute a reset even when the command is disabled i r i s b l a ck o u t The iris blackout setting enh...

Page 15: ...splayed when the head temperature exceeds 85 C 185 F Overheating is probably due to dirty air filters fans or air vents It may be due to incorrect power supply settings or a defective fan Manual control The manual control menu provides commands for resetting the fixture striking the lamp and dousing the lamp It also permits you to position and move individual effects Service utilities Important En...

Page 16: ...on and set each fixture to the same tilt DMX value Select one fixture to be the reference fixture On the other fixtures select and press Enter Adjust the offset as necessary to align the beam with the reference beam Press Enter to save the setting 5 To calibrate the dimmer set the iris to fully closed and set focus to 1m in the menu Select and press Enter Hold a piece of paper over the lens Set th...

Page 17: ...sent for 5 seconds If the lamp off command is disabled in the control menu the lamp off command can still be selected on channel 1 if the following effects are also selected color wheel 2 must be set to slot 1 by sending DMX value 17 on channel 4 in basic mode 6 in extended mode the prism must be set to on with no rotation by sending DMX values 80 89 on channel 10 in basic mode13 in extended mode ...

Page 18: ...mode provides pre programmed variable speed macros that use different combinations of color and gobos Prism On channel 10 in basic mode 13 in extended mode the prism can be activated and rotated clockwise and counterclockwise with variable speed Iris Channel 11 in basic mode 14 in extended mode controls the diameter of the iris opening and provides variable speed pulsing effects Fine control of th...

Page 19: ...When using vector control the controller s cross fade time if available must be set to 0 B la ck o u t When blackout while moving is selected on a speed channel the shutter closes when an effect moves to make the transition invisible The shutter opens when the movement is complete This function is available for pan and tilt on channel 18 in basic mode 24 in extended mode and for color wheels fixed...

Page 20: ... the back of the head must be upside down and remove the bottom cover 3 For best access align the rotating gobo wheel so that the open position is above the color filter to be replaced see arrow in Figure 9 4 Turn the color wheel to access the desired filter position Press the filter forwards slightly to release it and then grasp it by the edges and remove If your fingers are too large protect the...

Page 21: ...be made with the artwork reversed on the coated side and used with the coated side facing away from the lamp While glass gobos are generally the most durable satisfactory results can be obtained at less expense with aluminum gobos Custom stainless steel gobos can also be used however they can warp losing sharpness in a matter of hours The useful life will depend on the gobo pattern and the project...

Page 22: ...artin dealer or gobo supplier More reflective side towards lamp To minimize the risk of gobo overheating and damage turn the more reflective side of a coated gobo towards the lamp Less reflective side away from lamp The less reflective side of a coated gobo will absorb less heat if it faces away from the lamp To determine which side of a gobo is coated hold an object up to it On the uncoated side ...

Page 23: ...rrow end press the spring flat the narrow end is on the inside Push the end of the spring in under the lip of the holder 6 Verify that the gobo is seated flush against the holder Press the spring as flat as possible against the back of the gobo 7 Work the rim of the gobo holder under both clips and snap the gobo holder back into position on the gobo wheel If necessary a small screwdriver or simila...

Page 24: ...ulting in gradual changes in color rendition of dichroic filters or the specular properties of reflectors for example The extent of wear and tear depends heavily on operating conditions maintenance and environment so it is impossible to specify precise lifetimes for optical components However you will eventually need to replace optical components if their characteristics are affected by wear and t...

Page 25: ...osition the head top side up so that you have access through the top Holding the zoom lens by its base slide it out it to its limit at the front of the fixture as shown in Figure 15 Figure 14 Releasing top and bottom covers and removing front lens Head top side up Figure 15 Moving the zoom lens forward ...

Page 26: ...smoke particles and in extreme cases fixtures may require cleaning after surprisingly few hours of operation Environmental factors that may result in a need for frequent cleaning include Use of smoke or fog machines High airflow rates near air conditioning vents for example Presence of cigarette smoke Airborne dust from stage effects building structures and fittings or the natural environment at o...

Page 27: ... from the side cover grill on the front of the base front is indicated by an arrow on the bottom Remove the top cover from the front of the base Lift the power supply ballast module up and out to expose the base fans for inspection and cleaning 9 Reinstall the power supply ballast module and base cover Lubrication The MAC 575 Krypton does not require lubrication under normal circumstances The slid...

Page 28: ...ce supported by the Martin Software Uploader application Martin Universal USB DMX Interface recommended T o i n s t a l l s o f t w a r e n o r m a l m et ho d Connect the PC to the fixture s DMX input via the PC DMX interface and power the fixture on For further details please refer to the Martin Software Uploader online help file To i n st al l s o ft wa re i f al l e ls e fa ils b oo t s e c to...

Page 29: ... strobe medium Random strobe slow Shutter open Random opening pulse fast Random opening pulse slow Random closing pulse fast Random closing pulse slow Shutter open Reset fixture Shutter open Lamp on Shutter open Lamp off 2 2 0 255 0 100 Dimmer Closed open 3 0 255 0 100 Dimmer fine LSB If disabled in the control menu Reset fixture and Lamp off work only if the following effects are selected Both co...

Page 30: ...4 95 96 97 98 99 100 Color wheel 1 Continuous scroll Open Open slot 1 Slot 1 Medium blue Slot 1 slot 2 Slot 2 Light green Slot 2 slot 3 Slot 3 Deep orange Slot 3 slot 4 Slot 4 Light yellow Slot 4 slot 5 Slot 5 Pink Slot 5 slot 6 Slot 6 Magenta Slot 6 slot 7 Slot 7 Deep blue Slot 7 slot 8 Slot 8 Red Slot 8 open Open Stepped scroll Slot 8 Slot 7 Slot 6 Slot 5 Slot 4 Slot 3 Slot 2 Slot 1 Open Continu...

Page 31: ...4 95 96 97 98 99 100 Color wheel 2 Continuous scroll Open Open slot 1 Slot 1 Green Slot 1 slot 2 Slot 2 Purple Slot 2 slot 3 Slot 3 Sky blue Slot 3 slot 4 Slot 4 Deep golden amber Slot 4 slot 5 Slot 5 Aqua green Slot 5 slot 6 Slot 6 Deep purple Slot 6 slot 7 Slot 7 Light blue Slot 7 slot 8 Slot 8 CTC 5500 4200 K Slot 8 open Open Stepped scroll Slot 8 Slot 7 Slot 6 Slot 5 Slot 4 Slot 3 Slot 2 Slot ...

Page 32: ... on channel 6 basic or 9 extended Gobo 1 slow fast Gobo 2 slow fast Gobo 3 slow fast Gobo 4 slow fast Gobo 5 slow fast Gobo 6 slow fast Continuous gobo rotation with shake set gobo rotation speed on channel 6 basic or 9 extended Gobo 6 slow fast Gobo 5 slow fast Gobo 4 slow fast Gobo 3 slow fast Gobo 2 slow fast Gobo 1 slow fast Gobo wheel scroll with continuous gobo rotation set gobo rotation spe...

Page 33: ...l Slot 9 Slot 8 Slot 7 Slot 6 Slot 5 Slot 4 Slot 3 Slot 2 Slot 1 Open Continuous wheel rotation CW fast slow CCW slow fast Random gobo Fast Medium Slow 9 12 0 15 16 55 56 95 96 135 136 175 176 215 216 255 0 5 6 21 22 37 37 53 54 69 70 84 85 100 Macros No macro Static gobo wheel shake slow fast Color wheel 1 shake slow fast Color wheel 2 shake slow fast Static gobo wheel and color wheel 1 shake slo...

Page 34: ...ride Tracking menu override Blackout while moving 19 25 0 2 3 245 246 251 252 255 0 2 3 245 246 248 249 251 252 255 0 245 246 248 249 251 252 255 0 251 252 255 0 1 1 96 96 98 99 100 0 1 1 96 96 97 98 99 100 0 96 96 97 98 99 100 0 98 99 100 Effects speed Dimmer iris zoom and focus Tracking Vector control fast slow Tracking Blackout while moving Color wheels static gobo wheel Tracking Vector control...

Page 35: ...d set via the control menu or via DMX Optimize effects for speed Optimize effects for silence studio mode Display remains on Display extinguishes 2 minutes after last key press Display extinguishes 10 minutes after last key press Display adjusts automatically for ambient light level Adjust display intensity manually Disable lamp off via DMX Enable lamp off via DMX Enable reset via DMX Disable rese...

Page 36: ...utter Close shutter Fast strobe Medium strobe Slow strobe Dimmer Color wheel 1 open position Color wheel 1 filters 1 8 Color wheel 1 continuous rotation CW and CCW fast medium and slow Color wheel 1 random rotation fast medium and slow Color wheel 2 open position Color wheel 2 filters 1 8 Color wheel 2 continuous rotation CW and CCW fast medium and slow Color wheel 2 random rotation fast medium an...

Page 37: ...ack from rotating effects See page 15 Disable position feedback from rotating effects Setting not saved See Adjustment submenu on page 38 OF offset Pan calibration adjustment range 1 255 Tilt calibration adjustment range 70 186 Dimmer calibration adjustment range 90 170 Color wheel 1 calibration adjustment range 103 153 Color wheel 2 calibration adjustment range 103 153 Gobo wheel 1 rotating gobos...

Page 38: ...ction Gobo wheel 2 static gobos gobo selection indexing Gobo wheel 2 scroll speed and direction 1 Iris diameter press Enter then use up and down arrows to select a value from 0 200 Iris closed Pulse opening fast closing slow Random pulse opening fast closing slow Test all effects in effects module For factory use Prism zoom and focus to adjustment positions Prism in Prism rotation direction and sp...

Page 39: ...Menu and press Up Resets fixture Hold Enter and press Up Strikes lamp Hold Enter and press Down Douses lamp Hold Menu and Enter while applying power Freezes pan and tilt Hold Up and press Down Invert display Table 4 Control menu shortcuts when service message LED is lit Displayed when lamp hours exceed average life Displayed if head temperature is too high Table 5 Service messages ...

Page 40: ...ay is stuck or if the lamp power feedback circuit fails The fixture may be operated but remote lamp on off may be affected Contact Martin service personnel for assistance Base temperature sensor error Lamp temperature sensor error Switchmode ballast side temperature sensor error there is a malfunction in the temperature sensing circuit Contact Martin service personnel for assistance Feedback error...

Page 41: ... is defective and disturbs data transmission on the link Unplug the XLR in and out connectors and connect them directly together to bypass one fixture at a time until normal operation is regained Have the fixture serviced by a qualified technician XLR pin out on fixtures does not match pins 2 and 3 reversed Install a phase reversing cable between the fixtures or swap pins 2 and 3 in the fixture th...

Page 42: ...42 MAC 575 Krypton Circuit board connections ...

Page 43: ... to infinity Zoom 14 30 2 1 1 Pan 540 Tilt 246 Position correction system Yes C O N T R O L A N D P R O G R A M M I N G Control channels 19 or 25 Setting and addressing Control panel with LED display 16 bit control Dimmer color wheels 1 2 rotating gobo indexing iris focus zoom pan tilt Movement control options Tracking and vector Protocol USITT DMX 512 1990 Receiver Opto isolated RS 485 Firmware u...

Page 44: ...erature 160 C 320 F Cooling Filtered forced air temperature regulated Total heat dissipation calculated 10 at 230 V 50 Hz 2800 BTU hr A P P R O V A L S EU safety EN 60598 1 EN 60598 2 17 EU EMC EN 55 015 EN 55 103 1 EN 61 547 US safety ANSI UL 1573 Canadian safety CSA C22 2 No 166 I N C L U D E D I T E M S GE CSR 575 S DE 70 lamp installed Two omega clamp attachment brackets with quarter turn fast...

Page 45: ... and of the Council of the European Union on WEEE Waste Electrical and Electronic Equipment as amended by Directive 2003 108 EC where applicable Help preserve the environment Ensure that this product is recycled at the end of its life Your supplier can give details of local arrangements for the disposal of Martin products ...

Page 46: ......

Page 47: ......

Page 48: ......

Reviews: