shut off, the folded paper may be removed from the exit ramp and conveyor.
NOTE: The user may find it easier
to run only a few sheets before running an entire stack. This way any adjustments can be made before run-
ning a large quantity of paper.
If hesitation occurs in the paper feeding, review machine set-up as described in
section
2.0
of this manual. Pay particular attention to paper guide placement. If the edges of the folded paper do
not line up, adjust the skew by turning the skew thumbscrew slightly. Retest with a few sheets and adjust as nec-
essary to square up the fold.
4.2 Manual Feed Operation of Multiple Sets
The Model 1701 is capable of folding single sheets or sets of
sheets up to 5 pages of #20 bond manually (one at a time).
To do so, set up the machine as described earlier in section
2.0
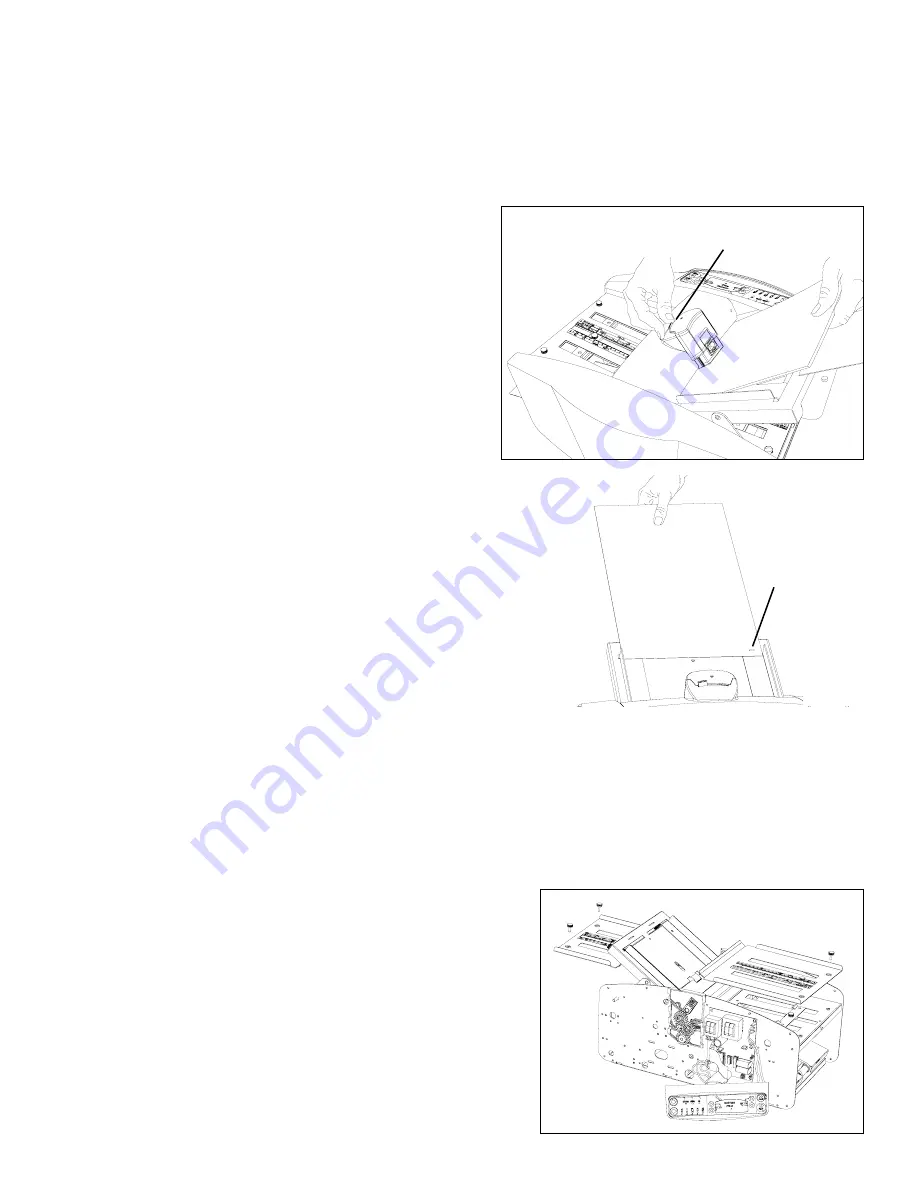
. With one hand, push the manual feed
lever
on the top
cover to raise the entire retarder and paper pusher assembly.
While holding the lever, insert the paper all the way under the
retarder until it stops, using the paper guides to keep it
square
(Fig. 14)
. The lever then can be lowered onto the
paper. Press the
Pulse Key
and hold until the folded paper
exits the conveyor.
4.3 Folding Stapled Sets of Paper
The Model 1701 is capable of folding stapled sets of paper up
to 5 sheets of #20 bond in the manual method described in
section
4.2
. However, a few simple rules must be followed to
prevent jams or roller damage. Always attach the staple par-
allel to the fold rollers. Always feed the stapled set in with the
stapled edge first
(Fig. 15)
. Avoid using loose fitting staples
or inserting them too close to the edge (less than 5/16",
8mm).
5.0 Maintenance
5.1 Fold Roller Removal and Cleaning
During normal operation, the fold rollers will become con-
taminated with paper dust, ink, copy toner and other per-
formance-inhibiting materials. At some point this will cause problems such as wrinkling or marking the paper and
even miss-folds or paper jams. At this time, cleaning the rollers will be necessary. Follow these steps to remove
the roller assembly:
1. Before turning the power off, use the custom fold button (
key C
) to move the 2nd fold paper stop out to its
longest position.
2. Turn off the power and disconnect the power cord from the outlet.
3. Remove (6) Philips pan head screws from each of the side covers. Remove the side covers by leaning them
out at the top and sliding outward at the bottom. Be careful with the electronic control display and switch wires
on the right cover.
4. Remove the drive belt by loosening
(do not remove)
the four
nuts on the motor and sliding the motor to the left. Slip the
belt off the top edge of the large pulley, then the motor pul-
ley. Do not over tighten the belt tension during re-installation.
5. Remove the four thumbscrews securing the 1st and 2nd
upper fold tables. Pull the upper fold tables straight out a
few inches to disengage the bearing blocks. The upper
tables can then be lifted out of the way
(Fig. 16)
.
6. Lower the feed table by pulling the feed table legs away
from the folder and letting the feed table down.
7. Remove the top cover assembly via the four Philips flat
head screws. Be careful not to damage the exposed paper
pusher spring or retarder during handling.
Fig. 15
Always feed the
stapled set in
with the stapled
edge first and
parallel to the
fold rollers
Fig. 14
Push spring loaded
lever
away
from operator
and insert paper into the folding rollers
Fig. 16
(6)


