


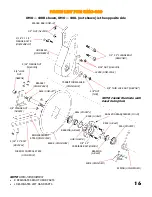


STEP 5 : INSTALLING THE OPTIONAL CAM ADJUSTMENT ASSEMBLY
This step is unnecessary if using the standard threaded adjustment bolt (see page 7)
IMPORTANT:
The cam installation shown in the picture is for the right UMO configuration. For a
left UMO configuration, install the same cam assembly with the cam pointing forward on the oppo-
site side.
1)
Mount the cam block to the frame using the four
3/8”
button head bolts.
2)
Slide the
1/2”
x
4”
bolt through the knob, spring, and support block and thread it into the cam.
3)
Tighten the bolt until the cam is directly adjacent the support block but still loose enough to be
disengaged from the pin by pushing on the knob.
4)
Install the
1/2”
nut on the end of the bolt and tighten securely against the cam. Torque to 57 ft
-
lbs.
7
1/2”
x4
”
Bolt
(B5M12NC4)
KNOB
(CA
-
32)
SPRING
(CA
-
34)
3/8”
BUTTON
HEAD BOLT X 4
(B5B38112)
1/2”
FLANE NUT
(N12CFL)
CAM BLOCK
(CA
-
31)
CAM
(CA
-
30)
Summary of Contents for UMO-WA1360
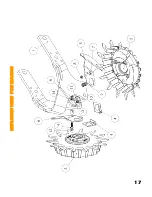
Page 18: ...EXPLODED VIEW FOR WA1360 17 ...
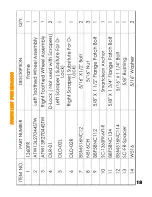
Page 19: ...PARTS LIST FOR WA1360 18 ...


