Martec MLXS524WS Installation Manual Download Page 6

Press button SW4 and hold for 2 seconds - The LED will illuminate and rotate towards the direction of 
detection. After 3  minutes of walk test the Sentinel Security Light will reset to Night Time operation only. 
Should further walk test be required press SW4 again for 2 seconds.

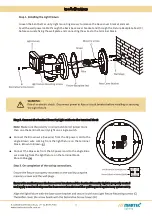
On turning the power on the Sentinel Security Light will start a self-calibration program .During this process 
you will notice a f lashing green LED light rn the detector lens .

Once the green light becomes stable and the Sentinel Security Light is ready for normal operation.

The Sen nel Security Light is designed to be "plug and play" most installa ons will require li le or no 

adjustment and can rely on the original default se ngs :

Af ter the comple on of the installat ion switch the power back on

R

Press and release the  SWI button to start sensitivity setting.
The LEDs 1-4 above the buttons will  indicate the setting selected・
1 - High 12 meters. 2 - Medium  9 meters. 3 - Low 6 meters.
Press and hold the  SWI  button for 2 seconds to conf irm and save the sensitivity choice.

Night time mode setting - The f ixture has a built-in photocell that will automatically enable the f ixture 
functions at sunset and of f at dawn , therefore there is no need for a additional Lux setting function 
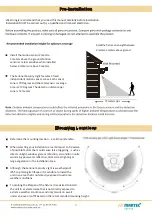
Motorized function to rotate the LED head towards motion detection within 3 sensor zones
Sensor sensitivity set at high setting at a maximum distance of 12


meters

Summary of Contents for MLXS524WS

Page 1: ...ons carefully prior to installstion and retain them for future reference Failure to follow any of these instructions could void product warranties Sentinel InstaIIation Guide Sentinel InstaIIation Guide Sentinel InstaIIation Guide MLXS524WS MLXS524MS ...

Page 2: ...wiring the Sentinel Security Light fixture to the power supply R Where other lights could shine on the sensor you may contact Martec customer service with the National AS NZS Electrical Code Near the outlet of a central heating unit or near an air conditioning unit ...

Page 3: ... directly exposed to extreme weather conditions Determine the mounting location a solid is preferable R Install the fixture on a height between 2 meters 3 meters above ground 12 meters plus To prolong the lifespan of the fixture it is advised to install the unit in a selected area that is not directly exposed to extreme weather conditions and only mount on a wall under an eave or soffit based on t...

Page 4: ...R ...

Page 5: ...ecurity Light mounting screws to remove the base cover bracket and seal Feed the wall power cable through the back base cover bracket and through the Fixture Backplate Seal C before securely fixing the wall plate and connecting the wires to the terminal block Connect the Brown wire live wire from the AC power cord to the single Brown wire coming from the light fixture on the terminal block Brown t...

Page 6: ...play most installa ons will require li le or no adjustment and can rely on the original default se ngs After the comple on of the installation switch the power back on R Press and release the SWI button to start sensitivity setting The LEDs 1 4 above the buttons will indicate the setting selected 1 High 12 meters 2 Medium 9 meters 3 Low 6 meters Press and hold the SWI button for 2 seconds to confi...

Page 7: ...to the Sentinel Security Light for about 10 seconds then turn back on The Sentinel Security Light will then go through its calibration warm up routine in preparation for normal operation The Sentinel Security Light is set in Night Mode R 1 Detection Method Passive Infrared Sensor PIR PIR measures infrared light radiating from a person or object in its field of view 2 Sensor Range up to 12 meters a...

Reviews: