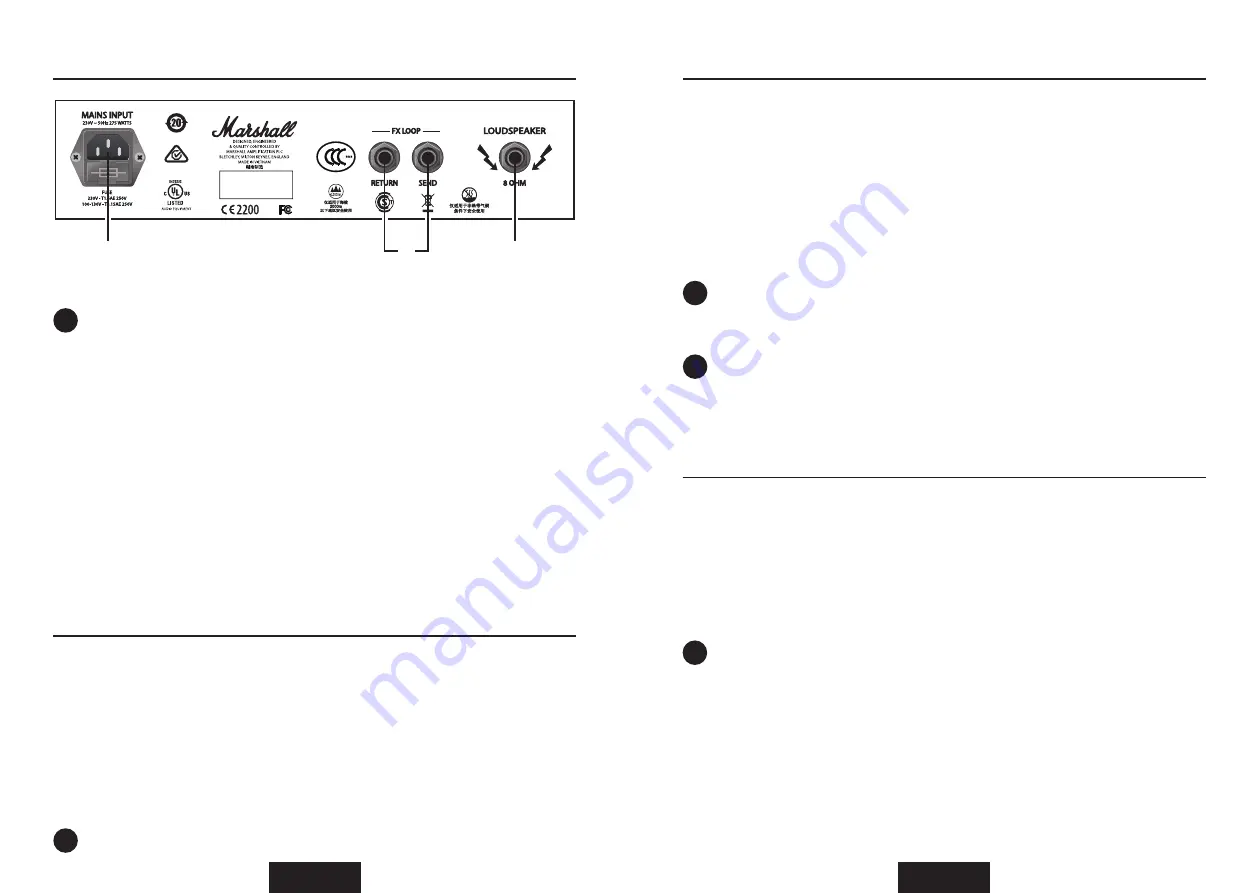
24. MAINS INPUT
Connects the amplifier to the mains power supply.
25. FX LOOP
Connect external FX pedals or a signal processor here. The FX LOOP is post DSP in the
signal chain.
26. SPEAKER OUTPUT (CODE100H ONLY)
Connect a speaker cabinet here.
IMPORTANT
- Do NOT connect a speaker cabinet of less than 8 Ohm, and NEVER use
CODE100H without a spekaer cabinet connected.
ENGLISH
EDITING A PRESET
• Hold down the Section Switch that you wish to edit (#15 - #21 in this manual).
• The display screen will show the current section’s settings.
• Turn the EDIT selector (#10 in this manual) to scroll through the different options within
the current
section: CL DSL, Plexi, JCM800, OD Silver Jubilee in AMP, or Chorus, Flanger,
Phaser, Tremolo in MOD, or Studio, Vintage, Multi, Reverse in DEL, for example.
• Push the EDIT selector to begin editing.
STORING A PRESET
To store an edited Preset, Store an edited Preset to a new location, and to rename an
edited Preset:
• When you have finished editing, press & hold EXIT/STORE briefly until the Preset name
begins to auto-scroll to the left into the Preset number.
• If you wish to store your edited Preset to another location, turn the PRESET selector to
find a new location, then press & hold EXIT/STORE until STORED appears on the display
screen.
Speaker cabinet models are not editable.
!
To learn how to store an edited Preset, refer to STORING A PRESET in this manual.
!
If you wish to keep your edited settings ensure that you store before moving off that
Preset.
!
Be sure that you want to store to the Preset location that you have selected, as the Preset
in that location will be overwritten.
!
To edit PRE FX, AMP, MOD, DEL, REV, POWER and CAB section settings:
ENGLISH
To rename the edited Preset and store to the current location:
• While the Preset name auto-scrolls to the left, press & hold EXIT/STORE again briefly
until the Preset name is displayed with arrows above and below the first letter or
character.
• Turn the EDIT selector to change the letter or character.
• Turn the PRESET selector to move to the next letter or character, or back to a previous
letter or character.
• Repeat until you have renamed the Preset.
REAR PANEL FUNCTIONS
!
• Turn the EDIT selector to edit the highlighted parameter. You will see the parameter
value change on the screen as you turn.
• When you are happy with your edited parameter value, push the EDIT selector to move
to the next parameter (if there is one).
• Turn the EDIT selector to edit the newly highlighted parameter.
• Repeat for all parameters and parameter values of the Sections that you wish to edit.
• When you are happy with your edited Preset you can store it to your CODE amplifier’s
memory.
• If you wish exit without storing your edits, press EXIT/STORE (# 22 in this manual).
This will return you to the main Preset screen.
EDITING A PRESET (CONT.)
24
25
26
!
The MAINS INPUT socket has an integrated fuse compartment. Ensure that the value
of a replacement fuse matches the labelling on the amplifier rear panel. You MUST
ALWAYS switch the amplifier OFF and disconnect it from the mains electricity supply
before attempting to access the fuse compartment. If in doubt, contact your Marshall
Dealer.


