


3
connect to the Wireless network which you want to use.
1
2
3
Make sure your mobile device has already been
.
Connect the power supply of the AC, activate the AP mode
(Read the WIRELESS MODE IN USER’S MANUAL or
INSTRUCTION MANUAL for detailed operations.).
When AP appears in the display, It means that the AC
WIRELESS has already entered into AP Mode. User can
do the next step in configuration.
Some type of AC’s do not need the step to be in AP
mode.
2
4
USER MANUAL OF SMART KIT
Align the QR co de within the fram e to scan
8:08 AM
50%
QR Code
IMPORTANT NOTE:
Read the manual carefully before connecting your
Smart kit(Wireless module). Make sure to save this
manual for future reference.
1
2
Click "
"
Enter your email address
and password, and then
click "
"
Registration
0
Crea Acc
Fo
rgot password?
CAUTION
: The following QR Code is only available
for downloading APP. It is totally different with
the QR code packed with unit.
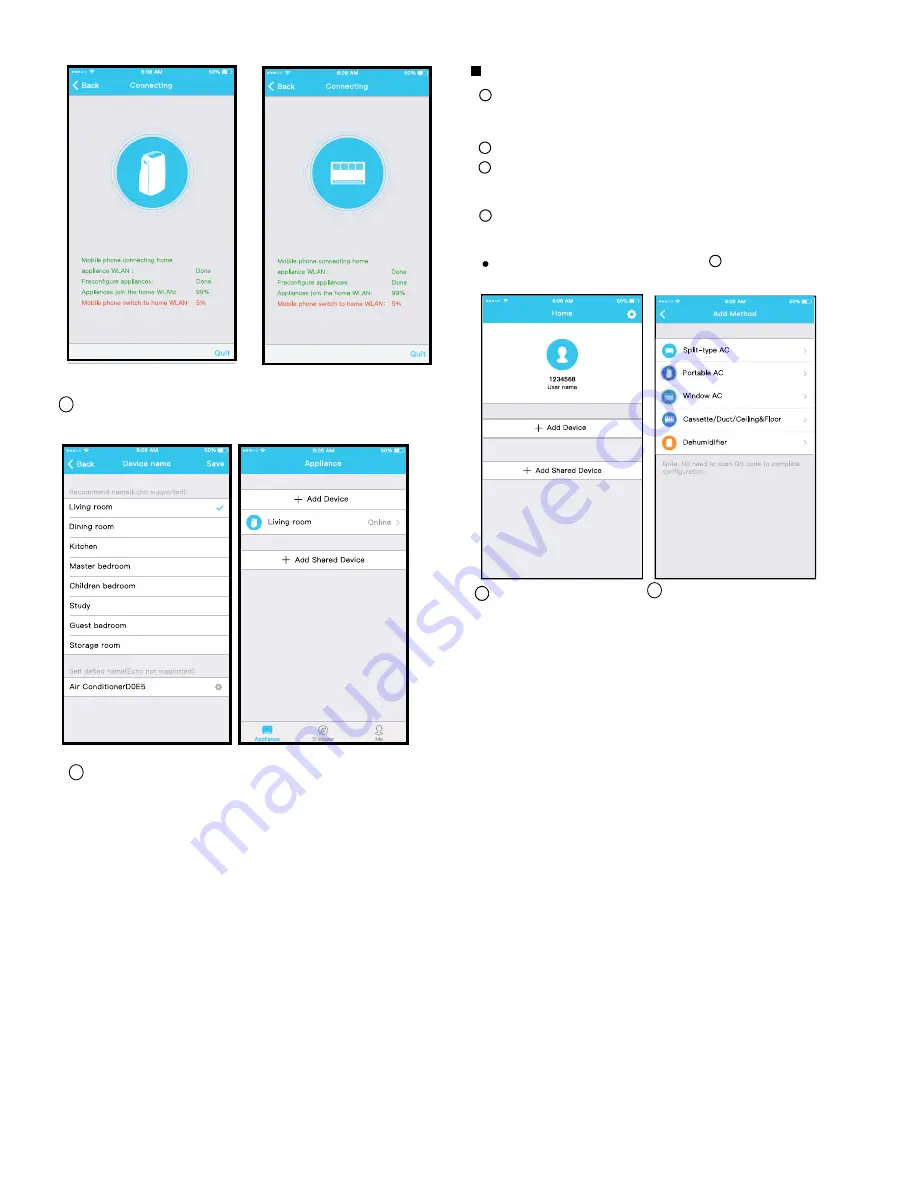
Using iOS device to do a network configuration
5 Press “ + Add Device ”
6 Select the appliance you
are setting up
1
SPECIFICATION
DECLARATION OF CONFORMITY
Model:
EU-OSK103,US-OSK103
Standard: IEEE 802. 11b/g/n
Antenna Type: Printed PCB Antenna
Frequency : WLAN 2400~2483.5 MHz
Operation Temperature:0 C~45 C/32 F~113 F
Operation Humidity: 10%~85%
Power Input: DC 5V/300mA
Maximum Transmitted Power: 19.8dBm Max
5
NETWORK CONFIGURATION
2
PRECAUTIONS
3
DOWNLOAD AND INSTALL APP
4
USER REGISTRATION
Hereby, we declare that this AC is in compliance
with the essential requirements and other
relevant provisions of Directive 2014/53/EU.
A copy of the full DoC is attached.
Android
iOS
Android Phone users: scan Android QR code or go to
google play, search ‘NetHome Plus” app and download it.
iOS users: scan iOS QR code or go to APP Store,
search ‘NetHome Plus” app and download it.
5 Press “ + Add Device ”
6 Select the appliance you
are setting up
7 Follow the above steps to enter “AP” mode.
8 Choose the network
configuration method.
9 Choose the “ Scan the
QR code ” method.
10
Or choose the “Manual
Setup” method.
Please enter password
13
Network configuration is
successful
for Portable AC
for Window AC
for Portable AC
for Window AC
for Portable AC
for Window AC
for Portable AC
for Window AC
for Portable AC
for Window AC
for Portable AC
for Window AC
12
11
7 Follow the above steps to enter “AP” mode.
Configuration Success,
you can see the device
on the list.
Network configuration is
successful
10
8
Connect to the Wireless
network.
Please enter password
9
Sign up
• Applicable system: iOS, Android.
- Please keep your APP up to date with the latest version.
- Due to special situation that may occur, we explicitly claim
the following; Not all of the Android and iOS systems are
compatible with this APP. We will not be responsible for any
issues as a result of the incompatibility.
• Wireless safety strategy
Smart kit only supports WPA-PSK/WPA2-PSK encryption
and not encryption WPA-PSK/WPA2-PSK encryption is
recommended.
• Cautions
- Smartphone camera needs to be 5 million pixels or above
to make sure scanning the QR code will work.
- Due to different network situations sometimes, a request
time-out could happen, thus, it is necessary to do a network
configuration again.
- The APP system is subject to updates wirhout prior notice
for product function improvement. The actual network
configuration process may be slightly different from the
manual, the actual process shall prevail.
- Please Check the Service Website For More information.
• Please ensure your mobile device is connected to a Wireless
router. Also, the Wireless router has already connected to Internet
before doing user registration and network configuration.
• It is better to log into your email box and activate your registration
account by clicking link in case you forgot the password. You can
log in with the third party accounts.
Cautions
• It is necessary to make sure the Android or iOS device just
connects to the Wireless network you want to configure.
• Make sure the Android or iOS device Wireless function works well
and can be connected back to your original Wireless network
automatically.
Reminder:
User must finish all the steps in 8 minutes after powering on AC,
otherwise you will need to power it on again, and start over.
• Using Android device to do the network configuration
1. Make sure your mobile device has already been connected to the
wireless network which you want to use.
2. Disconnect the power supply of the AC.
3. Connect the power supply of the AC, activate the AP mode (The
pictures in the manual are for explanation purposes only. Your
machine may be slightly different. Read the WIRELESS MODE IN
USER’S MANUAL or INSTRUCTION MANUAL for detailed
operations.)
4. When AP appears in the display, it means that the AC WIRELESS
has already entered into AP mode. User can do the next step of
configuration.
• Some type of AC’s do not need the 2 step to be in AP mode.
Disconnect the power supply of the AC.
connect to the Wireless network which you want to use.
1
2
3
Make sure your mobile device has already been
.
Connect the power supply of the AC, activate the AP mode
(Read the WIRELESS MODE IN USER’S MANUAL or
INSTRUCTION MANUAL for detailed operations.).
When AP appears in the display, It means that the AC
WIRELESS has already entered into AP Mode. User can
do the next step in configuration.
Some type of AC’s do not need the step to be in AP
mode.
2
4
USER MANUAL OF SMART KIT
Align the QR co de within the fram e to scan
8:08 AM
50%
QR Code
IMPORTANT NOTE:
Read the manual carefully before connecting your
Smart kit(Wireless module). Make sure to save this
manual for future reference.
1
2
Click "
"
Enter your email address
and password, and then
click "
"
Registration
0
Crea Acc
Fo
rgot password?
CAUTION
: The following QR Code is only available
for downloading APP. It is totally different with
the QR code packed with unit.
Using iOS device to do a network configuration
5 Press “ + Add Device ”
6 Select the appliance you
are setting up
1
SPECIFICATION
DECLARATION OF CONFORMITY
Model:
EU-OSK103,US-OSK103
Standard: IEEE 802. 11b/g/n
Antenna Type: Printed PCB Antenna
Frequency : WLAN 2400~2483.5 MHz
Operation Temperature:0 C~45 C/32 F~113 F
Operation Humidity: 10%~85%
Power Input: DC 5V/300mA
Maximum Transmitted Power: 19.8dBm Max
5
NETWORK CONFIGURATION
2
PRECAUTIONS
3
DOWNLOAD AND INSTALL APP
4
USER REGISTRATION
Hereby, we declare that this AC is in compliance
with the essential requirements and other
relevant provisions of Directive 2014/53/EU.
A copy of the full DoC is attached.
Android
iOS
Android Phone users: scan Android QR code or go to
google play, search ‘NetHome Plus” app and download it.
iOS users: scan iOS QR code or go to APP Store,
search ‘NetHome Plus” app and download it.
5 Press “ + Add Device ”
6 Select the appliance you
are setting up
7 Follow the above steps to enter “AP” mode.
8 Choose the network
configuration method.
9 Choose the “ Scan the
QR code ” method.
10
Or choose the “Manual
Setup” method.
Please enter password
13
Network configuration is
successful
for Portable AC
for Window AC
for Portable AC
for Window AC
for Portable AC
for Window AC
for Portable AC
for Window AC
for Portable AC
for Window AC
for Portable AC
for Window AC
12
11
7 Follow the above steps to enter “AP” mode.
Configuration Success,
you can see the device
on the list.
Network configuration is
successful
10
8
Connect to the Wireless
network.
Please enter password
9
Sign up
• Applicable system: iOS, Android.
- Please keep your APP up to date with the latest version.
- Due to special situation that may occur, we explicitly claim
the following; Not all of the Android and iOS systems are
compatible with this APP. We will not be responsible for any
issues as a result of the incompatibility.
• Wireless safety strategy
Smart kit only supports WPA-PSK/WPA2-PSK encryption
and not encryption WPA-PSK/WPA2-PSK encryption is
recommended.
• Cautions
- Smartphone camera needs to be 5 million pixels or above
to make sure scanning the QR code will work.
- Due to different network situations sometimes, a request
time-out could happen, thus, it is necessary to do a network
configuration again.
- The APP system is subject to updates wirhout prior notice
for product function improvement. The actual network
configuration process may be slightly different from the
manual, the actual process shall prevail.
- Please Check the Service Website For More information.
• Please ensure your mobile device is connected to a Wireless
router. Also, the Wireless router has already connected to Internet
before doing user registration and network configuration.
• It is better to log into your email box and activate your registration
account by clicking link in case you forgot the password. You can
log in with the third party accounts.
Cautions
• It is necessary to make sure the Android or iOS device just
connects to the Wireless network you want to configure.
• Make sure the Android or iOS device Wireless function works well
and can be connected back to your original Wireless network
automatically.
Reminder:
User must finish all the steps in 8 minutes after powering on AC,
otherwise you will need to power it on again, and start over.
• Using Android device to do the network configuration
1. Make sure your mobile device has already been connected to the
wireless network which you want to use.
2. Disconnect the power supply of the AC.
3. Connect the power supply of the AC, activate the AP mode (The
pictures in the manual are for explanation purposes only. Your
machine may be slightly different. Read the WIRELESS MODE IN
USER’S MANUAL or INSTRUCTION MANUAL for detailed
operations.)
4. When AP appears in the display, it means that the AC WIRELESS
has already entered into AP mode. User can do the next step of
configuration.
• Some type of AC’s do not need the 2 step to be in AP mode.
Disconnect the power supply of the AC.


