background image


19 

EXERCISE INSTRUCTIONS


Each workout should include the following three parts:


1.  The Warm Up Phase 

This stage helps get the blood flowing around the body and the muscles working properly. It will also 
reduce the risk of cramp and muscle injury. It is advisable to do a few stretching exercises as shown 
below. Each stretch should be held for approximately 30 seconds, do not force or jerk your muscles 
into a stretch - if it hurts, STOP. 


2.    The Exercise Phase 

This is the stage where you put the effort in. After regular use, the muscles in your legs will become more flexible.   

Work to your targeted heart rate but it is very important to maintain a steady tempo throughout. The rate of work 

should be sufficient to raise your heartbeat into the target zone shown on the graph below. 


This stage should last for a minimum of 12 minutes though most people start at about 15-20 minutes               

20 


SIDE BENDS 


        OUTER THIGH


INNER THIGH


FORWARD 

BENDS


CALF / ACHILLES


Summary of Contents for 170620

Page 1: ...t Precautions Components Assembly Operation and Adjustment Maintenance Parts List Warranty Model JX 650W Retain This Manual for Reference 170620 OWNER S MANUAL MARCY JX 650W Motorized Treadmill IMPEX...

Page 2: ...r safety and benefit read this manual carefully before using the equipment As a manufacturer we are committed to provide you complete customer satisfaction If you have any questions or find there are...

Page 3: ...ile using the treadmill Do not wear loose clothes that could become caught in the treadmill Athletic support clothes are recommended for both men and women Always wear athletic shoes Never use the tre...

Page 4: ...Always unplug the power cord immediately after use before cleaning the treadmill and before performing the maintenance and adjustment procedures described in this manual Never remove the motor hood un...

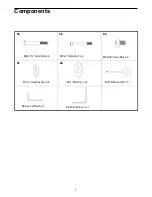
Page 5: ...4 Components Lubricating Oil Hardware Pack 1 Base Frame 5 Console Support Frame 52 Power Cord 45 Safety Key 3 Left Console Mast 4 Right Console Mast...

Page 6: ...5 Components 54 Multi Wrench QTY 1 84 87 68 66 M8x 3 Allen Bolt x 4 M8x3 Allen Bolt x 2 M8x5 8 Allen Bolt x 8 Lock Washer x 14 Washer x 14 6 Allen Wrench x 1 5 Allen Wrench x 1...

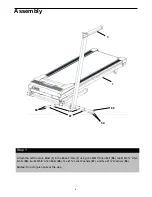
Page 7: ...ft Console Mast 3 to the Base Frame 1 using one M8x3 Allen Bolt 66 two M8x3 Allen Bolts 54 two M8x5 8 Allen Bolts 68 five Lock Washers 87 and five Washers 84 Notes Do not tighten bolts at this step St...

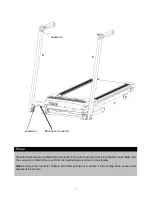
Page 8: ...up the lead wire from top of Right Console Mast until the connector on Main Wire is out from the handrail hole as shown in the diagram Notes Secure the connector on Main Wire after pulling out to ens...

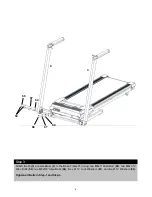
Page 9: ...ole Mast 4 to the Base Frame 1 using one M8x3 Allen Bolt 66 two M8x3 Allen Bolts 54 two M8x5 8 Allen Bolts 68 five x Lock Washers 87 and five Washers 84 Tighten all Bolts in Step 1 and Step 3 Step 3 3...

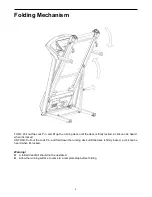
Page 10: ...mly locked a click can be heard when it s locked UNFOLD Pull out the Lock Pin and fold down the running deck until the deck is firmly locked a click can be heard when it s locked Warning A folded trea...

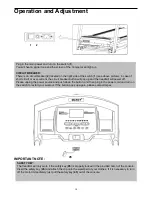
Page 11: ...sole Plug in the main power and turn on the switch 1 You will hear a signal tone and the screen of the Computer will light up CIRCUIT BREAKER There is an circuit breaker 2 located on the right side of...

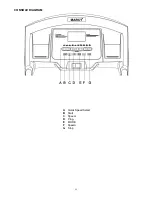
Page 12: ...11 CONSOLE DIAGRAM A Quick Speed Select B Start C Speed D Prog E MODE F Speed G Stop...

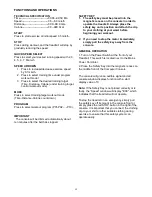
Page 13: ...magnetic recess on the console in order to operate the treadmill Always place the safety key on its position and attach the clip to your clothing at your waist before beginning your workout 2 If you...

Page 14: ...lly during your training and the treadmill will stop automatically when the Time window displays 0 00 TRAINING DISTANCE CONTROL WORKOUT MODEL Turn on the treadmill press the Mode key two times and the...

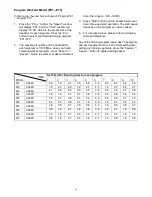
Page 15: ...ou have chosen 4 For all preset values please refer to following table and diagrams Any of the training program levels has 10 segments and each segment time is 1 10 of total setting time during any tr...

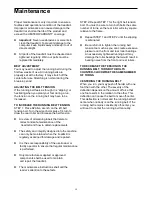
Page 16: ...ve to the frame Repeat STEP 1 and STEP 2 until the slipping is eliminated Be careful not to tighten the running belt tension too much as you can create excessive pressure on the front and rear roller...

Page 17: ...hes 4mile h 2 Observe whether the running belt is toward the right or left side of the deck a If toward the left side of the deck using 6 Allen Wrench turn the left adjustment bolt clockwise 1 4 turn...

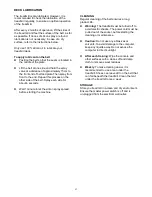
Page 18: ...e other side of the belt Spray each side for about 4 seconds Wait 1 minute to let the silicon spray spread before starting the machine CLEANING Regular cleaning of the belt ensures a long product life...

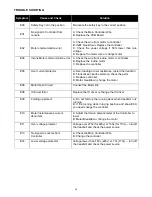
Page 19: ...ll B Transmission parts seized up check the parts C Replace controller D Motor breakdown change the motor E06 Motor Open Circuit Connect the Motor link E08 IC Driver Error Replace the IC driver or cha...

Page 20: ...not force or jerk your muscles into a stretch if it hurts STOP 2 The Exercise Phase This is the stage where you put the effort in After regular use the muscles in your legs will become more flexible W...

Page 21: ...ot to force or jerk your muscles into the stretch As you get fitter you may need to train longer and harder It is advisable to train at least three times a week and if possible space your workouts eve...

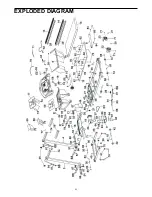
Page 22: ...21 EXPLODED DIAGRAM...

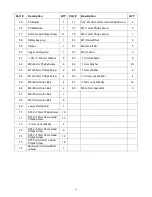
Page 23: ...rotective pipe 2 38 End cap 1 12 Running deck 1 39 End cap 2 13 Running belt 1 40 Cushion 1 14 Side rail 2 41 Shock pad 4 15 Console housing 1 42 Roller 2 16 Safety key cover 1 43 Washer 2 17 Display...

Page 24: ...6 62 M8 24mm Philips Screw 6 84 8mm Washer 20 63 M10 25mm Philips Screw 2 85 3mm Washer 2 64 M10 20mm Philips Screw 4 86 10mm Lock Washer 4 65 M8 60mm Allen Bolt 4 87 8mm Lock Washer 16 66 M8 80mm All...

Page 25: ...e product or other damages with respect to any economic loss loss of property loss of revenues or profits loss of enjoyments or use costs of removal installation or other consequential damages or what...

Reviews: