background image

2

Installation

Adequat air circulation should be around the appliance to prevent overheating. Please Keep at least 2'' on both sides and 

top of the refrigerator for ventilation, easy access and removal of shelves. 

Wherever possible the spacers of the product should be against a wall to allow for proper ventilation and


to prevent contact with warm parts such as the compressor or condenser.

The appliances must not be located close to radiators or cookers.

Make sure that the main plug is accessible after the installation of the appliance.

WARNING! 

The electrical outlet must be easily accessible after installation in the event you need to 

disconnect the refrigerator from the main power outlet.

Before plugging in, ensure that the voltage and frequency shown on the rating plate correspond to your power supply. 

The appliance must be ''grounded'' and the power cord plug is provided with a ''ground'' for this purpose.

If the power supply socket is not ''grounded'', connect the refrigerator to a separate ''ground'' in compliance with local and 

Federal regulations after consulting a certified electrician. The manufacturer declines all responsability if the above safety 

precautions are not observed. This appliances complies with the E.E.C. Directives.

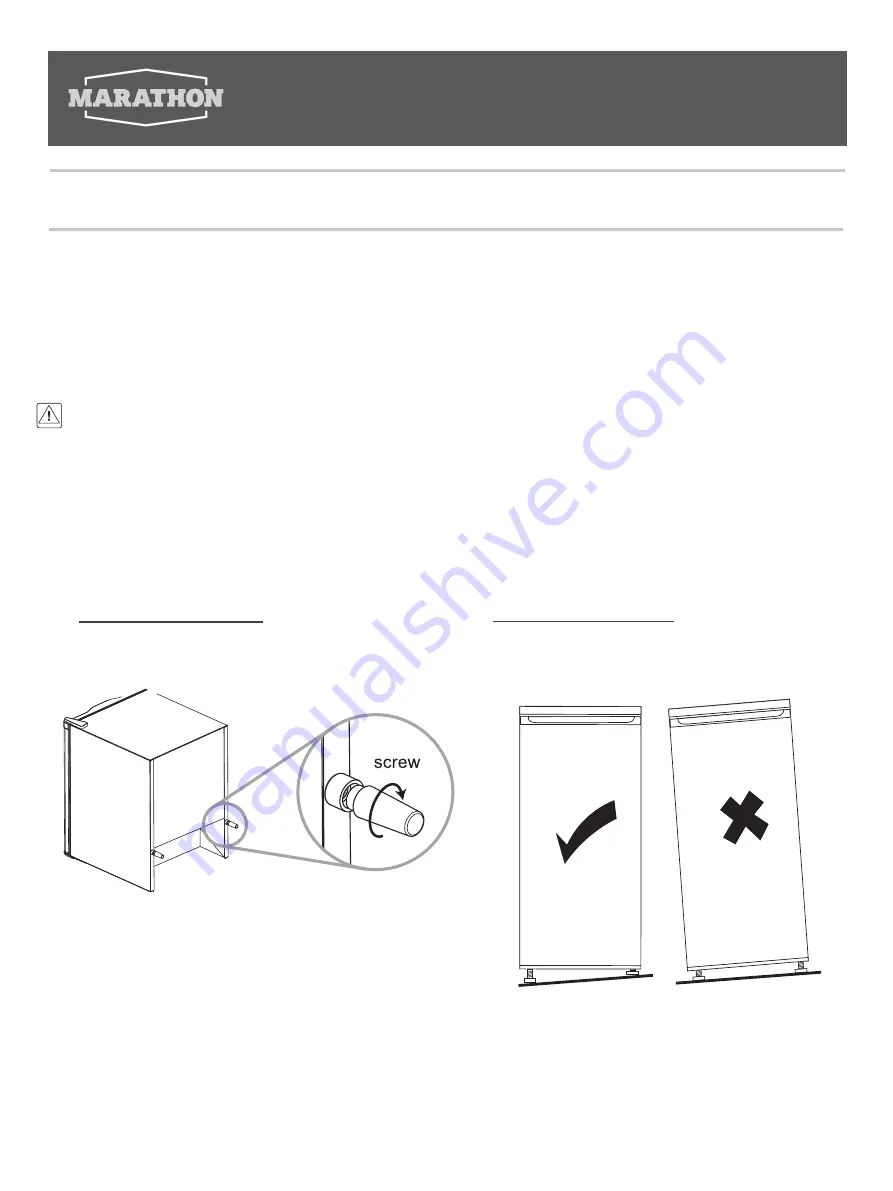
Rear Spacer

s

 (if supplied)

Install the rear spacer at the rear of the

appliances to provide ventilation

Level

l

ing the Refrigerator

Adjust the two levelling feet at front of the

R

efrigerator. If the refrigerator is not level,

the door may not close and seal properly.

MAR45W/MAR45BLS

Summary of Contents for MAR45BLS

Page 1: ...closed Warranty Registration Card We are confident you will have years of hassle free enjoyment and ask that you please retain the Use Care Guide for future reference and your safety Before installing...

Page 2: ...ent please take the following precautions before throwing out the refrigerator Remove door from the unit Leave the shelves in place so thaht children may not easily climb inside Never allow children t...

Page 3: ...rigerator from the main power outlet Before plugging in ensure that the voltage and frequency shown on the rating plate correspond to your power supply The appliance must be grounded and the power cor...

Page 4: ...do re installation of the door After completing the door reversal allow the unit to stand for 4 hours this will allow the coolant system to settle It is best if 2 people assist in changing the door s...

Page 5: ...soft pad Unscrew the bottom hinge and levelling foot 6 Unscrew and remove the bottom hinge pin turn the bracket over insert and re install to the same location 7 Install the hinge and leg from the ri...

Page 6: ...and 7 is the coldest setting Accesories To permit storage of food packages of various sizes the adjustable door bins can be replaced at different heights To adjust pull gently the door bin upwards unt...

Page 7: ...allation of the appliance be certain that none of the components of the refrigerant circuit become damaged It is dangerous to alter the speci cations or modify this product in any way Any damage to th...

Page 8: ...he door will not close properly The refrigerator is not on a level surface The gasket is dirty A storage basket is out of position This is the normal Metal parts undergo expansion and contraction The...

Page 9: ...shelves racks light bulbs etc Punctures to the evaporator system due to improper defrosting of the unit Service or Repair by unauthorized service technicians Service calls that do not involve defects...

Reviews: