background image

17

ENGLISH

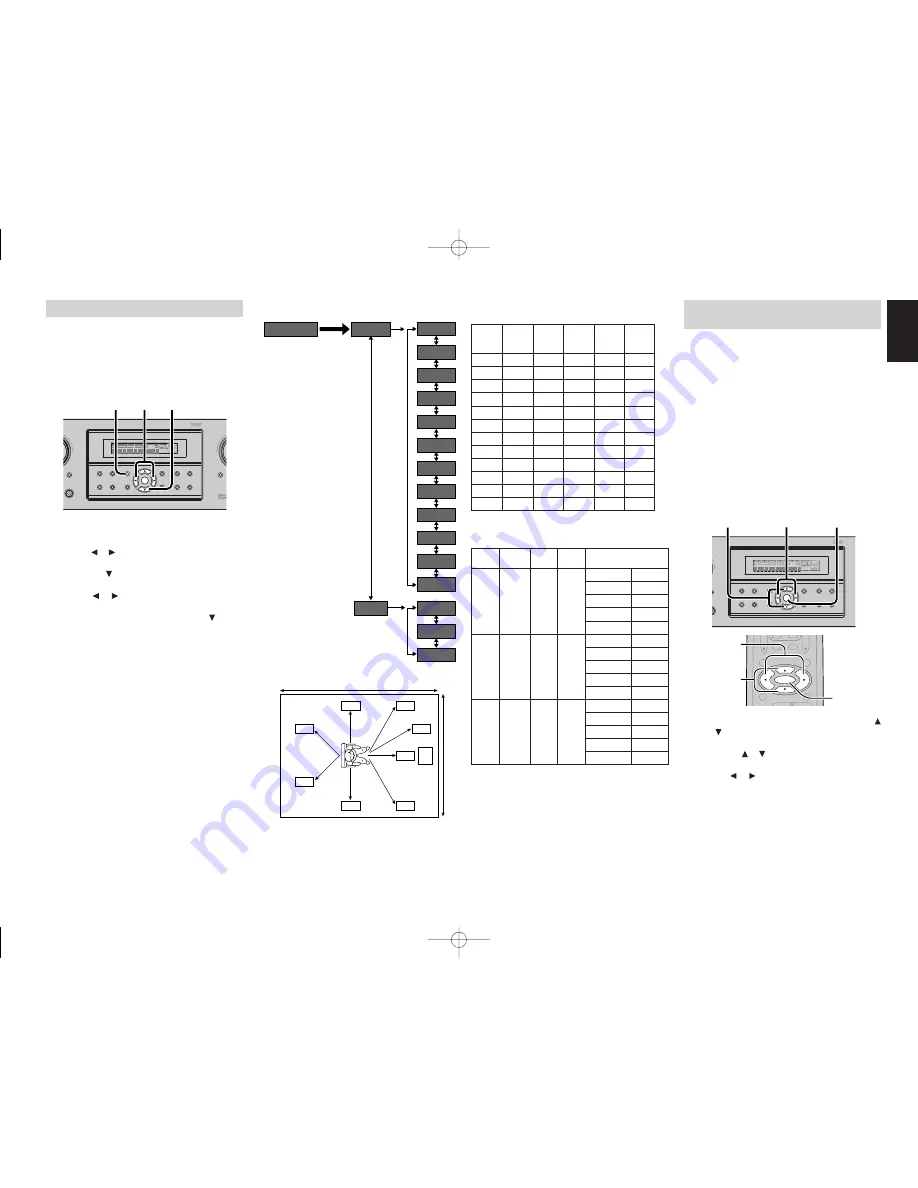
1. INPUT SETUP
(ASSIGNABLE DIGITAL INPUT)

Four digital inputs can be assigned as the desired
source.
Use this menu to select the digital input jack to be
assigned to the input source.
The Input Setup consists of 6 items, which are as
below.

• D1AUTO to D4AUTO : Digital AUTO mode

If the input signal from the selected source is digital
signal, this unit chooses a digital input automatically.

• DIG.1 to DIG.4 : Digital FIXED mode

The SR4600 chooses a digital input regardless of
a input signal from the selected source.

• ANA : Analog mode

Use this menu to select the digital input jack to be
assigned to the input source.

1.

Select “1.INPUT” in SETUP MENU with the 
or   cursor button.

2.

Press the 

ENTER 

button to enter the menu.

3.

Press the   or   cursor button to select the input
source.

4.

Press   or   cursor button to select the input
function.
Select “DxAUTO”,  “DIG.x” or “ANA” for input
sources.

The relation of the speakers number and
conectted speaker

The relation of the room size and floor space

The relation of the room size and floor space is a
roughly standard.

Front

Front

Surround Surround

Sub

CHANNEL

L/R

Center

L/R

Back L/R

woofer

(F)

(C)

(S)

(SB)

(SW)

7.1 ch

LARGE

SMALL

SMALL

2ch

YES

7.0 ch

LARGE

SMALL

SMALL

2ch

NONE

6.1 ch

LARGE

SMALL

SMALL

1ch

YES

6.0 ch

LARGE

SMALL

SMALL

1ch

NONE

5.1 ch

LARGE

SMALL

SMALL

NONE

YES

5.0 ch

LARGE

SMALL

SMALL

NONE

NONE

4.1 ch

LARGE

NONE

SMALL

NONE

YES

4.0 ch

LARGE

NONE

SMALL

NONE

NONE

3.1 ch

LARGE

SMALL

NONE

NONE

YES

3.0 ch

LARGE

SMALL

NONE

NONE

NONE

2.1 ch

LARGE

NONE

NONE

NONE

YES

2.0 ch

LARGE

NONE

NONE

NONE

NONE

SIMPLE SETUP

You can setup the speaker conditions quickly with
SIMPLE SETUP menu. In this menu, the number
of speakers and speaker delay time can be set.
These settings can be changed more detail in “2.
SPEAKER” setup menu.
Press the 

SIMPLE SETUP

 button on the unit to

enter this menu.

1.

Press the 

SIMPLE SETUP

 button on the unit

to enter the “SPEAKERS” menu.

2.

Press   or   cursor button to select the speaker
number.

3.

Press the   cursor button to enter the “ROOM”
menu.

4.

Press   or   cursor button to select the room
size.

5.

After finishing all setup, press the   cursor
button to exit the SIMPLE SETUP menu.

Note

• All Simple Setup menu is reset when the speaker

setting is changed with Speaker Setup menu.

SIZE

Floor

Width

Depth

Imaging Distance

space

(W)

(D)

Front (F)

6 ft. (1.8 m)

Center (C)

5 ft. (1.5 m)

SMALL

10 m

2

2.7 m

3.6 m

Surround (S)

4 ft. (1.2 m)

Surr. Back (SB)

5 ft. (1.5 m)

Sub Woofer (SW) 5 ft. (1.5 m)

Front (F)

7 ft. (2.1 m)

Center (C)

6 ft. (1.8 m)

MEDIUM

16 m

2

3.6 m

4.5 m

Surround (S)

5 ft. (1.5 m)

Surr. Back (SB)

7 ft. (2.1 m)

Sub Woofer (SW) 6 ft. (1.8 m)

Front (F)

9 ft. (2.7 m)

Center (C)

8 ft. (2.4 m)

LARGE

24 m

2

4.5 m

5.4 m

Surround (S)

7 ft. (2.1 m)

Surr. Back (SB)

8 ft. (2.4 m)

Sub Woofer (SW) 8 ft. (2.4 m)

MENU STRUCTURE of Simple Setup

3.0 (ch)

3.1 (ch)

2.0 (ch)

2.1 (ch)

4.0 (ch)

4.1 (ch)

5.0 (ch)

5.1 (ch)

6.0 (ch)

6.1 (ch)

7.0 (ch)

7.1 (ch)

LARGE

ROOM

MEDIUM

SMALL

SPEAKERS

SIMPLE SETUP

SL

SR

C

W

D

TV

SW

FR

FL

SBL

SBR

(F)

(F)

(S)

(S)

(C)

(SW)

(SB)

(SB)

DTS

PURE DIRECT

AUTO

T.TONE

MENU OFF

SET UP/

MENU

OSD

VOL.

TV

VOL.

MAIN

SLEEP

MUTE

ENTER

4. 5.

2. 5.

1. 3. 5.

SURROUND

SURROUND RECEIVER SR4600

DOWN

PHONES

MUTE

PURE

SETUP

DIRECT

SIMPLE

AUTO

HT-EQ

MENU

ENTER

DISPLAY

MEMORY

CLEAR

T-MODE

EXIT

BAND

MODE

DISP

MULTI

AUTO

TUNED

ST

V – OFF

NIGHT

PEAK

ANALOG

DIGITAL

ATT

SLEEP

SURR

AUTO

DIRECT

DISC 6.1

MT X 6.1

EQ

DIGITAL

SURROUND

AAC

PCM

L

C

R

SL

S

SR

LFE

S. SPEAKER B

2. 4. 3. 5.

1.

SURROUND

ND RECEIVER SR4600

D

NES

EAKER

PURE

SETUP

DIRECT

SIMPLE

AUTO

HT-EQ

MENU

ENTER

DISPLAY

MEMORY

CLEAR

T-MODE

EXIT

BAND

MODE

DISP

MULTI

AUTO

TUNED

ST

V – OFF

NIGHT

PEAK

ANALOG

DIGITAL

ATT

SLEEP

SURR

AUTO

DIRECT

DISC 6.1

MT X 6.1

EQ

DIGITAL

SURROUND

AAC

PCM

L

C

R

SL

S

SR

LFE

4. 5.

2. 5.

1. 3. 5.

SR4600N DFU̲01̲ENG 2̲2

05.5.20, 6:08 PM

Page 17

Adobe PageMaker 6.5J/PPC

Summary of Contents for SR4600

Page 1: ...Model SR4600 User Guide AV Surround Receiver SR4600N DFU 00 cover 05 5 20 6 05 PM Page 9 Adobe PageMaker 6 5J PPC ...

Page 2: ...twoordelijkheid van de consument een gedateerd bewijs van aankoop te tonen Uw kassabon of factuurzijn voldoende bewijs ESPAÑOL GARANTIA Para obtener información acerca de la garantia póngase en contacto con su distribuidor Marantz GUARDE SU RECIBO DE COMPRA Su recibo de compra es su prueba permanente de haber adquirido un aparato de valor Este recibo deberá guardarlo en un lugar seguro y utilizarl...

Page 3: ...nvironnement qui s appliquent à votre pays ou région Ne placez aucun object à moins de 0 2 mètre environ du panneau supérieur Veiller à ce qu aucun objet ne soit à moins de 0 2 mètre des côtés de l appareil Aucun objet rempli de liquide un vase par exemple ne doit être placé sur l appareil Lorsque l interrupteur est sur la position OFF l appareil n est pas complètement déconnecté du SECTEUR MAINS ...

Page 4: ...l apparecchio sorgenti di fiamme scoperte quali candele accese Smaltire le pile usate in conformità alle norme governative o disposizioni ambientali vigenti nel proprio paese o zona Non posare alcun oggetto sopra il pannello superiore lasciando libero uno spazio di circa 0 2 m Lasciare 0 2 metro liberi tutto intorno l unità Non mettere sull apparecchiatura alcun contenitore di liquido come ad esem...

Page 5: ...IO INPUT OR DIGITAL AUDIO INPUT 27 RECORDING AN ANALOG SOURCE 28 HT EQ 28 7 1 CH INPUT 28 7 1 CH INPUT LEVEL 29 BASIC OPERATION TUNER 30 LISTENING TO THE TUNER 30 PRESET MEMORY 30 RDS OPERATION 32 SURROUND SPEAKER B SYSTEM 33 MULTI ROOM PLAYBACK USING THE S SURROUND SPEAKER B TERMINALS 33 TROUBLESHOOTING 34 TECHNICAL SPECIFICATIONS 35 DIMENSIONS 35 INTRODUCTION Thank you for purchasing the Marantz...

Page 6: ...ound quality transparent to the original 96 24 master 2 Full backward compatibility with all existing decoders Existing decoders will output a 48 kHz signal 3 No new player required DTS 96 24 can be carried on DVD video or in the video zone of DVD audio accessible to all DVD players 4 96 24 5 1 channel sound with full quality full motion video for music programs and motion picture soundtracks on D...

Page 7: ...eaker drivers are covering the pinna of the ear the listening experience differs greatly from traditional speaker playback TruSurround utilizes patented headphone perspective curves to solve this problem and provides a non fatiguing immersive home theater listening experience TruSurround Headphone also delivers exceptional 3D audio from mono and stereo material Dolby Digital EX Dolby Digital DTS E...

Page 8: ...n This function is unavailable when the surround speaker B system is activated While this function is activated this function will be canceled if the S SPEAKER B button is pressed i SIMPLE SETUP button Press this button to enter the simple setup mode You can setup the speaker conditions speaker sizes number of speakers speaker delay times quickly by pressing the cursor buttons o DISPLAY button Whe...

Page 9: ... be illuminated 6 Main Information Display This display shows messages relating to the status input source surround mode tuner volume level or other aspects of unit s operation 7 DIRECT Pure direct indicator This indicator is illuminated when the SR4600 is in the PURE DIRECT mode 8 HDCD indicator When HDCD signal is decoded from digital input this indicator will light up j NIGHT mode indicator Thi...

Page 10: ...or output and each one includes both composite video and S video configurations b REMOTE CONT IN OUT terminals Connect to a Marantz component equipped with remote control RC 5 terminals z AUDIO IN OUT CD TAPE CD R MD TV DVD VCR1 DSS VCR2 These are the analog audio inputs and outputs There are 7 audio inputs 4 of which are linked to video inputs and 4 audio outputs 2 of which are linked to video ou...

Page 11: ...es the occurrence of an abruptly loud voice at night However the function is valid only in the case when the Dolby Digital signal is entered into OPTICAL or COAXIAL and data to compress the voice exists in the signal to be played back When this button is pressed the NIGHT indicator is illuminated REMOTE CONTROL OPERATION FUNCTION AND OPERATION The provided remote control unit is a universal re mot...

Page 12: ...ppliances Some codes may be not match your equipment In this case your equipment cannot be controlled with this remote controller PROGRAMMING WITH THE 4 DIGIT CODE 1 Press and hold down the Function Selector button for the appliance which should be controlled and press SETUP button until the indicator blinks twice 2 Press the 4 digit code for appliance code table at the end of this book 3 When the...

Page 13: ... control SR4600 in any function mode TUNER Selects a frequency band 0 9 Inputs the numeric s CLEAR Clears the inputting MEMO Enters the tuner preset memory numbers P SCAN V OFF Starts preset scan CHANNEL SKIP Selects a preset station 4 Changes a PTY type TUNE SEARCH Tunes a station 5 6 T MODE 1 2 Selects the auto stereo mode or mono mode RDS Selects the display mode in RDS F DIRECT 2 Selects the F...

Page 14: ...OK OK OK OK SETUP T TONE SETUP MENU MENU OFF CANCEL CANCEL MENU MENU 0 9 INPUT INPUT INPUT INPUT INPUT INPUT INPUT INPUT NUMERIC NUMERIC NUMERIC NUMERIC NUMERIC NUMERIC NUMERIC NUMERIC CLEAR INPUT TAPE INPUT INPUT INPUT INPUT INPUT INPUT CLEAR SPEED CLEAR CLEAR CLEAR CLEAR CLEAR CLEAR MEMO CALL CALL CALL CALL CALL PROGRAM PROGRAM PROGRAM PROGRAM PROGRAM CHANNEL SKIP 4 CH PREV PREV CH PREV PREV PRE...

Page 15: ...wall behind the listening position The center of the speaker should face into the room Subwoofer We recommend using a subwoofer to have maximum bass effect Subwoofer bears only low frequency range so you can place it any where in the room HEIGHT OF THE SPEAKER UNITS Front left and right speakers and a center speaker Align the tweeters and mid range drivers on the three front speakers at the same h...

Page 16: ... components have been completed Notes Insert all plugs and connectors securely Incomplete connections may make noise Be sure to connect the left and right channels properly Red connectors are for the R right channel and white connectors are for the L left channel Be sure to connect input and output properly Refer to the instructions for each component that is connected to this unit Do not bind aud...

Page 17: ...ponent has an S VIDEO output we recommend to use it Connect the S VIDEO output jack on your video component to the S VIDEO input jack on this unit Component jack Make component video connections to a TV or monitor with component inputs to produce higher quality video images Use a component video cable or 3 video cords to connect the component video out jacks on the SR4600 to the monitor Video conv...

Page 18: ...O PLAYER or SACD MULTI CHANNEL PLAYER Center Front Left Front Right Surround Left Surround Right Subwoofer CONNECTING THE REMOTE CONTROL JACKS MD DECK CD RECORDER q You can control other Marantz products through this unit with the remote control by connecting the REMOTE CONTROL terminals on each unit The signal transmitted from the remote control is received by the remote sensor on this unit Then ...

Page 19: ...ilar implements in the position that will cause the least amount of distortion If you experience poor reception quality an outdoor antenna may improve the quality Connecting the supplied AM loop antenna The supplied AM loop antenna is for indoor use only Set it in the direction and position it to where you receive the clearest sound Put it as far away as possible from the unit televisions speaker ...

Page 20: ...9 0m 30ft 10 0 10 0dB 0dB 0dB 0dB 0dB 0dB 0dB 0 0 LAST 10 0 10 10 0 10 10 0 10 10 0 10 10 0 10 10 0 10 0dB 15 0 10 0 1 2 3 4 5 6 LAST TV DVD V OFF OFF ON 0 10 OFF DEFAULT CUSTOM DEFAULT OFF OFF ON DIMENSION 3 0 1 2 3 4 5 6 C WIDTH Parameter Center Width 3 0 1 2 3 4 5 6 7 D4 AUTO D1 AUTO D3 AUTO ANALOG ANALOG ANALOG D2 AUTO SETUP MENU 0 3m 1ft 9 0m 30ft 0 1 2 3 4 5 6 SETUP After all components are ...

Page 21: ...n 2 SPEAKER setup menu Press the SIMPLE SETUP button on the unit to enter this menu 1 Press the SIMPLE SETUP button on the unit to enter the SPEAKERS menu 2 Press or cursor button to select the speaker number 3 Press the cursor button to enter the ROOM menu 4 Press or cursor button to select the room size 5 After finishing all setup press the cursor button to exit the SIMPLE SETUP menu Note All Si...

Page 22: ...large sized Select if no center speaker is connected Select if no surround left and right speakers are connected Select if the surround left and right speakers are large sized Select if the surround left and right speakers are small sized YES NONE LARGE SMALL SMALL L R CENTER LARGE NONE SMALL LARGE NONE SL SR Select if no surround back speaker is connected Select if the surround back left and righ...

Page 23: ... meter intervals C Set the distance from the center speaker to your normal listening position between 1 and 30 feet in 1 0 foot interval 0 3 to 9 meters in 0 3 meter intervals SL SR Set the distance from the surround left and right speaker to your normal listening position between 1 and 30 feet in 1 0 foot interval 0 3 to 9 meters in 0 3 meter intervals MENU STRUCTURE of Speakers Distance setup bu...

Page 24: ...rround Right SBR Surround Back Right SBL Surround Back Left SL Surround Left SW Subwoofer L increments of 2 seconds for each channel Using the and cursor buttons adjust the volume level of the noise from the speaker so that it is the same level for all speaker Press the ENTER button you can stop the test tone mode Or press the or cursor button to select EXIT then press the ENTER button to exit the...

Page 25: ...al range of LARGE are produced simultaneously from those channels and the subwoofer channel When actual low frequency sound volume is weak depending on room size use this function to fill low frequency sound equally in the room When Mix is selected subwoofer output is determined depending on the speaker sizes for each channels If the front speaker size is set to Large subwoofer output is only the ...

Page 26: ...he ENTER button Or press the or cursor button to select EXIT then press the ENTER button to exit the SETUP MENU PANORAMA Select the Panorama mode On or Off with or cursor button Panorama wraps the sound of the front left and right speakers around you for an exciting perspective DIMENSION Set the Dimension level between 0 and 6 level in 1 level interval with or cursor button Adjust the soundfield e...

Page 27: ...dB in steps of 1 dB However when the channel level is set as described on page 20 if the volume for any channel is set at 1 dB or greater the volume cannot be adjusted up to 18 dB In this case the maximum volume adjustment range is 18 dB Maximum value of channel level ADJUSTING THE TONE BASS TREBLE CONTROL During a listening session you may wish to adjust the Bass and Treble Control to suit your l...

Page 28: ...tra channel which has been added during the mixing of the program This channel called Surround Back places sounds behind the listener in addition to the currently available front left front center front right surround right surround left and subwoofer channels This additional channel provides the opportunity for more detailed imaging behind the listener and brings more depth spacious ambience and ...

Page 29: ...e signals from DTS laser disc or CD are playing in another Surround mode you cannot switch to digital input or from digital input to analog input by INPUT SETUP in SETUP MAIN MENU or the A D button The outputs for the VCR 1 OUT DSS VCR 2 OUT TAPE OUT and CD R OUT output analog audio signals Do not record from CDs or LDs that support DTS using these outputs If you do the DTS encoded signal will be ...

Page 30: ... ES O O O O O dts L C R SL SR LFE DOLBY Dolby D Surr EX Dolby Digital 5 1 O O O O O 2 DIGITAL L C R SL SR S LFE PL IIx movie Dolby D 5 1ch Dolby Digital 5 1 O O O O O 2 DIGITAL L C R SL SR LFE PL IIx music Dolby D 2ch Pro Logic IIx O O O O 2 DIGITAL L R PL IIx game Dolby D 2ch Surr Pro Logic IIx O O O O 2 DIGITAL 2 SURROUND L R S Pro Logic PCM Audio Pro Logic IIx O O O O PCM L R Analog Pro Logic I...

Page 31: ...ed the digital inputs you can temporarily select the audio input mode for each input source with the A D button on the remote controller When this button is pressed the input mode is switched in the following sequence Digital Auto Digital Analog Digital Auto In Digital Auto mode the types of signals being input to the digital and analog input jacks for the selected input source are detected automa...

Page 32: ...e played back in large movie theater environments Activating the HT EQ feature when watching a film made for movie theaters corrects this and restores the correct tonal balance The HT EQ feature can be activated only while in Dolby Pro Logic Mode or while decoding Dolby Digital or DTS encoded material SURROUND AV SURROUND RECEIVER SR4600 INPUT SELECTOR PHONES STANDBY 7 1CH INPUT PURE DIRECT AUTO H...

Page 33: ...each channel press the CH SEL button on the remote Adjust the speaker output levels so that you can hear the same sound level from each speaker at the listening position For the front left front right center surround left surround right and surround back speakers the output levels can be adjusted between 10 to 10 dB The subwoofer can be adjusted between 15 and 10 dB These adjustments result will b...

Page 34: ...s period the current station is memorized in location Preset 02 If you wish to skip the current station press the cursor button during this period this station is skipped and auto presetting continues 5 Operation stops automatically when all 50 preset memory positions are filled or when auto scanning attains the highest end of all bands If you desire to stop the auto preset memory at anytime press...

Page 35: ... 5 5 5 5 6 6 6 6 6 buttons on the remote alphabetic and numeric characters will be displayed in the following order A B C Z 1 2 3 0 Blank A UP DOWN 5 After selecting the first character to be entered press the MEMO or ENTER buttons press the MEMO button on the remote The entry in this column is fixed and the next column starts to flash Fill the next column the same way To move back and forth betwe...

Page 36: ...ired PTY is shown in the display CH SEL LIP SYNC PTY SUB T ATT AUDIO INPUT DISC F DIRECT RDS TUNE SEARCH T MODE TREBLE CHANNEL SKIP BASS A D P SCAN V OFF MEMO CLEAR 0 SYSTEM REMOTE CONTROLLER CH SEL LIP SYNC PTY SUB T ATT AUDIO INPUT DISC F DIRECT RDS TUNE SEARCH T MODE TREBLE BASS SYSTEM REMOTE CONTROLLER RC5500SR SURROUND R4600 PURE SETUP DIRECT SIMPLE AUTO HT EQ MENU ENTER DISPLAY MEMORY CLEAR ...

Page 37: ...n volume Notes for SURROUND SPEAKER B SURROUND SPEAKER B On Off is available in main room only SURROUND SPEAKER B output terminals can be used when the SURROUND BACK SPEAKER is set NONE in SPEAKER SETUP menu See SPEAKER SETUP page 18 The Surr Back Speakers are in use is displayed by pressing the S SPEAKER B button when the SURROUND BACK SPEAKER is set except NONE in SPEAKER SETUP menu See SPEAKER ...

Page 38: ...om the center speaker Set another Surround mode Make the correct setting Connect the cable correctly When STEREO has been selected for Surround mode no sound will be output from the surround speaker Set another Surround mode Make the correct setting Connect the cable correctly Set surround mode EX ES Make the correct setting SYMPTOM Can not select EX ES mode Can not select Pro Logic IIx mode Can n...

Page 39: ...nit with the following procedure The SR4600 is turned on press and hold the 7 1CH INPUT and ATT buttons simultaneously for 3 seconds or more Remember that the procedure will reset the settings of the function selector Surround mode delay time TUNER PRESET etc to their initial settings GENERAL MALFUNCTION If the equipment malfunctions this may be because an electrostatic discharge or AC line interf...

Page 40: ...sher 0101 Garrard 0466 0335 Harman Kardon 0209 0056 JVC 0271 0300 Kenwood 0097 Magnavox 0056 Marantz 0056 0036 Mitsubishi 0310 NAD 0171 Onkyo 0309 0163 0162 Optimus 0054 0247 0466 0364 Panasonic 0256 Philips 0056 Pioneer 0054 0247 0126 Polk Audio 0056 RCA 0054 0247 Revox 0217 Sansui 0056 0036 Sherwood 0364 Sony 0270 0197 0318 Teac 0335 Technics 0256 Victor 0300 Wards 0054 Yamaha 0124 0121 SAT DSS ...

Page 41: ...undesign 0207 0205 Squareview 0198 SSS 0207 Starlite 0207 Studio Experience 0870 Supreme 0027 SVA 0775 0892 Sylvania 0081 0057 0198 Symphonic 0207 0198 Tandy 0120 Tatung 1783 Technics 0277 0078 Techwood 0078 Teknika 0081 0207 0177 0087 0119 Telefunken 0729 TMK 0205 TNCi 0044 Toshiba 0181 0183 0087 1283 1383 1183 1731 0677 TVS 0490 Vector Research 0057 Victor 0080 Vidikron 0081 Vidtech 0205 Viewson...

Page 42: ...236 1506 iii DVD Aiwa 0668 Allegro 0896 Apex Digital 0699 0823 1031 1127 0821 0857 1088 0824 1047 Blue Parade 0598 Broksonic 0722 CineVision 0903 0896 Curtis Mathes 1114 CyberHome 1050 0843 1051 Daewoo 0896 0860 Denon 0517 DVD2000 0548 Emerson 0618 0848 Enterprise 0618 GE 0549 0842 Go Video 0860 0742 0896 Harman Kardon 0729 0609 Hitachi 0600 Hiteker 0699 JBL 0729 JVC 0585 0650 0894 Kenwood 0517 05...

Page 43: ...ewood Drive Itasca IL 60143 U S A EUROPE Marantz Europe B V P O Box 8744 5605 LS Eindhoven The Netherlands Manufactured under license from Dolby Laboratories Dolby Pro Logic and the double D symbol are trademarks of Dolby Laboratories Confidential Unpublished Works Copyright 1992 1997 Dolby Laboratories Inc All rights reserved SR4600N DFU 00 cover 05 5 20 6 05 PM Page 8 Adobe PageMaker 6 5J PPC ...

Reviews: