background image

13

STEP 1

Preparation

STEP 2

Detect & Measure (Main)

Set up speakers (Audyssey® Auto Setup)

4

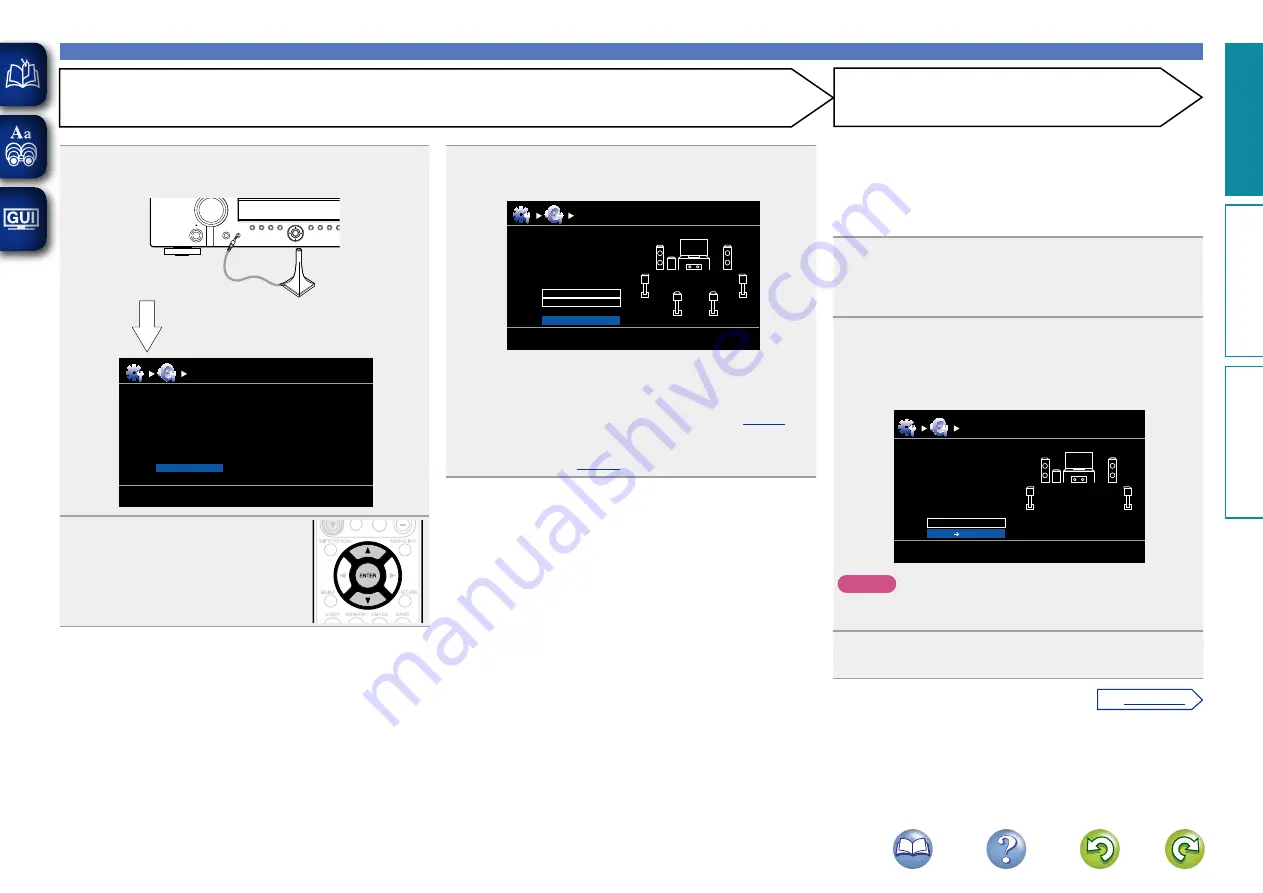
Connect the setup microphone to the SETUP MIC 

jack of this unit.

MultEQ

Preparation

Connect the speakers and place them according

to the recommendations in the manual.

Next

Audyssey Auto Setup

[RETURN]

[ENTER] Enter

Cancel

When the setup microphone is 
connected, the following screen is 
displayed.

5

Select “Next” and then press 

ENTER

.

• In STEP 2, you will perform measurements at the main listening 

position.

• This step automatically checks the speaker configuration and speaker 

size, and calculates the channel level, distance, and crossover 
frequency.
It also corrects distortion in the listening area.

7

Select “Measure” and then press 

ENTER

.

When measuring begins, a test tone is output from each 
speaker.

• Measurement requires several minutes.

8

The detected speakers are displayed.

• The illustration below shows an example of when the front 

speakers, center speaker, subwoofer, and surround speakers have 
been detected.

Detect Check

Front

Center

Subwoofer

Surround

S.Back

Retry

Next     Measure

Yes

Yes

Yes

Yes

No

Audyssey Auto Setup

MultEQ

[RETURN]

[ENTER] Enter

Cancel

NOTE

If a connected speaker is not displayed, the speaker may not be 
connected correctly. Check the speaker connection.

9

Use 

ui

 to select “Next → Measure” and then press 

ENTER

.

6

Use 

ui

 to select “Auto Setup Start” and then press 

ENTER

.

Preparation

Set the following items

if necessary.

Pre Assign

Channel Select

Auto Setup Start

Audyssey Auto Setup

MultEQ

[RETURN]

[ENTER] Enter

Cancel

Here, we explain setup using the example of 5.1-channel speaker 
playback.

For settings other than 5.1-channel surround, select “Pre Assign” 
and perform step 4 to 5 of “Set up “Pre Assign”” (

v

page 35

).

If unused channels are set with “Channel Select”, measuring time 
can be shortened. For setting, perform steps 7 to 11 of “Set up 
“Channel Select”” (

v

page 36

)

.

Basic v

ersion

A

dv

anced v

ersion

Inf
or

mation

Basic v

ersion


v

See overleaf

Summary of Contents for Slim-line NR1402

Page 1: ...Owner s Manual AV Surround Receiver NR1402 Basic version Advanced version Information...

Page 2: ...ments accessories specified by the manufacturer 11 Use only with the cart stand tripod bracket or table specified by the manufacturer or sold with the apparatus When a cart is used use caution when mo...

Page 3: ...lecloths or curtains Naked flame sources such as lighted candles should not be placed on the unit Observe and follow local regulations regarding battery disposal Do not expose the unit to dripping or...

Page 4: ...ting the remote control connectors 37 Playback Advanced operation 38 Convenient functions 38 How to make detailed settings 43 Menu map 43 Examples of menu screen displays 44 Examples of menu and front...

Page 5: ...ers such as Dolby TrueHD DTS HD Master Audio etc M XPort marantz eXtension Port vpage 10 This unit is equipped with the M XPort a marantz original innovation that provides outstanding expandability Yo...

Page 6: ...age 6 7 Connection vpage 6 8 Playback vpage 19 Playback Connection vpage 8 Connection vpage 9 Playback Playback vpage 19 Connection vpage 6 Connection vpage 9 Playback Playback vpage 20 Connection vpa...

Page 7: ...r Video device This unit Output Input IN Output MONITOR OUT Input Component video connectors Component video connectors Resolutions of HDMI compatible TVs can be checked at Monitor Info vpage 53 HDMI...

Page 8: ...TV or Blu ray Disc player DVD player that is not compatible with the HDMI control function About 3D function This unit supports input and output of 3D 3 dimensional video signals of HDMI 1 4a To play...

Page 9: ...with a DVI D connector NOTE No sound is output when connected to a device equipped with a DVI D connector Make separate audio connections Signals cannot be output to DVI D devices that do not support...

Page 10: ...ti channel PCM with this unit use an HDMI connection vpage 5 Connecting an HDMI compatible device Connecting a TV Select the connector to use and connect the device For instructions on HDMI connection...

Page 11: ...set top box Satellite tuner Cable TV You can watch satellite or cable TV Select the connector to use and connect the device For instructions on HDMI connections see Connecting an HDMI compatible devi...

Page 12: ...op antenna supplied Black White FM indoor antenna supplied n nAM loop antenna assembly 1 Put the stand section through the bottom of the loop antenna from the rear and bend it forward Stand Square hol...

Page 13: ...receiver For instructions on the wireless receiver settings refer to the RX101 s operating instructions Wireless receiver RX101 Bluetooth device A2DP Compatibility Remote control unit You can enjoy l...

Page 14: ...increase in volume Operating VOLUME during the measurements will cancel the measurements Measurement cannot be performed when headphones are connected Settings Here we explain Audyssey Auto Setup whi...

Page 15: ...tand and place it in the main listening position When placing the setup microphone adjust the height of the sound receptor to the level of the listener s ear Sound receptor Setup microphone If you do...

Page 16: ...illustration below shows an example of when the front speakers center speaker subwoofer and surround speakers have been detected Detect Check Front Center Subwoofer Surround S Back Retry Next Measure...

Page 17: ...nish Measurements finished Next Calculate Retry RETURN ENTER Enter Cancel 12On the STEP 3 screen use ui to select Next Calculate and then press ENTER Measuring results are analyzed and the frequency r...

Page 18: ...ly without any loss in the dynamism and clarity of the sound when for example the volume suddenly increases for commercials shown during television programs n n When turning Dynamic Volume on Use u to...

Page 19: ...Ambient noise is too high or level is too low Cancel Retry Audyssey Auto Setup There is too much noise in the room for accurate measurements to be made Speaker or subwoofer sound is too low for accur...

Page 20: ...or each speaker are displayed Sp Config Check Check the speaker configuration Distance Check Check the distance Ch Level Check Check the channel level Crossover Check Check the crossover frequency EQ...

Page 21: ...rom an audio system connected to the AUX INPUT jack The input source GAME is selected to playback from a game device connected to GAME connector of HDMI IN Select the input source AUX or GAME using on...

Page 22: ...appears on a TV screen The sound is reduced to the level set at Mute Level vpage 59 To cancel press MUTE again Muting can also be canceled by adjusting the master volume Playing a Blu ray Disc player...

Page 23: ...uio p to return to the original screen n nPresetting radio stations Manual preset Your favorite broadcast stations can be preset so that you can tune them in easily Up to 56 stations can be preset Sta...

Page 24: ...stations RDS works only on the FM band is a broadcasting service which allows a station to send additional information along with the regular radio program signal NOTE The operations described as foll...

Page 25: ...tion all the reception bands are searched The station name is displayed on the display after searching stops If no station broadcasting the designated program type is found when all the frequencies ha...

Page 26: ...uency tuning RDS Search uio p Cursor operation ENTER Enter RETURN Return MEMORY Preset memory registration T MODE Switch search modes BAND FM AM switching 0 9 Preset channel selection 1 8 Direct frequ...

Page 27: ...round sound can be selected to match the source being played back Press SURROUND until the desired surround mode is reached This mode detects the type of input digital signal and automatically selects...

Page 28: ...ton Input signal Listening mode DTS HD DTS Express DTS HD HI RES DTS HD MSTR DTS Express DTS HD NEO 6 DTS HD PLgx Movie DTS HD PLgx Music DTS HD PLgz PCM multi channel MULTI CH IN MULTI CH IN 7 1 MULT...

Page 29: ...cluding surround back channels DOLBY TrueHD This mode can be selected when playing sources recorded in Dolby TrueHD DOLBY DIGITAL Plus This mode can be selected when playing sources recorded with Dolb...

Page 30: ...sted Sound is output from the front left and right speakers and subwoofer If multichannel signals are input they are mixed down to 2 channel audio and are played Direct listening mode Listening mode t...

Page 31: ...ck Advanced operation vpage 38 F How to make detailed settings vpage 43 F Other settings vpage 67 F Operating the connected devices by remote control unit vpage 68 Advanced version Here we explain fun...

Page 32: ...kers Install the surround back speakers in a position 60 to 90 cm higher than ear level z Surround speaker 60 90 cm GViewed from the sideH Front height speaker Point slightly downwards At least 1 m Su...

Page 33: ...d back speaker FR Front speaker R FHL Front height speaker L C Center speaker FHR Front height speaker R SW Subwoofer SL Surround speaker L SR Surround speaker R When 6 1ch Surround back speaker insta...

Page 34: ...ower amplifier sold separately is required for this connection For speaker cable connections see C page 6 Connecting the speakers Connect so that the speaker cable core wires do not protrude from the...

Page 35: ...l playback using the front height speaker set Pre Assign to F HEIGHT in steps 3 and 4 for Set up Pre Assign vpage 35 NOTE A power amplifier sold separately is required for this connection For speaker...

Page 36: ...speaker installed vpage 30 To perform 6 1 channel playback using the surround back speaker set Pre Assign to NORMAL in steps 3 and 4 for Set up Pre Assign vpage 35 Also use the Speaker Config setting...

Page 37: ...the speakers For speaker impedance see page 31 The PRE OUT connectors can be used to connect front speakers In this case follow procedures 3 and 4 in Set up Pre Assign vpage 35 and set Pre Assign to...

Page 38: ...Auto Setup measurement the settings shown below can be made Changing the amplifier assignment Pre Assign The signal output from the FL SBL HL and FR SBR HR connectors on PRE OUT of the amplifier can...

Page 39: ...uring a surround back speaker Skip Set for no measuring of a surround back speaker 10Use o p to set whether or not a subwoofer channel is measured Measure Set for measuring a subwoofer Skip Set for no...

Page 40: ...rol only at the this unit Set the remote control switch located on the rear panel of the connected audio component to EXTERNAL or EXT to use this feature If a marantz power amplifier excluding certain...

Page 41: ...set to ON signals input to the HDMI input connector are output to the television or other device connected to the HDMI output connector even if the power of this unit is in standby pass through functi...

Page 42: ...at Input Assign vpage 64 Should any of the operations below be performed the interlocking function may be reset in which case repeat steps 2 and 3 Input Assign HDMI vpage 64 setting has changed There...

Page 43: ...L Front R Subwoofer 8 5dB 11 5dB When a headphone jack is inserted the headphone channel level can be adjusted n nAdjusting the volume of groups of speakers Fader function This function lets you adjus...

Page 44: ...D VOLUME n nDisabling all key button operations Press ON STANDBY while you press and hold PURE DIRECT and BAND with the unit in standby mode Panel Lock ON appears on the display and all button operati...

Page 45: ...idual input sources The surround parameters tone settings and the volumes of the different speakers are stored for the individual surround modes n nLast function memory This function stores the settin...

Page 46: ...etup Sets the speaker size and distance the channel level etc 55 HDMI Setup Makes settings for HDMI video audio output 58 Audio Setup Makes settings for audio playback 59 Option Setup Makes various ot...

Page 47: ...Input Setup Surr Parameter Tone AudysseySettings Manual EQ M DAX Audio Delay Menu w q e Selected setup item r Options of the selected setup item GExample 2H Audyssey Auto Setup screen with illustratio...

Page 48: ...None None G COMPONENT H Default BD DVD SAT GAME AUX HDMI1 HDNI2 HDMI3 HDMI4 None None COAX None None None Input Assign ENTER Enter Select Return 1 2 G HDMI H G DIGITAL H 1 RCA 2 RCA None None None G C...

Page 49: ...eyboard section r Uppercase and lowercase switch key t Space key y Cursor keys u Insert key i Delete key o OK key Q0 Guide for operation buttons Using the keyboard screen 1 Display the screen for inpu...

Page 50: ...isplayed A cursor mode screen is displayed 3 Use o p to set the cursor to the character you want to change 4 Use ui to change the character then press ENTER The types of characters that can be input a...

Page 51: ...back Menu operation 1 Press AMP MENU to set the remote control unit to AMP operation mode The menu is displayed on the TV screen 2 Use ui to select the menu to be set or operated 3 Press ENTER or p to...

Page 52: ...sources 10dB C Image Assign center channel signal to front left and right channels for wider sound 0 0 1 0 0 3 Panorama Assign front L R signal also to surround channels for wider sound ON Set OFF Do...

Page 53: ...is played back the Audyssey Settings cannot be set Setting items Setting details MultEQ MultEQ corrects both time and frequency response problems in the listening area based on Audyssey Auto Setup ca...

Page 54: ...music that has a wider dynamic range This setting should also be selected for TV content as that is usually mixed at 10 dB below film reference 15dB Select this setting for pop rock music or other pro...

Page 55: ...et to ON and when a TV compatible with Auto Lip Sync is connected Store Audio Delay for each input source Audio Delay for game mode can be set when Video Mode vpage 65 is set to Auto or Game Manual EQ...

Page 56: ...yed when inputting signals including a surround back channel MATRIX is displayed with Dolby Digital EX and DTS ES Matrix signals DISCRETE with DTS ES Discrete signals Dialogue normalization function T...

Page 57: ...enu operation 1 Press AMP MENU to set the remote control unit to AMP operation mode The menu is displayed on the TV screen 2 Press ui to select the menu to be set or operated 3 Press ENTER or p to ent...

Page 58: ...round S Back and F Height can not be set to Large Center Set the presence and size of the center speaker Large Use a large speaker that can adequately play back low frequencies Small Use a small speak...

Page 59: ...E Set LFE signal playback range Set this when you want to change the playback frequency of the subwoofer 80Hz 90Hz 100Hz 110Hz 120Hz 150Hz 200Hz 250Hz Setting items Setting details Distance Set distan...

Page 60: ...s Crossover Freq Set the maximum frequency of the bass signal output from each channel to the subwoofer Set the Crossover Frequency to suit the bass reproduction capability of the speaker being used C...

Page 61: ...on about the HDMI control function NOTE When HDMI Control is set to ON it consumes more standby power If you are not using this unit for an extended period it is recommended that you unplug the power...

Page 62: ...ge 80 5 dB to 18 dB Absolute Display in the range 0 Min to 99 The Volume Display setting is applied also to the Volume Limit and Power On Level display method Volume Limit Make a setting for maximum v...

Page 63: ...een saver started is displayed OFF Screensaver is not activated Format Set the video signal format to be output for the TV you are using NTSC Select NTSC output PAL Select PAL output Format can also b...

Page 64: ...owing procedure However the menu screen is not displayed 1 Press and hold the main unit s MENU and ENTER for at least 3 seconds V Format PAL appears on the display 2 Press the main unit s STATUS and s...

Page 65: ...AMP MENU while the menu is displayed The menu display disappears Important information n nAbout the display of input sources In this section the configurable input sources for each item are shown as...

Page 66: ...ils Start Start the auto preset process TUNER If an FM station cannot be preset automatically select the desired station by tuning it in manually then preset it manually Preset Skip Default settings a...

Page 67: ...nput connector to the selected input source At time of purchase the settings of the different input sources are as shown below Input source BD DVD SAT GAME Default setting HDMI 1 HDMI 2 HDMI 3 HDMI 4...

Page 68: ...ased on the HDMI content information Game Always process video appropriate for game content Movie Process video normally If Video Mode is set to Auto the mode is switched according to the input conten...

Page 69: ...UX TV Auto Detect type of digital input signal and decode and play automatically PCM Decode and play only PCM input signals DTS Decode and play only DTS input signals This item can be set for input so...

Page 70: ...press ON STANDBY while holding down SURROUND MODE and STATUS on the main unit Remote Lock ON is shown on the display and the infrared light receiving function is disabled n nEnabling the remote senso...

Page 71: ...istered on the TV button z CD marantz CD player TUNER Radio of this unit M XPort Device registered on the M XP button z z If a preset code is registered for this button the remote control unit of this...

Page 72: ...ng the code table q Entering a 4 digit code See the preset code list table for the code to be input 1 Press and hold down the input source select buttons for the appliance to control and press SET unt...

Page 73: ...eset codes Default settings for preset codes The devices shown below are registered for each input source button as default Settings can be changed according to the devices to be used 1 Press and hold...

Page 74: ...andby SHIFT TOP MENU Top menu uio p Cursor operation ENTER Enter MENU Popup Menu 3 Pause 1 Playback 2 Stop 8 9 Auto search cue 6 7 Manual search fast reverse fast forward 0 9 Select title chapter or c...

Page 75: ...ANNEL Switch channels up down n nSet top box for satellite SAT operation Operation buttons Function SOURCE Z X Power on standby uio p Cursor operation ENTER Enter 0 9 Channel selection CLR Clear the i...

Page 76: ...age 79 F Troubleshooting vpage 87 F Specifications vpage 90 F Index vpage 91 F List of preset codes vpage 93 Information Here we list various information related to this unit Please refer to this info...

Page 77: ...g loss do not raise the volume level excessively when using headphones Q4PURE DIRECT button 24 41 Q65AUX INPUT jack 8 Q6VOLUME control knob 19 Q7PURE DIRECT indicator 24 Q8Master volume indicator Q9Di...

Page 78: ...me are ON When MultEQ and Dynamic EQ are ON and Dynamic Volume is OFF When MultEQ is ON and Dynamic EQ and Dynamic Volume are OFF iSurround back indicator This lights when audio signals are being outp...

Page 79: ...s 7 8 tCOMPONENT VIDEO connectors 7 8 ySpeaker terminals C 6 31 32 33 34 uAC inlet AC IN C 5 iHDMI connectors C 3 6 oDigital audio connectors 7 9 Q0REMOTE CONTROL connectors 37 Q1M XPort connector 10...

Page 80: ...er buttons 20 69 70 Q9Clear button CLR W0TUNING buttons 20 W1PRESET buttons 20 21 W2TV operation buttons TV Z X INPUT 23 71 72 W3RANDOM button 1 W4REPEAT button 0 W5System buttons 71 72 Pause button 3...

Page 81: ...carefully wipe the fluid off the inside of the battery compartment and insert new batteries Remove the batteries from the remote control unit if it will not be in use for long periods Used batteries s...

Page 82: ...S and worldwide patents issued pending DTS and the Symbol are registered trademarks DTS HD DTS HD Master Audio and the DTS logos are trademarks of DTS Inc Product includes software DTS Inc All Rights...

Page 83: ...DIRECT Multi channel z1 S D D Dz2 Dz2 D S S S STEREO S D S S S MULTI CH IN S D D D D D S S DOLBY PRO LOGIC gz S D D D D S S S DOLBY PRO LOGIC gx S D D D D S S S DOLBY PRO LOGIC g S D D D S S S DTS NE...

Page 84: ...DIGITAL Plus S S S S S DOLBY TrueHD S S S S S DTS SURROUND S S S S S DTS 96 24 S S S S S DTS HD S S S S S DTS Express S S S S S MULTI CH STEREO S S S S S VIRTUAL S S S S S z1 During playback in PURE...

Page 85: ...gx MUSIC z1z3 S S S S S S DTS HD PLgz z4 S S S S S S S DTS EXPRESS S DTS HD NEO 6 z1z3 S S S S S S DTS NEO 6 CINEMA S S S DTS NEO 6 MUSIC S S S DOLBY SURROUND DOLBY TrueHD S DOLBY DIGITAL S DOLBY DIGI...

Page 86: ...H IN PLgz z4 S MULTI CH IN Dolby EX z1z3 S MULTI CH IN 7 1 z3 S DIRECT S S S S S S S S S S S S S S S S PURE DIRECT S S S S S S S S S S S S S S S MULTI CH STEREO S S S S S S S S S S S S S S S S VIRTUAL...

Page 87: ...S HDMI S COMPONENT A S HDMI A COMPONENT A S S S S HDMI S COMPONENT S VIDEO S HDMI A COMPONENT A VIDEO S Video signal input present A No video signal input S The input signal between the marks is outp...

Page 88: ...at on CDs is encoded into 5 channels to achieve an excellent surround effect The surround channel signals are converted into stereo and full band signals with a frequency response of 20 Hz to 20 kHz o...

Page 89: ...logy encrypts the signals to prevent content from being copied without authorization HDMI This is an abbreviation of High Definition Multimedia Interface which is an AV digital interface that can be c...

Page 90: ...cable and then re connect it to the speaker terminal C 6 31 C 6 After turning on the power the power indicator is blinking red in intervals of approximately 0 5 seconds This unit amplifier circuit has...

Page 91: ...fer Mode is set to LFE no sound may be output from the subwoofers depending on the input signal or selected surround mode C 6 31 32 55 55 56 DTS sound is not output Set Decode Mode on the menu to Auto...

Page 92: ...evice and Wireless receiver RX101 are correctly paired 10 86 GRemote Control UnitH Symptom Cause Solution Page The set cannot be operated with the remote control unit Batteries are worn out Replace wi...

Page 93: ...response 5 Hz 10 MHz 0 3 dB Color component video connector Input output level and impedance Y brightness signal 1 Vp p 75 PB CB signal 0 7 Vp p 75 PR CR signal 0 7 Vp p 75 Frequency response 5 Hz 60...

Page 94: ...TrueHD 85 Downmix 85 DRC 49 DTS 85 DTS 96 24 85 DTS Digital Surround 85 DTS ES Discrete 6 1 85 DTS ES Matrix 6 1 85 DTS Express 86 DTS HD 86 DTS HD High Resolution Audio 86 DTS HD Master Audio 86 DTS...

Page 95: ...e Delete 59 Source Level 66 Speaker Connect 31 Install 29 Set up 11 35 Speaker Config 55 Speaker impedance 86 Speaker Setup 55 Standby Source 58 Subwoofer setting 12 Surround back speaker 29 30 31 33...

Page 96: ...101 Daytron 1003 1013 1016 Dimensia 1103 1110 Dumont 1003 1010 1153 E Electroband 1001 Electrohome 1001 1003 1069 1133 Emerson 1003 1013 1015 1020 1021 1022 1023 1025 1038 1044 1045 1048 1055 1061 109...

Page 97: ...I 3046 NEC MCS 3025 NIKKO 3007 3016 O Onkyo 3049 3050 3051 3052 3055 3102 3103 OPTIMUS 3011 3014 3020 3028 3054 3056 3057 P Panasonic 3008 3060 3061 Philips 3009 3010 3010 3040 Pioneer 3020 3021 3062...

Page 98: ...95 Dimensions Unit mm 328 5 22 5 369 0 14 5 90 5 105 0 440 0 18 0 Weight 8 2 kg Basic version Advanced version Information Information...

Page 99: ...D M Holdings Inc 3520 10039 003M V00...

Reviews: