


PO
WE
R
ON
/OF
F
OF
F
ON
CLO
NE
MA
CR
O
MO
DE
LEA
RN
ING
RE
MO
TE
CO
NT
RO
L
RC
-18
SR
D1
D2
D3
D4
D5
D6
D7
D8
MACR
O
MA
CR
O
1
2
3
4
LD
TV
DS
S/
VC
R2
TU
NE
R
CD
TA
PE
AU
X
CD
-R
/MD
VC
R1
CH
VO
L
OK
3
6
9
2
5
8
0
1
4
7
M
C
AM
P
GU
IDE
MU
TE
3
1
VOL
MENU
CH
STATUS/EXIT
6
2:30
WABC
VOL
MENU
CH
STATUS/EXIT
1
3
2
SOURCE
SELECT
TV
AND
R
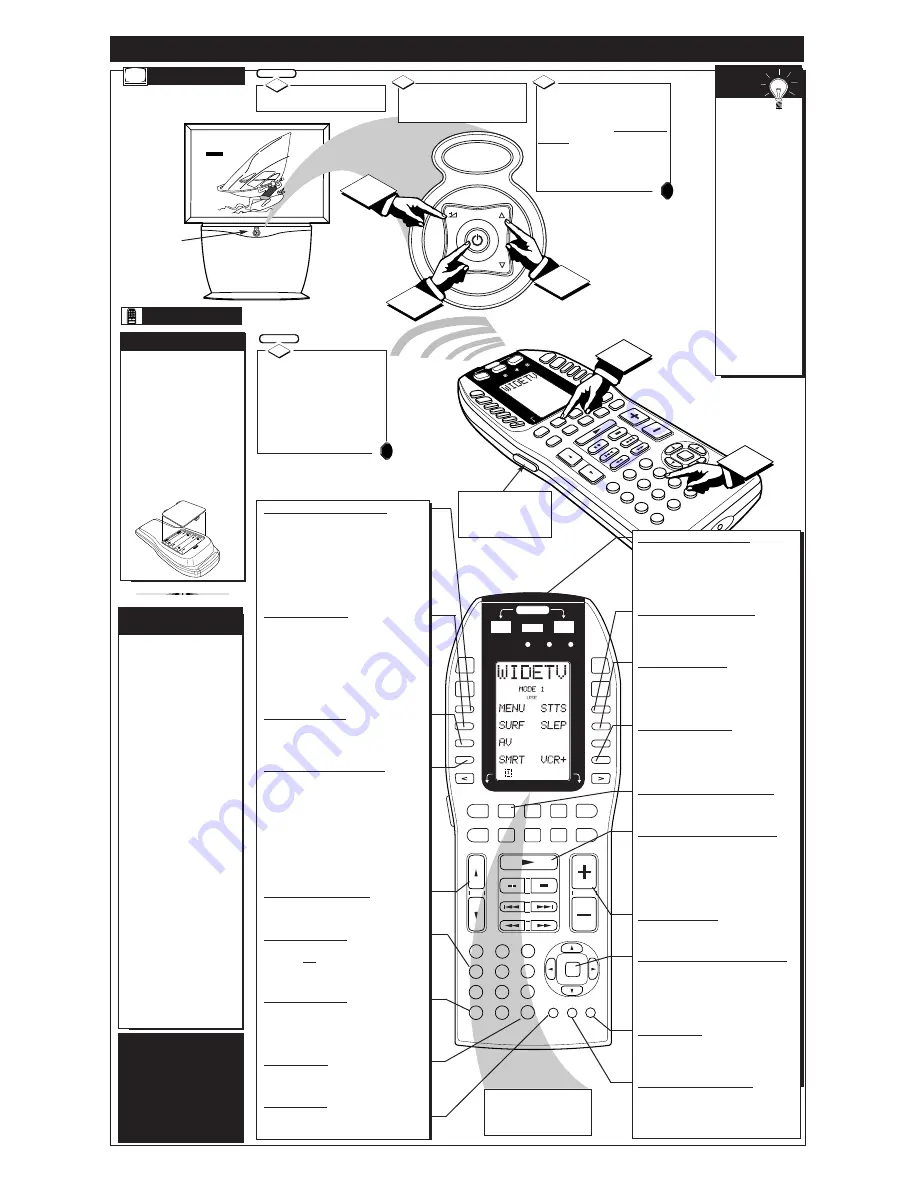
EMOTE
C
ONTROL
O
PERATION
T
ELEVISION
T
o load the supplied bat-
teries into the remote:
1. Remove the battery
compartment lid on the
back of the remote.
2. Place the batteries (4-
AA) in the remote. Be
sure the (+) and (-) ends
of the batteries line up
correctly (inside of case is
marked.)
3. Reattach the battery lid.
B
ATTERY
I
NSTALLATION
Press the TV
"System" button on the
remote to be sure the remote
sends its commands to the TV.
Point the remote control
toward the remote sensor win-
dow on the TV when operating
the TV with the remote.
BEGIN
1
STOP
Press the POWER
button to turn the TV ON.
Press the VOLUME UP
(+) or DOWN (-) buttons to
adjust the TV sound level.
2
Press the CHANNEL UP
(
▲
) or DOWN (
▼
) button to
select TV channels.
Note: Always press two number
buttons on the remote when
selecting channels.
For example: press "0" then "6"
for channel 6.
3
R
EMOTE
BEGIN
1
STOP
Y
our LCD panel universal
remote is designed for
flexible adaptability and use.
Set to automatically work all
Marantz HD Projection TV
Menu system features, the
remote also has preset
“Device” operations for a
variety of Audio and Video
accessory products (such as
VCR, DVD, CD, Tape, etc.)
Although the remote’s prepro-
grammed operating codes
were set to work with
Marantz and Philips branded
products, other manufacturer’s
equipment can easily be con-
trolled through the remote’s
“Learn” mode capabilities.
The remote can also memo-
rize select key button
sequences in order to auto-
mate or “short-cut” a feature
function selection or process.
Once created and placed in
memory, the recorded
“MACRO” buttons will exe-
cute desired commands to
various components in order
to complete, for example, a
VCR movie playback on the
HD PTV or other similar pro-
cedure.
R
EMOTE
LCD P
ANEL
&
"S
YSTEM
" B
UTTONS
D1
D2
D3
D4
D5
D6
D7
D8
POWER
SOURCE
OFF
ON
ON/OFF
CLONE MACRO
MODE
L E A R N I N G R E M OT E C O N T RO L
R C - 1 8 S R
MACRO
MACRO
1
2
3
4
OK
VOL
CH
LD
DVD
AUX
TAPE
CD
TV
TUNER
CD-R
/MD
DSS/
VCR2
VCR1
MUTE
GUIDE
AMP
1
4
7
M
2
5
8
0
3
6
9
C
Menu Select (D1) Button
Press the Menu (D1) button to select the
TV’s Menu screen or highlighted feature
control. Note: You can also use the remote’s
OK and arrow buttons to select and access
Menu controls. The arrow buttons move up
and down (or left and right) through the list
of onscreen controls. The center OK button
selects the highlighted control.
Surf (D2) Button
Press to select previously viewed channels.
With the TV’s “Auto Surf” control ON you
can place up to 10 channels in memory. Then
by pressing the SURF button you can quickly
view the select channels.
See the "Auto Surf" section (in your other
owner's manual) to see how to select a series
of channels using the Surf button.
A/V (D3) Button
Press to quickly display the Auxiliary source
inputs on the TV (AUX1-5 VIDEO, etc.) as
well as Antenna A/B inputs.
Smart/Auto (D4) Button
Press to select from a list of Auto controls.
Auto Picture for factory preset picture con-
trol levels (set for different types of viewing
sources and programs.) Auto Sound to set
TV audio for more consistent volume pro-
gram levels even during commercial breaks.
Auto Surf to quickly select up to 10 chan-
nels (separate from the TV’s normal channel
scan memory). See the "Auto Features" sec-
tion in your other owner's manual for details.
Channel Scan Button
Press to scan up (
▲
) or down (
▼
) through
programmed channel numbers.
Number Buttons
Press the number buttons to select TV chan-
nels. Press two number buttons to select sin-
gle digit channels. For example: press "0"
then "6" for channel 6.
M (100+) Button
Press to select channel numbers greater than
99 (by direct button entry). Press the “M”
button then the remaining two digits to select
the desired channel.
Clear Button
Press to Clear current control entries and
return the TV to Factory Settings.
AMP Button
Press to reset the remote’s LCD Display panel
for use with Amplifier device mode controls.
3
Note: You
can press any of the
TV’s front keyboard
buttons to turn the
TV ON, but the
Power button must
be used to turn the
set OFF (from the
TV’s local key-
board).
The tuned channel
number will always
briefly appear when
the TV is first
turned ON (and
with channel
changes.)
You can also press
the STATUS button
(on the TV or
remote) to see what
channel the TV is
ON.
S
MART
H
ELP
Remote Sensor
Window
Press the HIGHLIGHTING
button to illuminate or light
the remote’s buttons to make
them easier to read and use
in dark room conditions.
Power On/Off Buttons
Press the separate ON (OFF) buttons on the
remote to turn the TV ON and OFF. Press
the “Power Source” ON/OFF button to turn
the selected LCD Panel device (TV, VCR,
DVD, etc.) ON or OFF.
Status/Exit (D5) Button
Press to see current channel number infor-
mation on the TV screen. Also press to clear
the TV screen after control adjustments.
Sleep (D6) Button
Press to set the TV to automatically turn
itself Off. Press the Sleep button repeatedly
to select the amount of time (15 minutes to 2
hours) before the TV shuts Off.
VCR+ (D8) Button
Press to display Guide Plus+
®
electronic TV
program guide schedule. See dedicated
Guide Plus+ feature button callout and
explanation shown below.
LCD Panel System Buttons
Press to send remote signals to either the TV
or other accessory devices (VCR, DVD, etc.).
VCR (LCD Device) Buttons
For use with VCR (Play, Stop, Pause, FF,
etc.) type feature operations. In some cases,
may also function with select LCD Display
devices (i.e., DVD, CD, etc.) See the "Using
the Remote With a VCR" in your other
owner's manual for further details.
Volume Buttons
Press to adjust the TV sound level up (+) or
down (-).
OK/Menu and Arrow Buttons
Press the OK button to show onscreen
Menus and select highlighted controls. Press
the direction arrow buttons to move up and
down (or left and right) through the list of
onscreen controls.
Mute Button
Press to turn the sound OFF on the TV.
Press again to return the sound to its previ-
ous level.
GUIDE Plus+® Button
Press to use the GUIDE Plus+ system elec-
tronic guide for TV program listings. Refer
to your separate GUIDE Plus+ information
manual for setup and use details.
See the following page for further
details on the LCD Display Panel
and its TV related D1-D8 button
functions (contained within the
WIDETV Mode settings).
Note: Due to the amount of
optional components avail-
able within the remote’s
Device Reference and Learn
Code Lists, please refer to
the separate full-use Remote
Control Owner’s Manual
for complete details on its
functions and operations.
All manuals and user guides at all-guides.com


