background image

ENGLISH

6

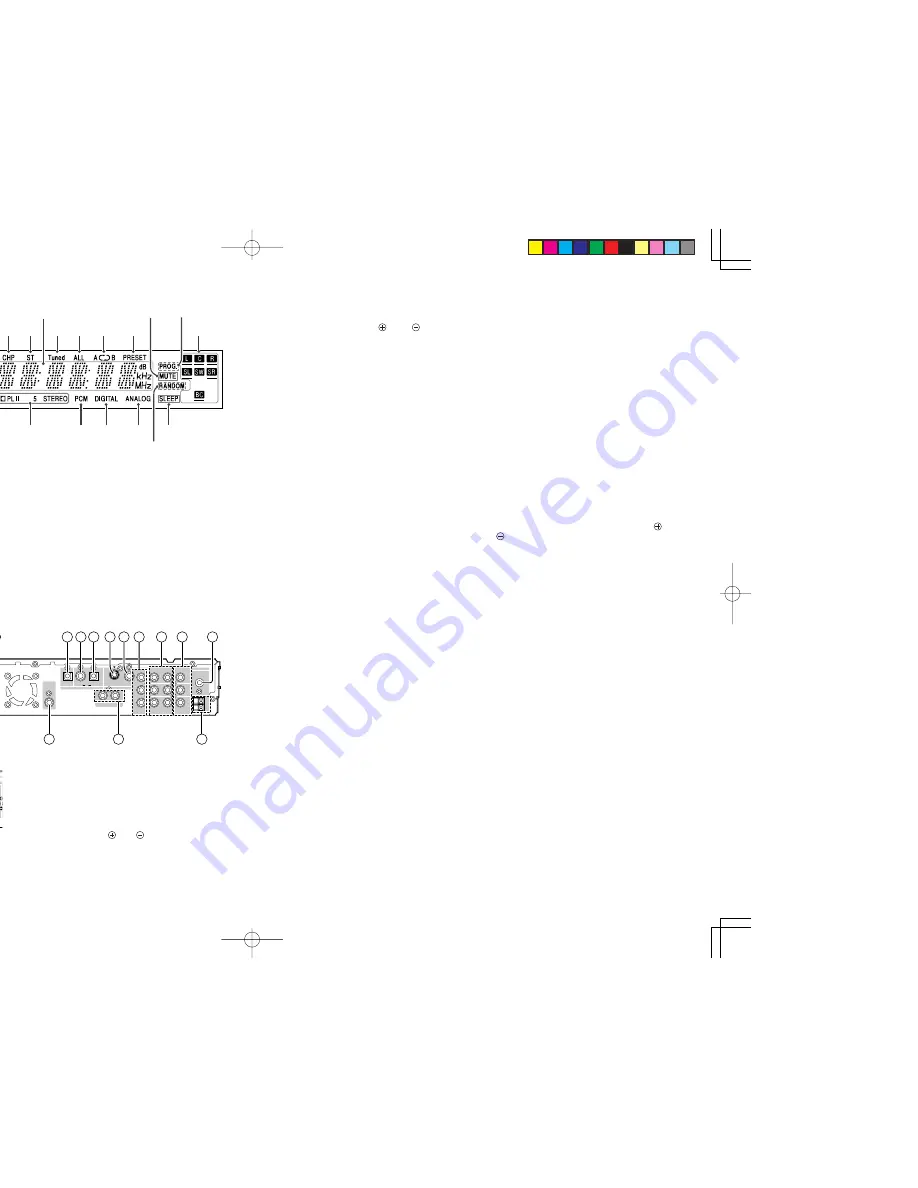
DISPLAY

a

Indicates current disc format.

s

P.SCAN indicates progressive scan mode.

d

Indicates current title number.

f

Indicates current track number.

g

Indicates current chapter number.

h

ST indicates in the tuner mode.

j

Displays current status or time.

k

Illuminates when a station is tuned.

l

Illuminates during all track repeat  playback.

¡0

Illuminates during repeat  playback.

¡1

Illuminates when PRESET mode is selected.

¡2

Illuminates during mute.

¡3

PROG. indicates programmed playback is active.

¡4

Speaker icons.

¡5

Illuminates when SLEEP TIMER is set.

¡6

Illuminates during shuffle playback.

¡7

Illuminates when an analog source is selected.

¡8

Illuminates when a digital source is selected.

¡9

Type of audio signal.

™0

Surround mode.

™1

Indicates encoding audio format.

™2

Operating status indicator.

REAR PANEL

GND

GND

AUDIO

AUDIO

COMPONENT

COMPONENT

VIDEO OUT

VIDEO OUT

VIDEO

VIDEO

VIDEO

VIDEO

S-VIDEO

S-VIDEO

DSS

DSS

VCR

VCR

DIGITAL

DIGITAL

OPTICAL OUT

OPTICAL OUT

IN

IN

DVD

DVD
ONLY

ONLY

MONITOR OUT

MONITOR OUT

AM

AM

IN

IN

IN

IN

OUT

OUT

Y

Y

VCR

VCR

C

C

R

R

/P

/P

R

R

C

C

B

B

/P

/P

B

B

DSS

DSS

L

L

R

R

FM

FM

(75

(75

))

ANTENNA

ANTENNA

SUB

SUB

WOOFER

WOOFER
PRE OUT

PRE OUT

FRONT

FRONT

CENTER

CENTER

SPEAKER SYSTEMS(6-16 OHMS)

SPEAKER SYSTEMS(6-16 OHMS)

WOOFER

WOOFER

SUB

SUB

CENTER

CENTER

AC IN

AC IN

SURROUND BACK

SURROUND BACK

SURROUND

SURROUND

L

L

R

R

L

L

R

R

R

R

L

L

TV AUDIO IN

TV AUDIO IN

F

G

I

H

J

C

D

E

N

M

K

A

O

P

L

B

A

CENTER, SURROUND  L/R
and SUBWOOFER speaker
terminals

 • Connect the center, surround left and right,

passive subwoofer speaker cord of center,
surround L/R and subwoofer channels,
observing the 

and

 polarity of the cord and

terminals.

B

FRONT L/R speaker terminals

 • Connect the front left and right speaker cord of

front channel, observing the 

 and 

 polarity

of the cord and terminals.

C

Digital output jack (Optical)

 • The DVD, CD signals during playback are output

digitally from this optical jack.

D

VCR digital audio input jack
(Coaxial)

 • Connect to the digital audio output jack of a VCR.

E

DSS digital audio input jack
(Optical)

 • Connect to the digital audio output jack of a DSS.

F

S-Video output jack
(DVD mode only)

 • Connect to the s-video input jack of a monitor or

TV input.

G

Video output jack

 • Connect to the composite video input jack of a

monitor or TV input.

H

Component video output jacks
(DVD mode only)

 • Connect to the component video input jacks of

TV.

I

 VCR IN/OUT jacks

 • Connect the IN jacks to the output jacks of VCR

and the OUT jacks to VCR input jacks.

J

 DSS IN jacks

 • Connect the IN jacks to the output jacks of DSS.

K

FM antenna terminal (75 ohms)

 • Connect an external FM antenna with a coaxial

cable, or a cable network FM source.

L

AM antenna and ground
terminals

 • Connect the supplied AM loop antenna. Use the

terminals marked “AM” and “GND”. The supplied
AM loop antenna will provide good AM reception
in most areas. Position the loop antenna until
you hear the best reception.

M

 TV AUDIO IN jack

 • Connect the IN jack to the audio output jack of TV.

N

SUB WOOFER PRE OUT jack

 • Connect to a component speaker input of an

active subwoofer.

O

SURROUND BACK CENTER
speaker terminals

 • Connect the separation cord supplied (Brown)

for Surround Back (Phantom) observing the 
and 

 polarity of the cord and terminals.

 • If you use other 6.1ch speaker system than

SS2500, connect the surround back center
speaker cord of surround back center channel.

P

AC power cable (ER2500U)

 • Connect to an AC power outlet.

This unit has to be powered by 120V AC only.

Q

AC IN (ER2500S)

 • Connect to supplied an AC cable, and connect

to an AC power outlet.
ER2500S unit has to be powered by 230V AC
only.

¡5

¡7

¡8

¡9

™0

™1

™2

¡6

d

s

a

a

f g h

k l

¡0

¡1

¡4

¡2

¡3

j

ER2500U

GND

AUDIO

COMPONENT

VIDEO OUT

VIDEO

VIDEO

S-VIDEO

DSS

VCR

DIGITAL

OPTICAL OUT

AV EURO

IN

DVD
ONLY

MONITOR OUT

AM

IN

IN

OUT

Y

VCR

C

R

/P

R

C

B

/P

B

DSS

L

R

FM

(75

)

ANTENNA

SUB

WOOFER
PRE OUT

FRONT

CENTER

CENTER

SPEAKER SYSTEMS(6-16 OHMS

SPEAKER SYSTEMS(6-16 OHMS)

WOOFER

WOOFER

SUB

SUB

CENTER

CENTER

AC IN

AC IN

SURROUND BACK

SURROUND BACK

SURROUND

SURROUND

L

R

L

L

R

R

Q

ER2500S

ER2500U DFU̲01̲eng1/4

04.8.26, 4:29 PM

Page 6

Adobe PageMaker 6.5J/PPC

Summary of Contents for ER2500

Page 1: ...Model ER2500 SS2500 User Guide DVD Surround Receiver 5 1 6 1ch Speaker System 04 8 26 4 38 PM Adobe PageMaker 6 5J PPC ...

Page 2: ...e reference 3 Heed Warnings All warnings on the product and in the operating instructions should be adhered to 4 Follow Instructions All operating and use instructions should be followed 5 Cleaning Unplug this product from the wall outlet before cleaning Do not use liquid cleaners or aerosol cleaners Use a damp cloth for cleaning 6 Attachments Do not use attachments not recommended by the product ...

Page 3: ... the power supply cord or plug is damaged b If liquid has been spilled or objects have fallen into the product c If the product has been exposed to rain or water d If the product does not operate normally by following the operating instructions Adjust only those controls that are covered by the operating instructions as an improper adjustment of other controls may result in damage and will often r...

Page 4: ...ité Ne pas essayer de retirer le boîtier de l appareil Ne rien insérer dans l appareil par les orifices de ventilation Ne pas manipuler le cordon d alimentation avec les mains mouillées Ne pas recouvrir les ouïes de ventilation avec un objet quelconque comme une nappe un journal un rideau etc Ne placer aucune source de flamme nue comme une bougie allumée sur l appareil Pour mettre au rebut les pil...

Page 5: ...OOM FUNCTION 27 CHANGING AUDIO 28 CHANGING SUBTITLE LANGUAGES 28 REPEAT PLAY 28 A B REPEAT PLAY 29 RANDOM PLAY 30 PROGRAM PLAY 31 BASIC OPERATIONS TUNER 32 LISTENING TO THE TUNER TUNING MODE 32 PRESET MEMORY OPERATION 32 SELECTING PRESET CHANNEL 33 CLEARING PRESET CHANNEL 33 OTHER OPERATIONS 34 NIGHT MODE 34 USING THE DIMMER FUNCTION 34 USING THE SLEEP TIMER 34 ANALOG DIGITAL VCR DSS MODE ONLY 34 ...

Page 6: ... with a total of 6 1 channels DTS ES Extended Surround includes two signal formats with different surround signal recording methods as DTS ES Discrete 6 1 and DTS ES Matrix 6 1 DTS DTS ES and Neo 6 are trademarks of Digital Theater Systems Inc Dolby Digital identifies the use of Dolby Digital audio coding for such consumer formats as DVD and DTV As with film sound Dolby Digital can provide up to f...

Page 7: ...left Blue x 1 10m cord for surround right Gray x 1 10m separation cord for surround back Phantom Brown x 1 Tray for center speaker x 1 Cushion for subwoofer x 4 Terminal cover x 5 ABOUT DISCS PLAYABLE DISCS DVD DVD R DVD RW DVD R DVD RW Finalized DVD disc recorded in the DVD video format Video CD VCD Super Video CD SVCD Audio CD CD DA CD R CD RW Finalized CD R and CD RW discs recorded in the CD DA...

Page 8: ...oose or search a section to play with a menu displayed on the TV screen Also still pictures can be displayed in higher quality Video CD Version 1 1 The video CD without PBC function It can play video and audio by operation much like to the ordinary audio CD STRUCTURE OF VIDEO CD DISCS Depending on the material on the disc a movie video clips a drama series etc these discs may have one or more trac...

Page 9: ...ng this button to change the function as follows DVD TUNER FM AM TV VCR DSS VOLUME UP DOWN buttons These buttons are used to change the master volume for listening Press the up button to increase and the down button to decrease the volume PHONES jack For connecting stereo headphones When the headphones are connected to this jack the speaker sound is turned off and the surround mode be changed to s...

Page 10: ...o input jack of a monitor or TV input G Video output jack Connect to the composite video input jack of a monitor or TV input H Component video output jacks DVD mode only Connect to the component video input jacks of TV I VCR IN OUT jacks Connect the IN jacks to the output jacks of VCR and the OUT jacks to VCR input jacks J DSS IN jacks Connect the IN jacks to the output jacks of DSS K FM antenna t...

Page 11: ...g VCD disc with PBC ON 1 SLEEP timer button This button is used to set the sleep timer Each press of this button change the sleep time following order 10 20 30 40 50 60 70 80 90 100 110 120 OFF original display The setting time passes the power is turned off 2 TV POWER button Press to turn power ON and press again to switch standby for TV 3 TV INPUT button Press this button to select for TV side i...

Page 12: ...repeat play during playback Each time the button is pressed the mode changes in the following sequence 1 chapter track repeat Title all track repeat Off 4 PRG Program button In DVD mode press this button to program tracks for program play in stop mode VCD CD 5 NTSC PAL button Press this button to select for the picture format PAL NTSC or MULTI to mach your TV 6 T TONE button This button is used to...

Page 13: ...7 7 6 6 5 5 4 4 3 3 2 2 1 1 TV CH TV CH TV VOL TV VOL TV INPUT TV INPUT A D A D DSS DSS VCR VCR TV POWER TV POWER TV TV TUNER TUNER DVD DVD SLEEP SLEEP STANDBY ON STANDBY ON 2 2 3 1 Turn on the appliance which should be controlled 2 Press and hold down the ENTER button and press TV button until the indicator lamp blinks twice 3 Press the 3 digit code for appliance code table at the end of this boo...

Page 14: ... CLR MODE ZOOM ANGLE AUDIO S TITLE TUNE PRESET ENTER MENU TOP MENU TOP MENU DVD SET UP DVD SET UP RETURN SURROUND SURROUND MUTE MUTE VOLUME VOLUME DISPLAY DISPLAY STEREO STEREO 0 0 9 9 8 8 7 7 6 6 5 5 4 4 3 3 2 2 1 1 TV CH TV CH TV VOL TV VOL TV INPUT TV INPUT SLEEP SLEEP AMP AMP VCR VCR TV POWER TV POWER TV TV TUNER TUNER DVD DVD SOURCE SOURCE RC2400SR SYSTEM SYSTEM 1 2 1 1 Press and hold down th...

Page 15: ...on of the arrow and keep this condition 2 Insert the bare part of the cord into the hole in the side of each terminal 3 Put the terminal lever back and make sure it is fastened securely by pulling the cord lightly 1 2 3 CONNECTING SPEAKER CORD TO 5 1 6 1CH SPEAKER SYSTEM SS2500 1 Loosen the knob by turning counterclockwise 2 Insert the bare part of the cord into the hole in the side of each termin...

Page 16: ...K SURROUND SURROUND L L R R L L R R CENTER SPEAKER SURROUND L FRONT SPEAKER SURROUND R FRONT SPEAKER SURROUND R FRONT SPEAKER SURROUND L FRONT SPEAKER CENTER SPEAKER Center speaker Subwoofer Front speaker left Front speaker right Surround speaker left Surround speaker right Green Black Red Black Purple Black Gray Black Blue Black White Black Brown Black Brown Black so that cover ER used as ets you...

Page 17: ...ty CONNECTING AN FM OUTDOOR ANTENNA Note Keep the antenna away from noise sources neon signs busy roads etc Do not put the antenna close to power lines Keep it well away from power lines transformers etc To avoid the risk of lightning and electrical shock grounding is necessary Surround back speaker Active Subwoofer ASSEMBLING THE AM LOOP ANTENNA 1 Release the vinyl tie and take out the connection...

Page 18: ...left channel Be sure to connect the inputs and outputs of the video signals properly If you connect the S VIDEO or component signal to the S VIDEO or component jack on this unit it is not necessary to connect the conventional video signal to the VIDEO composite jack If you use both video inputs this unit gives priority to the S VIDEO signal Each type of video jack works independently Signals input...

Page 19: ...TICAL OUT OPTICAL OUT IN IN DVD DVD ONLY ONLY MONITOR OUT MONITOR OUT AM AM IN IN IN IN OUT OUT Y Y VCR VCR C CR R P PR R C CB B P PB B DSS DSS L L R R FM FM 75 75Ω Ω ANTENNA ANTENNA SUB SUB WOOFER WOOFER PRE OUT PRE OUT R R L L TV AUDIO IN TV AUDIO IN DIGITAL IN S ear panel corder or CD recorder MD deck 04 8 26 4 29 PM Adobe PageMaker 6 5J PPC ...

Page 20: ...ss the SPK SET button SP SIZE appears on the front display 4 Press the cursor button FRONT appears on the front display 5 Press the cursor button to set F LARGE or F SMALL appears on the front display 6 Press the cursor buttons to change the front speaker size setting 7 If you want to decide the speaker size setting press the cursor button WAIT blinks for 4 seconds and the setting is saved in memo...

Page 21: ...ET SPK SET NTSC PAL NTSC PAL 1 ALL 1 ALL A B A B RANDOM RANDOM CLR CLR PRG PRG ZOOM ZOOM ANGLE ANGLE AUDIO AUDIO S TITLE S TITLE T CLR T CLR RDS RDS FM MODE FM MODE MEMORY MEMORY TUNE PRESET TUNE PRESET BAND BAND TUNE MODE TUNE MODE REPEAT REPEAT RC2500ER RC2500ER ENTER ENTER MENU MENU TOP MENU TOP MENU DVD SET UP DVD SET UP RETURN RETURN DISPLAY MUTE VOLUME DIMMER SURROUND 0 9 8 7 6 5 4 3 2 1 TV ...

Page 22: ... Hall Theater and Live mode DEFAULT SETTING EXCEPT THE DVD SETUP MENU If this default setting is performed all the settings except the DVD setup menu are reset to the factory defaults Volume STANDBY PHONES DOWN VOL UP FUNCTION STOP PLAY IIPAUSE ER2500 OPEN CLOSE OPEN CLOSE POWER ON STANDBY me PHONES DOWN VOL UP FUNCTION STOP PLAY IIPAUSE ER2500 P SCAN EX V CD MP3 DVD A PRGM TITLE TRK CHP DIGITAL P...

Page 23: ...D SLEEP STANDBY ON NIGHT TONE T TONE SPK SET NTSC PAL 1 ALL A B RANDOM CLR PRG ZOOM ANGLE AUDIO S TITLE T CLR RDS FM MODE MEMORY TUNE PRESET BAND TUNE MODE REPEAT RC2500ER ENTER MENU TOP MENU TOP MENU DVD SET UP DVD SET UP RETURN DISPLAY DISPLAY MUTE MUTE VOLUME VOLUME DIMMER DIMMER SURROUND SURROUND 0 0 9 9 8 8 7 7 6 6 5 5 4 4 3 3 2 2 1 1 TV CH TV CH TV VOL TV VOL TV INPUT TV INPUT A D A D DSS DS...

Page 24: ...isting Dolby Surround mixes sound more like discrete 5 1 channels Surround sound This mode provides 6 1 or 7 1 channel surround sound from Dolby Surround encoded stereo movie sound tracks Pro Logic IIx MUSIC Only 6 1ch Setting Dolby Pro Logic IIx brings the excitement of surround sound to any stereo mix while making existing Dolby Surround mixes sound more like discrete 5 1 channels Surround sound...

Page 25: ...SCRETE DTS STEREO DTS 6 1 Matrix DTS ES MATRIX DTS STEREO PCM PRO LOGIC II MOVIE PRO LOGIC II MUSIC DTS NEO 6 CINEMA DTS NEO 6 MUSIC HALL THEATER LIVE 5 STEREO STEREO Dolby Digital 5 1 DOLBY DIGITAL STEREO Dolby Digital 5 1 EX DOLBY DIGITAL STEREO 5 1ch Dolby Digital 2ch PRO LOGIC II MOVIE PRO LOGIC II MUSIC STEREO DTS 5 1 DTS STEREO DTS 6 1 Discrete DTS STEREO DTS 6 1 Matrix DTS STEREO PCM 32kHz ...

Page 26: ...PLAY IIPAUSE PLAY IIPAUSE ER2500 OPEN CLOSE POWER ON STANDBY DIGITAL PCM 5 STEREO ANALOG SL EEP RANDOM MUTE STEREO ned ALL AB PRESET dB kHz MHz 1 1 1 Press the PAUSE button To resume playing press the 2 PLAY button sc type JPEG c types can be e under anish A JPEG s player GHT GHT LR LR OOM OOM MORY MORY MODE MODE NU NU MUTE TV CH TV VOL V INPUT V POWER SLEEP Volume PHONES DOWN VOL UP FUNCTION STOP...

Page 27: ...DISPLAY DISPLAY MUTE MUTE VOLUME VOLUME DIMMER DIMMER SURROUND SURROUND 0 0 9 9 8 8 7 7 6 6 5 5 4 4 3 3 2 2 1 1 TV CH TV CH TV VOL TV VOL TV INPUT TV INPUT A D A D DSS DSS VCR VCR TV POWER TV POWER TV TV TUNER TUNER DVD DVD SLEEP SLEEP STANDBY ON STANDBY ON 1 1 With the VCD SVCD CD MP3 WMA or JPEG discs specify the track number using the numeric buttons 0 to 9 on the remote control unit Chapter 3 ...

Page 28: ... the cursor buttons select a direct playback item Then select a title chapter track or time position to play back directly with the numeric buttons Press ENTER button to start playback from the selected a title chapter track or time position DVD MENU DVD Most of DVD discs have their own menu screen DVD menu In this menu you can choose a chapter audio language subtitle etc NIGHT NIGHT TONE TONE T T...

Page 29: ...G ZOOM ZOOM ANGLE ANGLE AUDIO AUDIO S TITLE S TITLE T CLR T CLR RDS RDS FM MODE FM MODE MEMORY MEMORY TUNE PRESET TUNE PRESET BAND BAND TUNE MODE TUNE MODE REPEAT REPEAT RC2500ER RC2500ER ENTER ENTER MENU MENU TOP MENU TOP MENU DVD SET UP DVD SET UP RETURN RETURN DISPLAY MUTE VOLUME DIMMER SURROUND 0 9 8 7 6 5 4 3 2 1 TV CH TV VOL TV INPUT A D DSS VCR TV POWER TV TUNER DVD SLEEP STANDBY ON 1 2 4 3...

Page 30: ...nu screen is displayed on TV If menu is not displayed press TOP MENU button on the remote control unit 2 Choose a file by pressing a Cursor button FOLDER PLAY MODE SINGLE ELAPSED 02 18 1 0 2 3 4 5 ROOT GONZAI JPEG MP3 WMA048 WMA064 A B C D E 3 Press the 2 PLAY button to view the file To select a file while playing JPEG press 4 or button on the remote control unit TO FLIP THE PICTURE 1 Press Cursor...

Page 31: ...R MENU MENU TOP MENU TOP MENU DVD SET UP DVD SET UP RETURN RETURN DISPLAY MUTE VOLUME DIMMER SURROUND 0 9 8 7 6 5 4 3 2 1 TV CH TV VOL TV INPUT A D DSS VCR TV POWER TV TUNER DVD SLEEP STANDBY ON 1 1 When 4 appears during playback press ANGLE button on the remote control unit Each time ANGLE button is pressed angle changes 1 4 2 4 4 4 3 4 Angle 4 4 Angle 2 4 Angle 3 4 ZOOM FUNCTION DVD When playing...

Page 32: ...it is pressed repeat mode is changed in the following order 1 chapter track repeat Title all track repeat Off Note For repeat play on VCD discs with PBC function disable PBC function first NIGHT NIGHT TONE TONE T TONE T TONE SPK SET SPK SET NTSC PAL NTSC PAL 1 ALL 1 ALL A B A B RANDOM RANDOM CLR CLR PRG PRG ZOOM ZOOM ANGLE ANGLE AUDIO AUDIO S TITLE S TITLE T CLR T CLR RDS RDS FM MODE FM MODE MEMOR...

Page 33: ...f the desired passage press REPEAT A B button on the remote control unit indicator lights up DVD VCD SVCD CD 2 At the end of the desired passage press REPEAT A B button again then indicator lights up and the desired passage is played repeatedly DVD VCD SVCD CD 3 Press REPEAT A B button to cancel the A B repeat play 4 Press REPEAT 1 ALL button on the remote control unit to select the folder repeat ...

Page 34: ...MEMORY MEMORY TUNE PRESET TUNE PRESET BAND BAND TUNE MODE TUNE MODE REPEAT REPEAT RC2500ER RC2500ER ENTER ENTER MENU MENU TOP MENU TOP MENU DVD SET UP DVD SET UP RETURN RETURN DISPLAY MUTE VOLUME DIMMER SURROUND 0 9 8 7 6 5 4 3 2 1 TV CH TV VOL TV INPUT A D DSS VCR TV POWER TV TUNER DVD SLEEP STANDBY ON 2 3 4 1 In stop mode select the track file you want to play 2 When the RANDOM button on the rem...

Page 35: ...rogramming If the number of programmed tracks exceeds 32 the display below will be shown 5 Upon completion of all the programming press the 2 PLAY button The selected tracks are now played in the programmed order 6 Press 9 STOP button to stop program play To check the programmed track 1 While the unit is stopped and in program mode press the Cursor 3 4 buttons on the remote control unit repeatedly...

Page 36: ...WER TV POWER TV TV TUNER TUNER DVD DVD SLEEP SLEEP STANDBY ON STANDBY ON 1 3 2 1 To select Tuner press the TUNER button on the remote control unit 2 To select the band FM or AM you want to preset press the 2 BAND button on the remote control unit 3 To start auto preset memory press the MEMORY button for more than 2 seconds Up to 30 of the best received stations in your area will be stored automati...

Page 37: ...ONE SPK SET NTSC PAL 1 ALL A B RANDOM CLR PRG ZOOM ANGLE AUDIO S TITLE T CLR RDS FM MODE MEMORY TUNE PRESET BAND TUNE MODE REPEAT RC2500ER ENTER MENU TOP MENU TOP MENU DVD SET UP DVD SET UP RETURN DISPLAY DISPLAY MUTE MUTE VOLUME VOLUME DIMMER DIMMER SURROUND SURROUND 0 0 9 9 8 8 7 7 6 6 5 5 4 4 3 3 2 2 1 1 TV CH TV CH TV VOL TV VOL TV INPUT TV INPUT A D A D DSS DSS VCR VCR TV POWER TV POWER TV TV...

Page 38: ...LAY DISPLAY MUTE MUTE VOLUME VOLUME DIMMER DIMMER SURROUND SURROUND 0 0 9 9 8 8 7 7 6 6 5 5 4 4 3 3 2 2 1 1 TV CH TV CH TV VOL TV VOL TV INPUT TV INPUT A D A D DSS DSS VCR VCR TV POWER TV POWER TV TV TUNER TUNER DVD DVD SLEEP SLEEP STANDBY ON STANDBY ON 1 1 When A D button is pressed the input mode is switched between the analog and digital inputs In Digital mode the digital input jacks are select...

Page 39: ...isplay the setup menu in stop mode 3 With Cursor buttons select TV DISPLAY OSD LANGUAGE SUB TITLE TV DISPLAY TV TYPE PARENTAL RATING PASSWORD ENGLISH OFF 4 3 LB MULTI UNLOCK CHANGE DVD SETUP MENU 4 Press ENTER button repeatedly select the aspect ratio of your TV You can select from 4 3 LB 4 3 PS and 16 9 WIDE 4 3 LB Letter Box Displays wide picture on aspect 4 3 TV in Letter Box format 4 3 PS Pan ...

Page 40: ...ULTI UNLOCK CHANGE DVD SETUP MENU 4 Press ENTER button repeatedly select the picture format You can select from MULTI NTSC and PAL MULTI Select MULTI when a MULTI TV is connected NTSC Select NTSC When a NTSC TV is connected PAL Select PAL when a PAL TV Euro pean standard is connected 5 Press DVD SETUP button to confirm it and to exit from the setup menu PARENTAL RATING If a disc has parental lock ...

Page 41: ...der the menu If you don t want to change progressive scan mode Press DISPLAY button again When your TV or monitor isn t compatible with progressive scan never set the progressive scan mode to ON No picture will be shown on the monitor In case you set the progressive scan mode to ON by mistake press the DVD SETUP button again DVD SETUP MENU will display on TV And press the DISPLAY button to turn OF...

Page 42: ...n the remote control unit and the main unit If a strong light is near the unit turn it off Cannot play Load a disc with the playback side facing down If the disc is dirty clean the surface of the disc A blank disc has been loaded Load a prerecorded disc Check the region code of the DVD Sound skips Place the unit on a stable place to avoid vibration and shock If the disc is dirty clean the surface ...

Page 43: ...15 134 088 GELOSO 103 109 132 134 090 Gibralter 160 163 161 GOLDSTAR 092 003 017 099 001 075 076 077 090 161 163 169 183 GOODMANS 033 001 060 077 GORENJE 066 136 GREATZ 049 058 109 122 123 128 129 130 134 Gradiente 167 169 GRANADA 033 099 001 058 060 142 115 125 134 GRUNDIG 094 100 057 058 108 112 114 082 Grunpy 185 184 Hallmark 183 HANSEATIC 033 047 099 001 109 139 111 HANTAREX 097 Harley Davidso...

Page 44: ...35 083 SAMBERS 046 097 051 053 115 077 SAMPO 121 163 164 SAMSUNG 015 026 099 054 077 136 090 170 163 183 161 169 153 Samsux 164 SANYO 049 002 005 033 044 048 060 113 118 071 054 136 177 Sansei 188 Sansui 189 SBR 001 142 148 149 088 SCHAUB LORENZ 049 058 109 122 123 128 129 130 134 Scimitsu 161 SCHNEIDER 096 099 001 050 052 019 141 109 142 125 149 078 132 Scotch 183 Scott 186 185 183 161 184 Sears ...

Page 45: ...3 161 0 134 3 183 9 159 111 6 127 033 1 189 2 193 099 3 161 9 134 9 172 0 134 iii 04 8 26 4 38 PM Adobe PageMaker 6 5J PPC ...

Page 46: ...6 ohms Frequency Range 100 Hz 20 kHz Phantom Surround Back 5 cm Corn Full Range Impedance 12 ohms Frequency Range 150 Hz 20 kHz Dimensions WxHxD 105 x 185 x 135 mm Weight 1 0 kg SUBWOOFER SS2500SW Type Passive Bass reflex type Woofer 20 cm Corn Magnetically Shielded Impedance 6 ohms Frequency Range 40 Hz 150 Hz Dimensions WxHxD 246 x 360 x 360 mm Weight 8 2 kg Specifications subject to change with...

Page 47: ...ed trademark istributor or dealer on our website 35 1 Sagami Ohno 7 Chome Sagamihara shi Kanagawa 228 8505 Japan 1100 Maplewood Drive Itasca IL 60143 U S A P O Box 8744 5605 LS Eindhoven The Netherlands 04 8 26 4 38 PM Adobe PageMaker 6 5J PPC ...

Reviews: