background image

1-9-3

E61M7BLV1

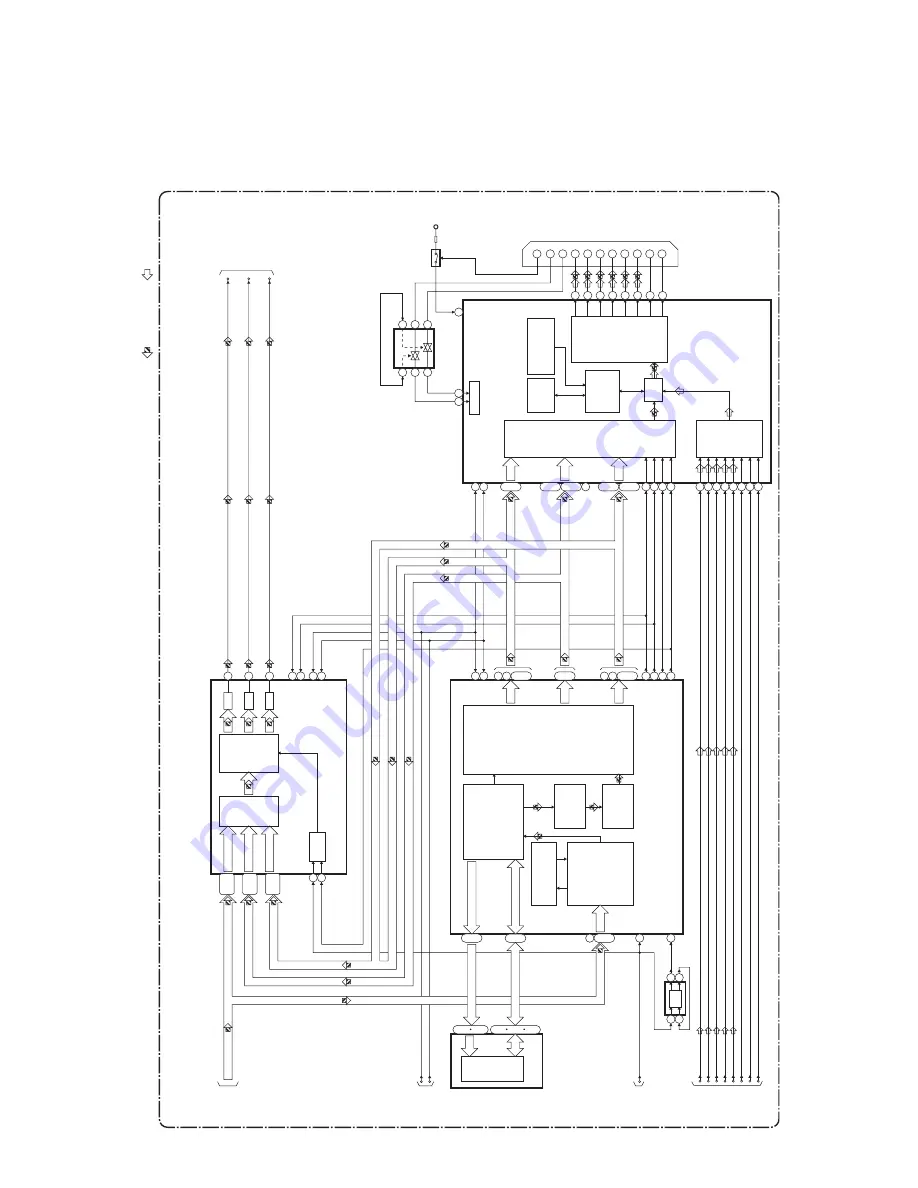
Video-1 Block Diagram

VIDEO SIGNAL

D

A

T

A(A

UDIO) SIGNAL

R(0-7)

ICF02

(SDRAM)

SDRAM

91

103

~

2

13

31

56

74

85

~

~

~

24

27

60

66

~

~

50

87

~

ICF01

(DIGT

AL VIDEO 

CONVER

TER)

ICF11

(HDTV VIDEO 

ENCODER)

SDRAM D

A

T

A

(0-31)

SDRAM ADDRESS(0-10)

NOISE REDUCER,

DEINTERLA

CER,FRAME 

RA

TE CONVER

TER AND

SDRAM INTERF

A

C

E

INPUT PR

OCESOR

WITH A

U

T

O

 SYNC

AND A

U

T

O

 ADJUST

196

CLOCK

GENERA

TION

PLLS

OUTPUT 

PR

OCESSOR WITH

SYNC GENERA

TION

AND DIGT

AL ANALOG

CONVER

TERS

VER

TICAL

AND

HORIZONT

AL

ENHANCERS

VER

TICAL

AND

HORIZONT

AL

SCALERS

YC(0-7)

YC(0-7)

YC(0-7)

199

205

~

YC(0-7)

140

145

~

148

155

~

136

137

130

135

~

126

127

49

56

~

57

58

~

61

65

~

75

79

~

68

70

~

VIDEO

DA

T

A

CAPTURE

BLOCK

A

UDIO

DA

T

A

CAPTURE

BLOCK

B(0-7)

G(0-7)

R(0-7)

B(0-7)

G(0-7)

R(0-7)

G(0-7)

119

V

-SYNC

118

H-SYNC

V

-SYNC

H-SYNC

122

HDMI-DE

125

VCLK

2

1

66

80

XOR

MASK

P

ANEL

LINK

TRANSMITTER

D/A

T

O

 DIGIT

AL

SIGNAL 

PR

OCESS

BLOCK 

DIA

GRAM

D

VD MAIN CB

A UNIT

TO

 A

U

D

IO

BLOCK 

DIA

GRAM

HDCP

ENCR

YPTION

ENGINE

HDCP

KEYS

EEPR

OM

REGISTERS

AND

CONFIGURA

TION

T

.M.D

.S D

A

T

A

2-

CNF01

3

1

6

4

HDMI-CONNECT

OR

T

.M.D

.S D

A

T

A

2+

9

7

10

12

T

.M.D

.S D

A

T

A

1-

T

.M.D

.S D

A

T

A

1+

T

.M.D

.S D

A

T

A

0-

T

.M.D

.S D

A

T

A

0+

T

.M.D

.S CLOCK+

T

.M.D

.S CLOCK-

35

36

32

33

29

30

27

26

ICF09

(HDMI INTERF

A

CE)

6

5

2

3

7

1

ICF04

(3.3V<-->5V CONVER

TER)

16

15

DDC D

A

T

A

DDC CLOCK

I2C SLA

VE

19

20

45

46

I2C-SCL

I2C-SD

A

I2C-SCL

I2C-SD

A

I2C-SCL

I2C-SD

A

T

O

 DIGIT

AL

SIGNAL 

PR

OCESS

BLOCK 

DIA

GRAM

19

18

67

43

44

HPD

QF01

+3.3V

HO

T PLUG 

DETECT

ICF06

1

2

5

(FLIP FLOP)

F/F

3

191

XT

AL-IN

CLOCK-PULSE

195

CLOCK-PULSE

SPDIF

PCM-D

A

T

A3

PCM-D

A

T

A2

PCM-D

A

T

A1

PCM-D

A

T

A0

PCM-LRCK

PCM-BCK

PCM-SCLK

T

O

 DIGIT

AL

SIGNAL 

PR

OCESS

BLOCK 

DIA

GRAM

5

7

8

9

10

11

12

6

I2C-SCL

I2C-SD

A

39

38

37

23

24

22

21

32

63

D/A

D/A

HDTV

VIDEO

ENCODER

DEMUX

PLL

53-55,

58-62 

4-9,

12,13 

16-18,

26-30

B(0-7)

R(0-7)

R(0,1)

G(0-7)

B(2-7)

G(0-7)

B(2-7)/R(0,1)

B(0-7)

G(0-7)

SDRAM D

A

T

A

(0-31)

SDRAM ADDRESS(0-10)

T

O

 VIDEO-2

BLOCK DIA

GRAM

VIDEO-Pr/R

VIDEO-Pb/B

VIDEO-Y/G

Summary of Contents for DV6600/N1B

Page 1: ... INSTRUCTIONS 1 2 2 LASER BEAM SAFETY PRECAUTIONS 1 2 3 IMPORTANT SAFETY PRECAUTIONS 1 3 1 STANDARD NOTES FOR SERVICING 1 4 1 CABINET DISASSEMBLY INSTRUCTIONS 1 5 1 HOW TO INITIALIZE THE DVD PLAYER 1 6 1 FIRMWARE RENEWAL MODE 1 7 1 TROUBLESHOOTING 1 8 1 BLOCK DIAGRAMS 1 9 1 SCHEMATIC DIAGRAMS CBA S AND TEST POINTS 1 10 1 WAVEFORMS 1 11 1 WIRING DIAGRAM 1 12 1 IC PIN FUNCTION DESCRIPTIONS 1 13 1 LE...

Page 2: ...lties do not hesitate to contact the Technical Department at above mentioned address 050616MZ USA MARANTZ AMERICA INC 1100 MAPLEWOOD DRIVE ITASCA IL 60143 USA PHONE 630 741 0300 FAX 630 741 0301 JAPAN Technical 35 1 7 CHOME SAGAMIONO SAGAMIHARA SHI KANAGAWA JAPAN 228 8505 PHONE 81 42 748 1013 FAX 81 42 741 9190 EUROPE TRADING MARANTZ EUROPE B V P O BOX 8744 BUILDING SILVERPOINT BEEMDSTRAAT 11 5653...

Page 3: ... CDs 4Hz to 20kHz 3 Super Audio CD 4Hz to 100kHz 2 S N ratio 115dB 3 Total harmonic distortion 1kHz CD 0 0045 4 Dynamic range DVD 100dB CD 98dB DIGITAL AUDIO OUTPUT Optical digital output Optical jack 1 set Coaxial digital output Pin jack 1 set POWER SUPPLY AC 200 240V 50Hz POWER CONSUMPTION 15 W MAXIMUM EXTERNAL DIMENSIONS 440 width x 65 height x 313 depth mm MASS 2 5 kg 5 5 lbs REMOTE CONTROL UN...

Page 4: ...o CDs with PBC function some operations e g track search and repeat tracks cannot be performed Cancel PBC function temporarily to perform those operations refer to page 17 10 This player cannot play the disc contents protected by Windows Media Digital Rights Management DRM NOTE This player cannot play the DVD RW discs that supports CPRM Content Protection for Recordable Media This player cannot pl...

Page 5: ...errors SBC444 Disc with DO errors black spots and fingerprints SBC444A 4822 397 30245 Disc 65 min 1kHz without no pause 4822 397 30155 Max diameter disc 58 0 mm 4822 397 60141 Torx screwdrivers Set straight 4822 395 50145 Set square 4822 395 50132 13th order filter 4822 395 30204 DVD test disc PAL 4822 397 10131 SERVICE HINTS ...

Page 6: ...ols also at this potential WARNING Safety regulations require that the set be restored to its original condition and that parts which are identical with those specified be used Veiligheidsbepalingen vereisen dat het apparaat in zijn oorspronkelijke toestand wordt terug gebracht en dat onderdelen identiek aan de gespecifieerde worden toegepast Bei jeder Reparatur sind die geltenden Sicherheitsvorsc...

Page 7: ... on Do not look directly at the laser beam CAUTION Use of controls and adjustments or doing procedures other than those specified herein may result in hazardous radiation exposure Location Top of DVD mechanism Do not look directly at the laser beam coming from the pickup or allow it to strike against your skin Drive Mechanism Assembly Laser Beam Radiation Laser Pickup Turntable CAUTION CLASS1MLASE...

Page 8: ... especially 1 Wires covered with PVC tubing 2 Double insulated wires 3 High voltage leads D Use specified insulating materials for hazardous live parts Note especially 1 Insulation tape 2 PVC tubing 3 Spacers 4 Insulators for transistors E When replacing AC primary side components transformers power cord etc wrap ends of wires securely about the terminals before solder ing F Observe that the wires...

Page 9: ... termi nals antenna terminals video and audio input and output terminals microphone jacks earphone jacks etc is lower than or equal to the specified value in the table below Measuring Method Power ON Insert load Z between B earth ground power cord plug prongs and exposed accessible parts Use an AC voltmeter to measure across the terminals of load Z See Fig 2 and the following table AC Line Voltage...

Page 10: ...machine then apply hot air to the Flat Pack IC about 5 to 6 seconds Fig S 1 1 2 Remove the flat pack IC with tweezers while applying the hot air 3 Bottom of the flat pack IC is fixed with glue to the CBA when removing entire flat pack IC first apply soldering iron to center of the flat pack IC and heat up Then remove glue will be melted Fig S 1 6 4 Release the flat pack IC from the CBA using tweez...

Page 11: ... by one using a sharp pin or wire to which solder will not adhere iron wire When heating the pins use a fine tip soldering iron or a hot air desoldering machine Fig S 1 4 3 Bottom of the flat pack IC is fixed with glue to the CBA when removing entire flat pack IC first apply soldering iron to center of the flat pack IC and heat up Then remove glue will be melted Fig S 1 6 4 Release the flat pack I...

Page 12: ...rs Fig S 1 6 Note When using a soldering iron care must be taken to ensure that the flat pack IC is not being held by glue When the flat pack IC is removed from the CBA handle it gently because it may be damaged if force is applied 2 Installation 1 Using desoldering braid remove the solder from the foil of each pin of the flat pack IC on the CBA so you can install a replacement flat pack IC more e...

Page 13: ...ed to remove any static electricity that may be charged on the body 2 Ground for Workbench Be sure to place a conductive sheet or copper plate with proper grounding 1 MΩ on the workbench or other surface where the semi conductors are to be placed Because the static electricity charge on clothing will not escape through the body grounding band be careful to avoid contacting semi conductors with you...

Page 14: ... body etc during unpacking or repair work To avoid damage of pickup follow next procedures 1 Short the three short lands of FPC cable with solder before removing the FFC cable CN201 from it If you disconnect the FFC cable CN201 the laser diode of pickup will be destroyed Fig D5 2 Disconnect Connectors CN301 CN401 CN601 and CNS01 Remove two Screws S 7A and S 7B and lift the DVD Main CBA Unit Fig D5...

Page 15: ... Fig D2 4 LED CBA 5 Function CBA 6 Front Assembly S 3 S 3 S 2 Fig D3 7 Rear Panel S 5 S 4 S 4 S 6 S 4 Fig D4 S 7A S 7B S 8 S 9 10 Jack PCB Holder 9 5 1ch Amp CBA 8 DVD Main CBA Unit CN401 CN301 L 5 A Fig D5 View for A Short the three short lands by soldering Either of two places Connector CNS01 CN7101 CN201 CN601 ...

Page 16: ...1 5 3 E61M7DC Fig D6 11 DVD Mechanism S 10 S 10 12 AV CBA S 11 S 11 S 12 Fig D7 13 Loader Base S 13 Fig D8 S 13 S 14 14 Main PCB Holder ...

Page 17: ...1 5 4 E61M7DC 3 How to Eject Manually 1 Remove the Top Cover 2 Rotate the roulette in the direction of the arrow as shown below A View for A Rotate this roulette in the direction of the arrow ...

Page 18: ... in that order Fig a appears on the screen 2 Press CLEAR button on the remote control unit Fig b appears on the screen When OK appears on the screen the factory default will be set 3 To exit this mode press POWER button MODEL Version Region EXIT POWER EEPROM CLEAR CLEAR Fig a differ depending on the models MODEL Version Region EEPROM CLEAR OK EXIT POWER EEPROM CLEAR CLEAR differ depending on the m...

Page 19: ...e power on by pressing the POWER button and the tray will close 9 Press 1 2 3 4 and DISPLAY buttons on the remote control unit in that order Fig g appears on the screen 10 Press CLEAR button on the remote control unit Fig h appears on the screen When OK appears on the screen the factory default will be set Then the firmware renewal mode is complete 11 To exit this mode press POWER button No Appear...

Page 20: ...vice it if defective FLOW CHART NO 1 The power cannot be turned on Is the fuse normal Is normal state restored when once unplugged power cord is plugged again after several seconds Is the EV 3 3V line voltage normal See FLOW CHART No 2 The fuse blows out Check if there is any leak or short circuiting on the primary circuit component and service it if defective Q1003 Q1008 Q1001 T1001 D1001 D1002 D...

Page 21: ...IC2001 Is there 500kHz oscillation at Pin 26 of IC2001 Are the filament voltage supplied between Pins 1 2 and Pins 29 30 of the fluorescent display tube And the negative voltage applied between these pins and GND Replace the fluorescent display tube Check the EV 3 3V line and service it if defective Check R2002 IC2001 and their periphery and service it if defective Check PWRCON line and service it...

Page 22: ...rol receiver RM2002 Or replace the remote control unit Check the line between Pin 1 terminal of receiver RM2002 and Pin 25 of CN1001 and service it if defective Is the L pulse sent out Pin 1 terminal of receiver RM2002 when the infrared remote control is activated Is the L pulse supplied to the Pin 25 of CN1001 Replace DVD Main CBA Is 5V voltage supplied to Pin 3 terminal of the infrared remote co...

Page 23: ...r Replace the DVD Mechanism No Yes Yes FLOW CHART NO 16 The disc tray cannot be opened and closed Replace the DVD Main CBA Original DVD Main CBA is poor Replace the DVD Mechanism No improvement can be found No Yes FLOW CHART NO 15 The disc tray cannot be opened and closed It can be done using the remote control unit Is the normal control voltage inputted to Pin 4 of IC2001 Refer to FLOW CHART NO 1...

Page 24: ...15 18 of IC1405 and service it if detective No Are the Y Cb Pb Cr Pr signals outputted to the COMPONENT OUT terminal JK1404 FLOW CHART NO 21 Picture does not appear normally Set the disc on the disc tray and playback Are the video signals outputted to each pin of CN1601 on the AV CBA Replace the DVD Main CBA or DVD Mechanism Check the line between each pin of CN1601 and each pin of IC1401 IC1402 I...

Page 25: ... CBA or DVD Mechanism Replace the DVD Main CBA or DVD Mechanism Replace IC1201 Check the periphery between Pins 1 7 of IC1201 JK1404 and JK1405 and service it if detective Check each line between each pin of CN1601 and each pin of IC1201 on AV CBA and service it if detective CN1601 13PIN IC1201 2PIN AUDIO L CN1601 15PIN IC1201 6PIN AUDIO R Are the analog audio signals inputted to each pin of IC120...

Page 26: ...2 6PIN SURROUND L R CN7102 7 5PIN IC7501 2 6PIN CENTER SUBWOOFER Are the analog audio signals inputted to each pin of IC7301 IC7401 and IC7501 Are the analog audio signals outputted to each pin of IC7301 IC7401 and IC7501 IC7301 1 7PIN FRONT L R IC7401 1 7PIN SURROUND L R IC7501 1 7PIN CENTER SUBWOOFER Yes Yes No No No Check each line and service it if defective No Replace the DVD Main CBA Unit No...

Page 27: ...461 2 1 3 3V IC202 OP AMP 15 16 14 13 12 11 17 18 23 6 4 5 3 1 2 25 24 27 26 87 SL AMP 139 SP ROT 3 3V 1 2 6 7 5 3 9 8 10 13 14 12 142 FD OFST 141 TD OFST ADAC MD ADAC MC 140 SL ADS ASPECT 14 I P SW 11 ASPECT I P SW TO VIDEO 2 BLOCK DIAGRAM TO AUDIO BLOCK DIAGRAM TO DIGITAL SIGNAL PROCESS BLOCK DIAGRAM DRIVE CBA DVD MAIN CBA UNIT TO SACD BLOCK DIAGRAM FG CBA 12 7 8 9 10 11 REMOTE SENSOR RM2002 Q20...

Page 28: ... RAM D A 156 157 Y I C VIDEO Y I I2C SDA I2C SCL I2C SDA I2C SCL VIDEO C YC 0 7 173 SD0 SPDIF 172 SD1 171 SD2 170 SD3 169 SD4 168 SD5 167 SD6 SD0 SPDIF SD1 SD2 SD3 SD4 SD5 SD6 166 SD7 194 XSHD 192 XSAK 193 SDCK XSHD XSAK SDCK 254 SACD RESET 195 XSRQ 191 SDEF SACD RESET XSRQ SDEF PSP WCK SACD READY SACD DATA PSP WCK SACD READY SACD DATA SACD LATCH SACD LATCH SACD SACD SDRAM DATA 0 15 SDRAM ADDRESS ...

Page 29: ...GNAL PROCESS BLOCK DIAGRAM DVD MAIN CBA UNIT TO AUDIO BLOCK DIAGRAM HDCP ENCRYPTION ENGINE HDCP KEYS EEPROM REGISTERS AND CONFIGURATION T M D S DATA2 CNF01 3 1 6 4 HDMI CONNECTOR T M D S DATA2 9 7 10 12 T M D S DATA1 T M D S DATA1 T M D S DATA0 T M D S DATA0 T M D S CLOCK T M D S CLOCK 35 36 32 33 29 30 27 26 ICF09 HDMI INTERFACE 6 5 2 3 7 1 ICF04 3 3V 5V CONVERTER 16 15 DDC DATA DDC CLOCK I2C SLA...

Page 30: ...AMP LPF DRIVER 9 13 4dB AMP 2dB AMP LPF DRIVER 11 6 18 IC1401 VIDEO DRIVER 4dB AMP 2dB AMP LPF DRIVER 2dB AMP DRIVER 4dB AMP 2dB AMP LPF DRIVER 3 1 5 6 7 1 1 VIDEO Y I CN601 CN1601 VIDEO Y I W F 2 VIDEO SIGNAL TO VIDEO 1 BLOCK DIAGRAM TO SYSTEM CONTROL SERVO BLOCK DIAGRAM TO DIGITAL SIGNAL PROCESS BLOCK DIAGRAM DVD MAIN CBA UNIT AV CBA VIDEO Cb Pb OUT VIDEO Y OUT VIDEO G VIDEO B VIDEO R VIDEO Cr P...

Page 31: ...A R MUTE 10 10 SURROUND L MUTE 8 8 SURROUND R MUTE 6 6 CENTER MUTE 14 14 A L MUTE 4 4 SUB WOOFER MUTE 16 16 A MUTE2 3 3 A MUTE 2 2 M MUTE MUTE ON 1 3 1 7 2 6 MUTE ON IC7301 Q7307 Q7308 AMP FRONT L OUT FRONT R OUT Q7302 JK7101 Q7301 MUTE ON 1 7 2 6 Q7351 Q7352 MUTE ON IC7401 Q7403 Q7404 AMP SURROUND L OUT SURROUND R OUT Q7402 Q7401 MUTE ON 1 7 2 6 MUTE ON IC7501 Q7503 Q7504 AMP CENTER OUT SUB WOOFE...

Page 32: ...SIGNAL PROCESS DSD OUTPUT I F ADDRESS BUS DATA BUS DST DECODER 6 2 7 123 9 31 168 XSAK 167 166 164 165 173 174 175 176 169 170 171 172 11 PCM SCLK 148 149 151 152 154 157 159 162 131 134 136 139 19 24 27 32 2 3 5 6 8 9 11 12 55 56 ICS13 1 2 1 2 4 ADAC MD ADAC MC ADAC MD ADAC MC 3 4 PCM SCLK TO SYSTEM CONTROL SERVO BLOCK DIAGRAM SURROUND R MUTE SURROUND R MUTE SURROUND L MUTE SURROUND L MUTE SUB WO...

Page 33: ...EV 11V 10 P ON 5V 1 2 9 P ON 3 3V 20 PWRCON D1006 SCHOTTKY BARRIER SCHOTTKY BARRIER D1008 F2 AV CBA TO CN401 Q1008 LATCH T1 6A L 250V REG 3 1 2 3 1 2V REG IC1003 3 1 2 Q1013 3 PULSE Q1020 Q1021 CAUTION Fixed voltage or Auto voltage selectable power supply circuit is used in this unit If Main Fuse F1001 is blown check to see that all components in the power supply circuit are not defective before y...

Page 34: ...stitute replacement parts that do not have the same safety characteristics as specified in the parts list may create shock fire or other hazards Notes 1 Do not use the part number shown on these drawings for ordering The correct part number is shown in the parts list and may be slightly different or amended since these drawings were prepared 2 All resistance values are indicated in ohms K 103 M 10...

Page 35: ... maintain original function and reliability of repaired units use only original replacement parts which are listed with their part numbers in the parts list section of the service manual 4 Voltage indications for PLAY and STOP mode on the schematics are as shown below 5 How to read converged lines 6 Test Point Information 2 3 1 5 0 2 5 5 0 The same voltage for both PLAY STOP modes Indicates that t...

Page 36: ...1 10 3 E61M7SCD1 DVD Main 1 7 Schematic Diagram 1 NOTE Either IC461 or IC462 is used for DVD MAIN CBA UNIT ...

Page 37: ...1 10 4 E61M7SCD2 DVD Main 2 7 Schematic Diagram ...

Page 38: ...NO PLAY STOP PIN NO PLAY STOP PIN NO PLAY STOP PIN NO PLAY STOP 129 2 3 2 3 161 0 0 193 3 2 3 2 225 1 9 1 9 130 2 3 2 3 162 1 7 1 7 194 3 2 3 2 226 0 0 131 2 3 2 3 163 1 7 1 7 195 1 7 1 7 227 3 2 3 2 132 2 4 2 3 164 0 0 196 0 0 228 3 3 3 3 133 2 4 2 4 165 1 3 1 3 197 3 5 3 5 229 3 0 3 0 134 2 4 2 4 166 3 2 3 2 198 230 135 2 3 2 3 167 3 2 3 2 199 231 1 6 1 6 136 2 3 2 3 168 0 0 200 232 137 2 3 2 3 ...

Page 39: ...1 10 6 E61M7SCD3 DVD Main 3 7 Schematic Diagram ...

Page 40: ...1 10 7 DVD Main 4 7 Schematic Diagram E61M7SCD4 ...

Page 41: ...1 10 8 DVD Main 5 7 Schematic Diagram E61M7SCD5 ...

Page 42: ...1 10 9 DVD Main 6 7 Schematic Diagram E61M7SCD6 ...

Page 43: ...1 10 10 DVD Main 7 7 Schematic Diagram E61M7SCD7 ...

Page 44: ...e that all components in the power supply circuit are not defective before you connect the AC plug to the AC power supply Otherwise it may cause some components in the power supply circuit to fail NOTE The voltage for parts in hot circuit is measured using hot GND as a common terminal CAUTION For continued protection against fire hazard replace only with the same type fuse ...

Page 45: ...1 10 12 E61M7SCAV2 AV 2 3 Schematic Diagram ...

Page 46: ... c d e f g c d e f g h i i a b a b a b a b a b FL2001 MATRIX CHART REPEAT TITLE GROUP VCR CHP REC SACD TRK ALL B PSCAN DVD P M HD V CD A A 5G 4G 3G 2G 1G 7G 6G a d g c b e f f i i REPEAT TITLE GROUP VCR CHP REC SACD TRK A ALL B PSCAN DVD PM HDVCD A AV 3 3 Function LED Schematic Diagram ...

Page 47: ...1 10 14 5 1CH AMP Schematic Diagram E61M7SCA ...

Page 48: ...hat all components in the power supply circuit are not defective before you connect the AC plug to the AC power supply Otherwise it may cause some components in the power supply circuit to fail NOTE The voltage for parts in hot circuit is measured using hot GND as a common terminal CAUTION For continued protection against fire hazard replace only with the same type fuse ...

Page 49: ... is used in this unit If Main Fuse F1001 is blown check to see that all components in the power supply circuit are not defective before you connect the AC plug to the AC power supply Otherwise it may cause some components in the power supply circuit to fail NOTE The voltage for parts in hot circuit is measured using hot GND as a common terminal CAUTION For continued protection against fire hazard ...

Page 50: ...1 10 17 FUNCTION CBA Top View FUNCTION CBA Bottom View BE6182F01013D ...

Page 51: ...1 10 18 LED CBA Top View LED CBA Bottom View BE6182F01013E ...

Page 52: ...1 10 19 BE5932F01011 5 1CH AMP CBA Top View 5 1CH AMP CBA Bottom View ...

Page 53: ...WF3 Pin 18 of CN1601 Pin 8 of CN1601 C1402 PLUS LEAD Pin 13 of CN1601 Pin 15 of CN1601 Pin 10 of CN1601 20 20µs 0 1V 0 1V VIDEO Y VIDEO Y VIDEO C VIDEO C 0 1V 0 1V 20 20µs VIDEO CVBS VIDEO CVBS 0 5V 0 5V 20 20µs AUDIO L AUDIO L 1V 1V 0 5ms 0 5ms AUDIO R AUDIO R 1V 1V 0 5ms 0 5ms SPDIF SPDIF 1V 1V 0 1 0 1µs ...

Page 54: ...15 15 AUDIO GND 11 11 AUDIO GND 12 12 AUDIO L 13 13 AUDIO R MUTE 14 14 FS TS DETECTOR 7 9 11 2 3 6 5 M SLED MOTOR M SPINDLE MOTOR AUDIO 5V 16 16 AUDIO 5V 17 17 SPDIF 18 18 AUDIO L MUTE 19 19 4 CN2004 CN2104 EV 5V 7 1 NU 6 2 STANDBY LED 5 3 GND 4 4 KEY 2 3 5 K2 2 6 HDMI LED 1 7 CN702 SP 3 SP 4 TRAY IN 5 GND 6 SL 7 SL 8 FS 3 TS 4 GND CD PD 5 GND DVD PD 6 PD MONI 7 DVD LD 8 TS 1 FS 2 GND 11 F 12 VREF...

Page 55: ...y Source 1 8 Out b KEY 2 Segment Output Key Source 2 9 Out c KEY 3 Segment Output Key Source 3 10 Out d KEY 4 Segment Output Key Source 4 11 Out e Segment Output 12 In f KEY 6 Segment Output Key Source 6 13 In g Segment Output 14 Out h Segment Output 15 VEE Pull Down Level 16 Out i Segment Output 17 Out 7G Grid Output 18 6G 19 5G 20 4G 21 3G 22 2G 23 1G 24 VDD Power Supply 25 VSS GND 26 In OSC Osc...

Page 56: ...313G 2SA1015 Y TE2 F T 2SA1015 Y TPE2 2SC2120 Y TE2 F T 2SC2120 Y TPE2 2SC2236 Y TPE6 C KTA1266 Y KTA1266 Y AT P KTC3203 Y KTC3203 Y AT P KTC3205 Y KTC3205 Y AT P BA1F4M T KRC103M KRC103M AT P KRA103M AT P 2SC1815 GR TE2 F T 2SC1815 GR TPE2 2SC1815 Y TE2 F T 2SC1815 Y TPE2 KTA1267 Y KTA1267Y AT P KTC3199 GR Y KTC3199 GR Y AT P BN1L3Z P KRA105M AT P KRA110M AT P KRA110M EL817B EL817C LTV 817B F LTV...

Page 57: ... CBA 2L071 2L041 A22 2L041 2L043 2L021 2L021 2L021 2L021 2B21 1B1 2B4 2B5 2L102 A B A B 2L102 2L023 2L023 2L052 2L052 A14 A1X A13 A14 A13 A15 A17 A2 A16 2L011 2B8 2L011 2L011 2L011 2L011 2L106 2L107 JK1401 JK1405 JK1404 JK1202 SW2081 JK1406 IC1204 LED CBA AC1001 F1001 2L041 DVD Main CBA Unit 5 1ch Amp CBA Function CBA 2L109 2L108 2B6 2L105 2L105 ...

Page 58: ...1 15 2 E61M7PEX Packing X10 X13 X2 X4 S2 S2 S4 Unit S1 X1 X5 X6 A22 A22 ...

Page 59: ...20092 A16 N1B nsp 00M38BW257010 LID TOP COVER BLACK E61M0UD 1VM320704 A16 N1S nsp 00M38BW257210 LID TOP COVER SILVER E61M4ED 1VM320706 X5 nsp 90M ZD000470R CORD AV CORD TSCKA Y RW100 OR AV CORD RCA M 2 TO RCA M 2 OR AV CORD DC2FN020001 WPZ0102TM015 OR WPZ0102LTE01 OR WPZ0102CAB01 X6 nsp 90M ZD000500R CORD RC CORD WPZ0102TM017 ORANGE WPZ0102TM017 ELECTRICAL PARTS LIST AV CBA C1001 90M DF100360R 90M...

Page 60: ...90M YU002030R FPC FFC CABLE 7P AV CBA TO IND CBA WX1E61M2 003 5 1CH AMP CBA JK7101 90M YT004210R 90M YT004210R TERMINAL 6PIN JACK MSD 246V 38 GILT FE JXRL060LY111 W7102 nsp 90M YU002070R FPC 16P FFC 5 1CH CBA TO MAIN WX1E61E2 002 NOTE ON SAFETY Symbol Fire or electrical shock hazard Only original parts should be used to replaced any part marked with symbol Any other component substitution other th...

Reviews: