background image

5

About Discs

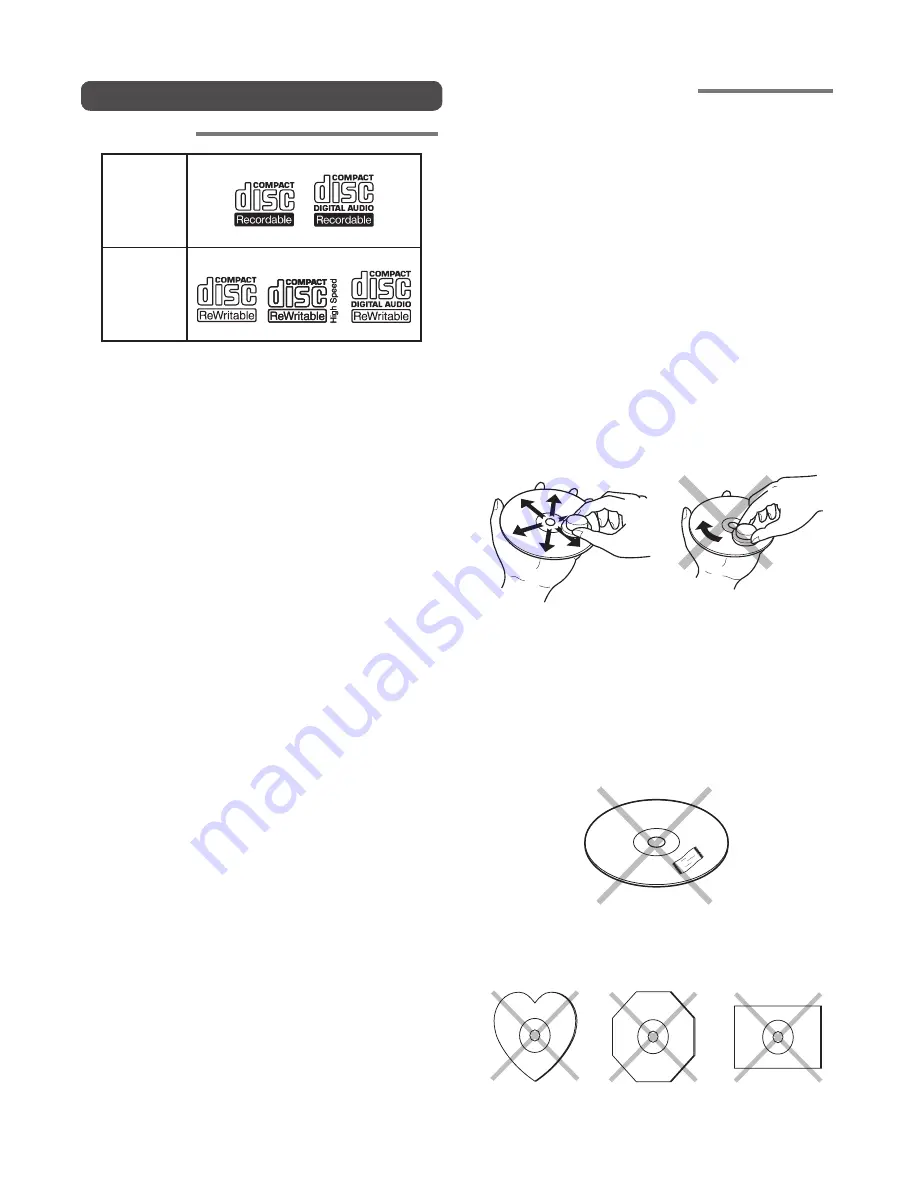
Playable discs

CD-R

CD-RW

Finalized CD-R and CD-RW discs recorded in the CD-DA 
format, MP3 format or Video-CD format can be played with 
the unit.

•  Finalize is the process to make a CD-R/CD-RW playable 

for players (not recorders)

•  Some discs may not be able to be played depending on 

condition of the discs and recording software.

•  Single CDs (8cm) cannot be used. 

ADDITIONAL INFORMATION

The glossy side shining like a rainbow is the front side of the 
disc, and the side on which the label is printed is the back. 
Unlike conventional turntables for playing analog discs, 
the unit reads the information recorded on the disc from 
underneath without contacting it using a beam of laser 
light. Therefore, the performance of a compact disc will not 
degrade like conventional analog records.

Handle discs carefully so as not to damage or scratch 
the front side.

To protect the disc, avoid placing it in the following 
locations:
•  In direct sunlight or near a source of heat like a heater.
•  In a place which is damp or dirty.
•  In a place which could be exposed to rain, such as near a 

window.

Always keep the disc surface clean.
When cleaning the disc surface, always be sure to use a 
special compact disc cleaner and wipe as shown below.

•  Do not use conventional record cleaner for analog records, 

as this will adversely affect the disc surface.


Store discs properly by placing them in their disc cases.

•  Do not attach a piece of paper or sticker on the label side 

of disc. When a disc has a piece of plastic tape or rental 
DVD/CD label with paste protruded from the edge or when 
a disc has a trace of such a sticky object, do not attempt 
to play the disc. If such a disc is played on the DVD player, 
impossibility of taking out the disc or other malfunction 
may result.

•  Do not use a disc with a special shape.
  Do not attempt to play a disc with a special shape such 

as a heart-shaped disc or octagonal disc. Otherwise the 
equipment malfunction may result.

Summary of Contents for CDR310

Page 1: ...Model CDR310 User Guide CD Recorder CLASS 1 LASER PRODUCT LUOKAN 1 LASERLAITE KLASS 1 LASERAPPARAT...

Page 2: ...the cover from the equipment Do not insert anything into the equipment through the ventilation holes Do not handle the mains lead with wet hands Do not cover the ventilation with any items such as tab...

Page 3: ...ion This product should not be placed in a built in installation such as a bookcase or rack unless proper ventilation is provided or the manufacturer s instructions have been adhered to Apparatus shal...

Page 4: ...de baixa voltagem Espa ol Esta unidad est de acuerdo con las normas EMC y las relacionadas con baja tensi n Svenska Produkten r tillverkad i enlighet med EMC direktivet och direktivet f r l gsp nning...

Page 5: ...dit 26 1 Trk Erase How to erase tracks 27 2 TrkMkErase How to erase all EDL marks within one track 27 3 AllMkErase How to erase all EDL marks 28 4 Format How to format a CF card 28 Virtual Track and C...

Page 6: ...o 128kbps stereo or 64kbps monaural Non compressed sound recording uses 16 bit linear pulse code modulation PCM Simple recording You can start simple recording to the HD just by pressing the REC butto...

Page 7: ...3 Package contents CDR310 AC power pack Power cord Battery holder AA type User Guide Customer Registration Document...

Page 8: ...n the power ON P XX Connect the external microphone to the MIC IN jack P XX Slide the power switch to the ON side P XX 3 Record P XX Press the REC button and recording starts Adjust the recording leve...

Page 9: ...t the disc avoid placing it in the following locations In direct sunlight or near a source of heat like a heater In a place which is damp or dirty In a place which could be exposed to rain such as nea...

Page 10: ...ecording is paused or during recording You can also adjust the recording level left and right L R balance by holding down the MENU button and rotating the JOG P XX Track selection You can select the t...

Page 11: ...search in the forward direction 4 CANCEL button Press this button in the MENU mode to cancel the menu contents being set and to return to the stopped status 5 PLAY PAUSE button Press this button when...

Page 12: ...speakers b Headphone PHONES jack Insert the stereo headphones plug here n LEVEL volume Turn this knob to adjust the internal speaker volume or volume output from the headphone jack Notes When recordin...

Page 13: ...ely control playback recording of the recorder by opening and closing the switch contact P XX D REMOTE 2 jack Connect microphone remote RC600PMD sold separately to this jack There is a recording indic...

Page 14: ...ording time is displayed in the AM PM format k Level meter icon Displays the recording levels in the left and right channels during recording Displays the playback levels in the left and right channel...

Page 15: ...this state Using batteries If you wish to run the recorder on battery power follow the procedure below to install batteries into the provided battery holder and insert the holder into the recorder Th...

Page 16: ...e recorder is not to be used for a prolonged period remove the batteries to prevent electrolyte leakage Make sure that the and markings on the batteries are aligned with the corresponding markings in...

Page 17: ...e BOOT process completes 2 Slide the power switch to the OFF side to switch the power OFF Battery type settings Set the battery type for the recorder to match the type of batteries you are using Defau...

Page 18: ...t of battery power remaining has decreased to approx half Only a small amount of battery power remaining There is not enough battery power remaining to record or playback Either replace the batteries...

Page 19: ...nth Date Hour Minute When DateForm M D Y 1 While the recorder is stopped press the MENU STORE button 2 Turn the JOG to select Date time and press the JOG 3 Turn the JOG to select Month Jan to Dec and...

Page 20: ...JOG 3 Turn the JOG to select the type of date form and press the JOG 4 Press the MENU STORE button to register the settings Time form settings There are 2 types of time form You can set the form to yo...

Page 21: ...Date Time FORMAT HD 1 2 3 Input RecFormat CD Split Default First level Second level The composition of these menu contents is explained below Menu Menu explanation Settings Default settings Preset P...

Page 22: ...phone Sets the attenuator function for the left channel side On Off Off Off Off MIC ATT R P xx External microphone Sets the attenuator function for the right channel side On Off Off Off Off IntMicATT...

Page 23: ...to select a menu item MENU STORE Button Menu mode Preset Date Time Date Form 1 2 3 First level 3 Press the JOG to choose the selected menu item MENU STORE Button Menu mode Preset Date Time Date Form...

Page 24: ...EC PAUSE button while the recorder is stopped to switch to recording standby status When in recording standby status the REC indicator flashes and the following contents are displayed on the display R...

Page 25: ...s Formatting the HD Formats all of the tracks recorded onto the HD Notes If the HD is formatted all contents of the HD are erased Before formatting re check the contents of the HD 1 While the recorder...

Page 26: ...the preset number that you wish to set and press the JOG 4 Turn the JOG to select Input and press the JOG 5 Turn the JOG to select the type of input source MIC Line Int Mic Dig In and press the JOG 6...

Page 27: ...pressed sound recording that uses the 16 bit linear pulse code modulation used on a CD Non compressed sound recording that uses WAVE Windows standard audio file format Non compressed sound recording t...

Page 28: ...ect Preset and press the JOG 3 Turn the JOG to select the preset number that you wish to set and press the JOG 4 Turn the JOG to select RecFormat and press the JOG 5 Turn the JOG to select the compres...

Page 29: ...the recording level control or operating method is set to Manual turn the JOG to set the recording level when recording is paused or during recording Also the LR balance can be set by holding down th...

Page 30: ...ed Turn the JOG to set the level The level can be changed from 10dB to dB LR balance settings Hold down the MENU button and turn the JOG while recording is paused or during recording and the LR balanc...

Page 31: ...ne connected to the MIC IN jack or the internal microphone is attenuated by 20dB Default value Preset1 Off Preset2 Off Preset3 Off 1 While the recorder is stopped press the MENU STORE button 2 Turn th...

Page 32: ...ry power Set this setting to Off when using the internal microphone a dynamic type microphone or other such microphone that does not use phantom power Default value Preset1 Off Preset2 Off Preset3 Off...

Page 33: ...inues from there This can be set to a maximum of 10 seconds which prevents missing the first part of a recording when recording is suddenly started Default value Preset1 Off Preset2 4 sec Preset3 4 se...

Page 34: ...was paused continues to be recorded When No is selected The data recorded by background is erased and the recording starts as a new track The new track is created from the point in which the track No...

Page 35: ...eset menu When silent skip is set to ON the prerecord function operates for 2 seconds irrespective of the prerecord setting time When silent skip is set to On and the REC PAUSE button is pressed while...

Page 36: ...used to create new tracks whenever desired making it easier to search for tracks during playback When manual track is set to On the M TRACK icon lights in the display Default value Preset1 On Preset2...

Page 37: ...Mbyte or 700Mbyte When auto track is set to On the A TRACK icon lights in the display Notes When both auto track and manual track are set to On at the same time if many tracks are created using manual...

Page 38: ...displayed 3 Press the MAKE CD button again to start burning all of the HD data onto a CD R The progress status is shown in the lower character display section The display is a 10 figure display with o...

Page 39: ...in If you selected No all of the HD data is erased After all of the HD data is erased HD Clear is displayed for 3 seconds after which the display returns to the default display Notes If an error occur...

Page 40: ...CD R Unused space remains on the disc but it is easier to play back these tracks because only complete tracks exist on the same disc If a track with a file size larger than the capacity of the disc is...

Page 41: ...ing playback 2 During playback press the PLAY PAUSE button to pause playback 3 Press the STOP button to stop playback This display shows the stopped status of playback If you press the PLAY PAUSE butt...

Page 42: ...to the next track and continues searching in the forward direction Fast reverse 1 You can search at high speed in the reverse direction by holding down the 5 button while playback is paused or stopped...

Page 43: ...gle After completing playback of the tracks playback is paused at the start of the next track Default value Preset1 Normal Preset2 Normal Preset3 Normal 1 While the recorder is stopped press the MENU...

Page 44: ...ry the recorder while a CD is inserted and operating Doing so may cause damage to the inserted CD Basic operations for playback 1 While the recorder is stopped press the HD CD button to switch to CD p...

Page 45: ...the JOG to select the automatic power off 5 10 15 30 minutes and press the JOG 5 Press the MENU STORE button to register the settings Beep sound alarm setting If there are no operations performed for...

Page 46: ...maining recordable time on the HD Return to the default display When CD is stopped CD total time and total number of tracks Default display Current time CD total time and total number of tracks Return...

Page 47: ...information Playback elapsed time for the track currently being played back Return to the default display The following display screens are for CD playback Playback elapsed time for the track current...

Page 48: ...lect Preset and press the JOG 3 Turn the JOG to select the preset number that you wish to set and press the JOG 4 Turn the JOG to select StopMonit and press the JOG 5 Turn the JOG to select function O...

Page 49: ...ton 2 Turn the JOG to select Preset and press the JOG 3 Turn the JOG to select the preset number that you wish to set and press the JOG 4 Turn the JOG to select Remote and press the JOG 5 Turn the JOG...

Page 50: ...n This is so file recording information can be seen on a regular CD player The information is recorded in the title areas for both as CD text for CD DA and as an ID3 tag for MP3 These text displays ca...

Page 51: ...sition of the speaker switch on the front side of the recorder Cannot record Check that the input source settings are correct Check to see if the maximum number of tracks 999 tracks have been recorded...

Page 52: ...y of the digital input signal is not 44 1kHz Write_Err Write to the HD or CD R failed Read_Err Read from the HD or CD R failed Format_Err Formatting failed Err_MPU MPU error detected Err_HD HD error d...

Page 53: ...0 mVrms 6 5 kohms LINE IN Type RCA terminal Input sensitivity 500 mVrms 20 kohms DIGITAL IN Type RCA terminal Input impedance 75 ohms Standard input output level 0 5Vp p Sampling frequency 44 1 kHz F...

Page 54: ...arges to your location anywhere in the United States or its territories 3 Whenever warranty service is required you must present the original dated sales receipt or other proof of date purchased Limit...

Page 55: ...D M Holdings Inc PROFESSIONAL BUSINESS COMPANY Printed in Japan 08 2006 00M28BS851250 ecmf e...

Reviews: