background image

Mantracourt Electronics Limited

 T24-RM1 User Manual     


5

Configuration 

This section explains how to install software and connect the required devices together. Please note that you 
will need the T24 Toolkit software and a T24-BS base station to allow your computer to communicate with T24 
telemetry devices. 
 

Installation 


T24 Toolkit 

To configure the devices we must use the 

T24 Toolkit

 software application. This can be downloaded from our 

web site or may be shipped with your products. 
Install this on a PC or laptop. 
Run 

setup.exe

 and follow the prompts to install the software. 


T24-BSu Base Station 

If you have a USB version of the base station (T24-BSu) then you just need to plug this into a USB socket on your 
PC. If you are using an alternative base station then please refer to the appropriate manual. 


Summary of Contents for T24-RM1

Page 1: ...T24 RM1 Relay Module User Manual www mantracourt co uk...

Page 2: ...es 6 Setup Base Station Communications 6 Home 7 Analyser 8 Information 9 Channel and Encryption 10 Save and Restore 11 Input Settings 12 Relay Operation Settings 13 Relay Settings Advanced 15 Errors I...

Page 3: ...d as a 6 character hexadecimal number consisting of the digits 0 to 9 and the letters A to F I e FFD3BE Data Tag Identifies each Data Provider message A Data Tag consists of a 4 character hexadecimal...

Page 4: ...the appropriate toolkit software LEDs Mode Flashes 2 x per second when operational Activity Flashes when T24 data packets are received Time Out No T24 data present for longer than user defined period...

Page 5: ...ined T24 device that causes the relay output to trigger Triggering of digital input 1 or 2 switch input which if configured reset latched relays Arrival of data from a specified data tag can reset lat...

Page 6: ...ices Installation T24 Toolkit To configure the devices we must use the T24 Toolkit software application This can be downloaded from our web site or may be shipped with your products Install this on a...

Page 7: ...d select 1 as the Base Station Address In the toolkit all items that can be changed by the user are coloured orange To change a value just click on the relevant orange item You will then be presented...

Page 8: ...dure Remove power from the T24 RM1 module Click the Pair button on the toolkit You now have 10 seconds to re apply power to the T24 RM1 module If you connect successfully the toolkit will change to th...

Page 9: ...or communications issues This page shows the radio signal levels detected across all the channels available to the T24 series of devices Using this tool may help in detecting noisy areas and allow you...

Page 10: ...ed T24 RM1 User Manual 9 Information This page shows you information about the connected device Items you can change Name You can enter a short descriptive name 11 characters which may help you recogn...

Page 11: ...s Items you can change Channel Select a channel between 1 and 16 The default is channel 1 You can use the Spectrum Analyser mode to determine a good clean channel to use NOTE Channel 16 is used to neg...

Page 12: ...the configuration file to All configuration information including calibration data will be saved to the file The file extension is tcf Restore Click this button to open a file dialog window to allow...

Page 13: ...hether the relay will activate See the Relay Operation Settings section for details Items you can change Relay1DataTag 1 8 Enter up to eight Data Tags the data from which will be used to determine the...

Page 14: ...compared to the setpoint i e If any of the individual acquisition modules exceed the setpoint Difference The difference between the lowest and highest values of all the Data Tags is calculated and thi...

Page 15: ...tronics Limited T24 RM1 User Manual 14 Operation and Hysteresis Settings Normal Operation Inverted Operation _________ RELAY ENERGISED RELAY DE ENERGISED Set Point Hysteresis OPTIONAL LATCH OPTIONAL L...

Page 16: ...zero to disable this feature Waker Duration Enter a time in milliseconds for this module to attempt to wake acquisition modules when first powered up The default is 12000 milliseconds 12 seconds When...

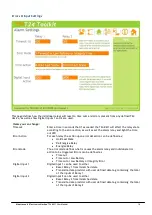
Page 17: ...upon error detection can be defined as Hold Last State De Energise Relay Energise Relay Error Mode The error mode defines what is causes the alarm relay and individual error action to be triggered Err...

Page 18: ...ials for product enclosures preference should be given to fibreglass light coloured ABS or Polypropylene at the wavelength of 2 4GHz radio other materials will adversely affect the signal by attenuati...

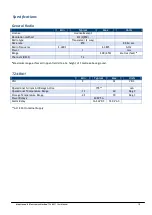
Page 19: ...dio Frequency 2 4000 2 4835 GHz Power 1 mw Range 200 650 Metres feet Channels DSSS 16 Maximum range achieved in open field site at a height of 3 metres above ground T24 RM1 Min Typical Max Units PSU 9...

Page 20: ...tiva 1999 5 EC Nederlands Deze apparatuur voldoet aan de belangrijkste eisen en andere voorzieningen van richtlijn 1999 5 EC Norsk Dette utstyret er i samsvar med de grunnleggende krav og andre releva...

Page 21: ...the equipment In order to fulfil the certification requirements the OEM must comply with FCC regulations 1 The system integrator must ensure that the text on the external label provided with this dev...

Page 22: ...ollowing form If the CE marking is reduced or enlarged the proportions given in the above graduated drawing must be respected The CE marking must have a height of at least 5mm except where this is not...

Page 23: ...Range to which this declaration relates are in conformity with the appropriate standard EN 300 328 following the provisions of the Radio and Telecommunications Terminal Equipment Directive 1999 5 EC F...

Page 24: ...sary to return the product to Mantracourt please include a note stating name company address phone number and a detailed description of the problem Also please indicate if it is a warranty repair The...

Reviews: