1
/
18
FT-6DOF-NB
FEETECH 6 Degrees of Freedom Nano Biped kit
FEETECH 6自由度双足机器人套件
Instruction Manual
使用说明手册
Version 1.00
Page 1: ...1 18 FT 6DOF NB FEETECH 6 Degrees of Freedom Nano Biped kit FEETECH 6 Instruction Manual Version 1 00...
Page 2: ...cedure 7 SCServo Arduino Download and install SCServo Arduino lib 12 SCServo Arduino SCServo Arduino lib instructions 12 Arduino Download Arduino Program 13 Perform Demonstrative Motions 14 About FT N...
Page 3: ...may be unavoidable missing parts or errors With a view to providing the user updated and complete information in the instruction manual we keep improving and supplement the contents of this instructio...
Page 4: ...e may lower after some while of operation and cause abnormal actions of the kit In such case remove and fully charge the battery before using again If prolonged testing and operation is required we su...
Page 5: ...rovides connection with the servo round horn and movement space of the Servo It also provides connection with two U shape brackets for different applications Aluminum U shape Bracket 27mm FK UB 001 4...
Page 6: ...dback the value of Position Temperature Load Speed and Input Voltage SCServo is easy to be controlled by Arduino Dimensions LxWxH 40 0X20 0X40 5mm Weight 56 g Speed 65RMP 7 4V Torque 16 5kg cm 7 4V Sc...
Page 7: ...joints to prevent the nut from loosening Assembly Procedure Kit packaging and all components 1 Installation of Foot Bracket and Servo side Bracket Foot Bracket x 2 Servo side Bracket x 2 M3 ISOF 3 x...
Page 8: ...e ID2 x 2 TP1P 2 x 6 mm x 8 3 U Installation of U shape Bracket 37mm U U shape Bracket 37mm x 4 M3x6 ISOP 3 x 6 mm x 8 M3 Nut 3 x 5 mm x 8 4 U Installation of U shape Bracket to ankle servos 2 Part of...
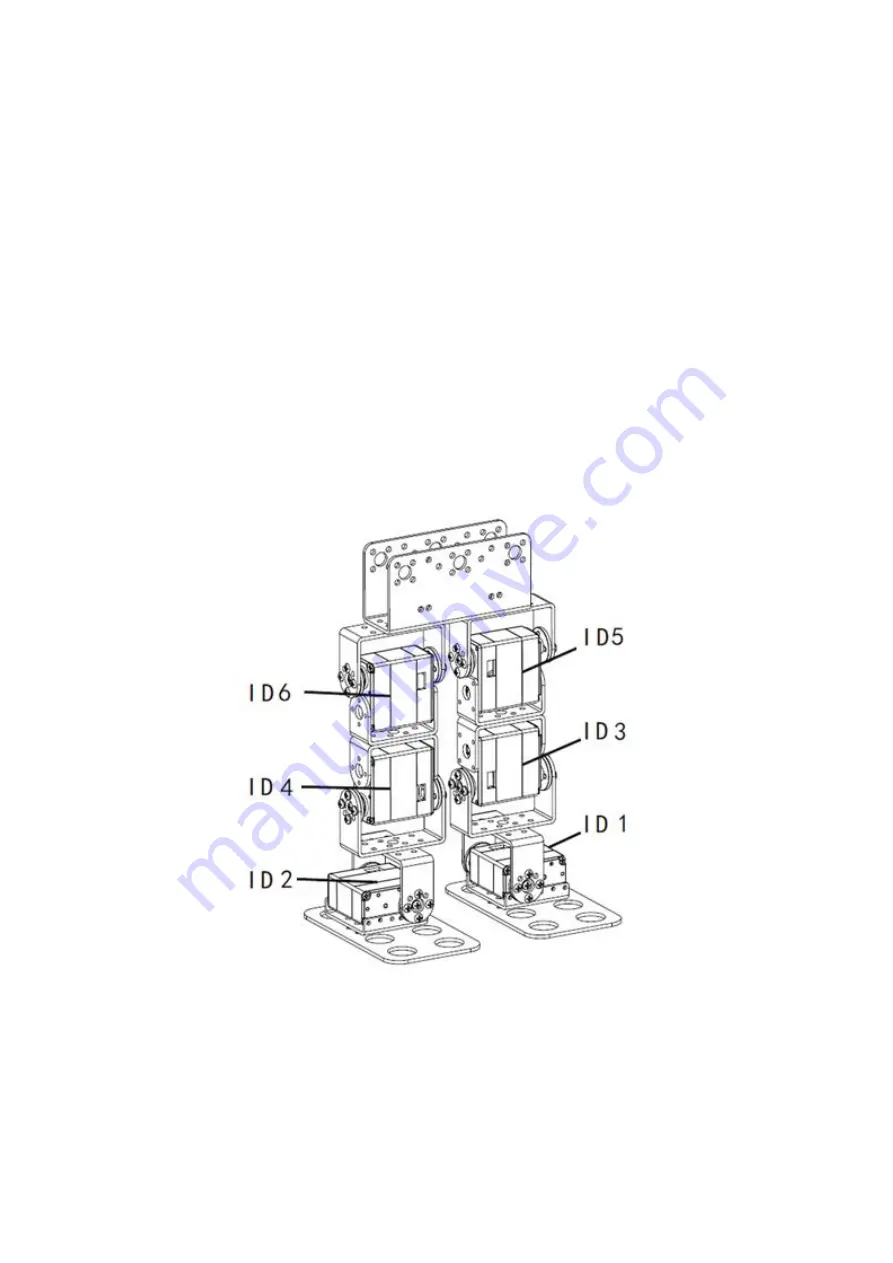
Page 9: ...8 6 U Installation of U U shape Bracket to servos 5 Part of step 5 x 2 SCS15 ID3 ID4 ID5 ID6 Servo ID3 ID4 ID5 ID6 x 4 TP1P 2 x 6 mm x 28 7 U Installation of U shape Bracket to servos 4 Part of step 4...
Page 10: ...step 7 x 2 U U shape Bracket 37mm x 2 M3x4 ISOP 3 x 4 mm x 16 Pay attention to the red midpoint marks on the round servo horn 9 U Installation of Main U shape Bracket to servos 8 Part of step 8 x 2 U...
Page 11: ...11 18 10 Connect black cable to servos 9 Part of step 9 x 1 3P Black 3P cable x 6 11 NANO TTLinker_mini Installation of NANO Shield and connect TTLi...
Page 12: ...duino Download and install SCServo Arduino lib Arduino SCServo Arduino libraries http www feetechrc com download SCServo libraries Arduino Before editing and download the Arduino program if there is n...
Page 13: ...output torque OFF SCServo EnableTorque 0xfe 1 Enable ALL SCServo output torque ON SCServo EnableTorque 0xfe 0 Enable ALL SCServo output torque OFF SCServo SCServo ID ID ID ID ID short define s16 short...
Page 14: ...lease go to http www feetechrc com download to download Arduino_Program_biped_FT_6DOF_ NB Rar to the local computer Then unpack In addition please confirm SCServo library file in t he Arduino librarie...
Page 15: ...eration video About FT NANO Shied and TTLinke_mini NANO Arduino Nano TTLinker_mini LED1 LED2 S1 S2 LED Arduino Nano D4 D2 Arduino Nano A1 A2 TTLinker_mini Arduino Nano TX1 RX0 Arduino Nano SCServo The...
Page 16: ...on or Reset within 1 second Press Off Flash Program Motion by Hand Enter Press Flash Off Program Motion by Hand Exit Press Off On Save Current Motion Save Press ON Flash Perform Motion Power on or Re...
Page 17: ...he time of between start works to LED2 normally on biped robot must keep the position to set up initial motion LED2 normally on is mean that the initial state set up complete Note If after power on or...
Page 18: ...rrent Motion EEPROM S2 LED1 LED2 LED1 LED2 When current motion need to be saved into EEPROM please press S2 button at this time LED1 normally on LED2 flashing one time complete store return programmin...