background image

USER’S MANUAL

18

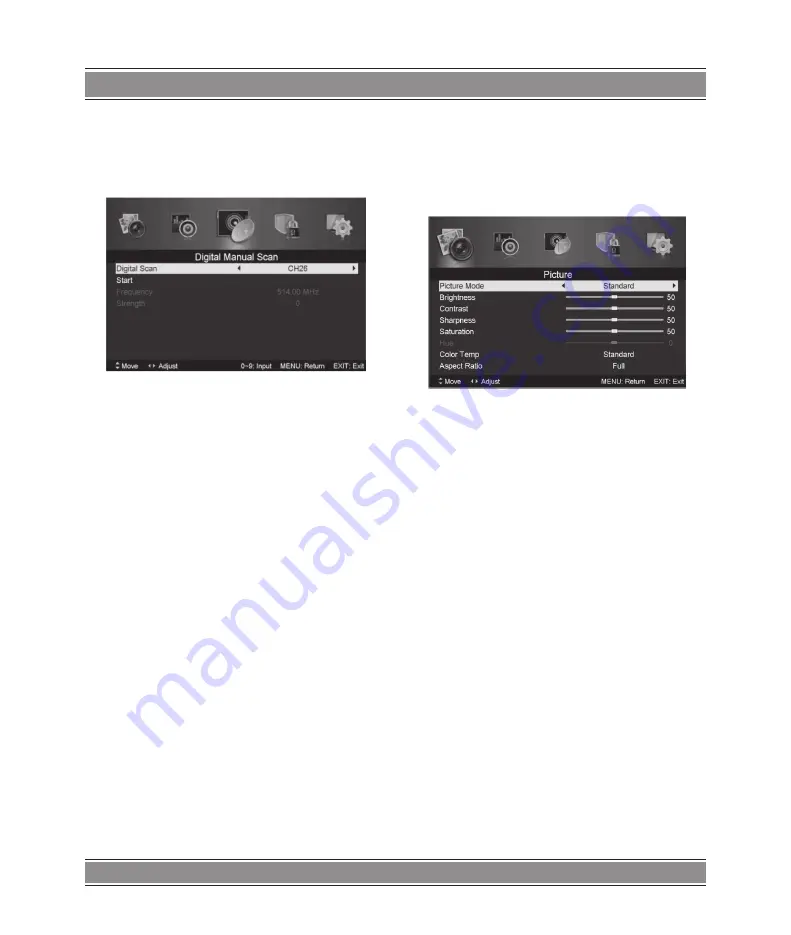
3.Digital Manual Tuning
Press  

 / 

 button to select “Diigital Manual Scan” and press 

the 

 button to start. 

Press “MENU” button to return the previous menu. 
Press “EXIT” button to exit the menu. 

4.Channel  Edit
Press 

 / 

 button to select “Channel Edit” and press the 

“ENTER” button to enter. 

a. DELETE
Press 

 / 

 button to select the program and press “RED” 

button once to delete the program.

b. RENAME
Press  

 / 

, button to select the program and press “GREEN” 

button to rename the program. Press 

 / 

, button to select the 

item which you want to change and press the 

 / 

,button to 

select the different item . Press “ENTER” button to confirm.

NOTE:
RENAME only use in ATV.
b. MOVE
Press 

 / 

,button to select the channel and press the “YEL-

LOW” button to move . Then press the 

 / 

,button to select 

the channel with which you want to move. Press “YELLOW” 
button again to confirm.

c. SKIP
Press 

 / 

,button to select the channel which you want to 

skip and press the “BLUE” button to skip . Press “BLUE” button 
again to cancel the setting.

5. Signal information (only use in DTV)
Press 

 / 

,button to select “Signal information” and press 

the “ENTER” button . Press “MENU” button to return the previous 
menu. Press “EXIT” button to exit the menu.

Picture

You can select the type of picture, which best corresponds 

to your viewing. 

Press the “MENU” button to enter the OSD menu. Then press  

 / 

, button to select the “PICTURE” menu. Press 

 / 

 button 

to select “Picture Mode” and press the

 / 

,button to select. 

1. Pressk 

 / 

 button to select “Brightness” and press the  

 / 

button to enter brightness adjustment menu to adjust 

brightness.

2. Press 

 / 

, button to select “Contrast” and press the 

 / 


button to enter contrast adjustment menu to adjust contrast.

3. Press 

 / 

 button to select “Sharpness” and press the  

 / 

 button to enter sharpness adjustment menu to adjust 

sharpness.

4. Press 

 / 

 button to select “Saturation” and press the 

 / 

 button to enter Saturation adjustment menu to adjust 

saturation.

5. Press 

 / 

 button to select “Hue’’ and press the 

 / 


button to enter hue adjustment menu to adjust hue.

6. Press 

 / 

 button to select “Sharpness” and press the 

 / 

 button to enter sharpness adjustment menu to adjust 

sharpness.

7. Press 

 / 

 button to select “Color Temp” and press the 


 button to select mode Standard/Cool/Warm.. 

8. Press  

 / 

 button to select “Aspect Ratio” and press the 

 / 

 button to select. 

Press  

 / 

 button to select “Advanced Settings” and press 

the 

 button to enter Advanced Settings adjustment menu 

to adjust.

Sound

You can select the type of sound, which best corresponds 

to your listening.

Press the “MENU” button to enter the OSD menu. Then press  

 / 

 button to select the “SOUND” menu. 

Summary of Contents for LED3201

Page 1: ...Instrukcja obs ugi User s Manual LED TV 32 LED3201 Przeczytaj mnie Read me...

Page 2: ...TV 12 Lista program w ulubionych 12 Informacje o programie 12 Audio 12 Elektroniczny przewodnik po programach EPG 12 Napisy 12 Z cze CI 13 Funkcje USB 13 Zdj cia 13 Muzyka 13 Filmy 13 Tekst 14 Tryb PV...

Page 3: ...ite List 21 Program Information 21 Audio 21 Electronic Program Guide EPG 22 Subtitle 22 Common interface 22 USB Features 22 Photo 22 Music 23 Movie 23 Text 23 PVR Operation 23 Trouble Shootiing 24 Spe...

Page 4: ...i nale y zachowa odst p minimum 10 cm z ka dej strony urz dzenia adne odkryte r d a ognia takie jak zapalone wiece nie mog by umieszczane na urz dzeniu ani w jego pobli u Bateriepowinnyby u ywanezgodn...

Page 5: ...ja opcjonalna Pod czy wej cie USB do gniazdka USB znajduj cego si na telewizorze UWAGA Za pomoc gniazda USB mo na pod czy pr d sta y o maksymalnym napi ciu 500 mA Zaleca si zastosowanie innego r d a z...

Page 6: ...isze funk cyjne telegazety INFO Wy wietla na ekranie informacje systemowe SOURCE Wy wietla dost pne r d a sygna u OK Naciskaj cstrza kimo nawybiera lub zmienia ustawienia wybranych pozycji w menu ekra...

Page 7: ...nijprzyciskMENU abywy wietli menug wne Naci nij aby wybra kana CHANNEL w menu g wnym 1 Skanowanie automatyczne Naci nij przycisk aby wybra tryb Auto Scan Naci nij przycisk aby wybra kraj i skorzystaj...

Page 8: ...ONYprzycisk abyzmieni nazw programu Naci nij przycisk aby wybra pozycj przewidzian do zmiany a nast pnie aby wybra inn pozycj Naci nij ENTER aby potwierdzi UWAGA Opcja zmiany nazwy jest dost pna wy cz...

Page 9: ...ast pnie naci nij aby wybra menu SOUND d wi k 1 Naci nij przycisk aby wybra tryb d wi ku Sound Mode a nast pnie aby wybra jeden z tryb w 2 Naci nijprzycisk abywybra wysokietony Treble a nast pnie aby...

Page 10: ...k lub aby wybra ustawienia godziny Time Setting 8 Naci nij przycisk lub aby wybra ustawienia PVR 9 Naci nijprzycisk abywybra opcj FirstTimeInstalla tion pierwszainstalacja anast pnieENTER abyskonfigur...

Page 11: ...wietlenie przez system okna EPG Po prawej stronie okna pokazuj si informacjeodacieigodzinie Date Time Polewejstronieokna znajduje si lista wszystkich kana w W prawej kolumnie listy pokazanezostaj prog...

Page 12: ...aby wej do podmenu 4 Naci nij przycisk EXIT aby powr ci do poprzedniego menu Muzyka 1 Naci nijprzycisk abywybra MUSIC Muzyka wmenu g wnym a nast pnie naci nij ENTER aby wej do menu 2 Naci nij przycis...

Page 13: ...aci nijprzycisk abywybra konfiguracj PVR PVR Settings i ENTER lub aby wej do menu a Naci nijprzycisk abywybra mened eraplik w File Manager i ENTER aby sprawdzi system plik w PVR b Naci nij by wybra li...

Page 14: ...ana stacja telewizyjna mo e mie problemy z nadawaniem Wyreguluj jasno kontrast w menu VIDEO Sprawd czy urz dzenie dzia a w trybie PAL Zak cenia d wi kowe Odsu od telewizora wszelkie urz dzenia dzia aj...

Page 15: ...I input terminal 11 USB input terminal 10 CI slot 12 COAXIAL connect to a 5 1 audio system Optional Configuration as below Connect the USB to the USB jack on the set NOTE It is only 500 mA MAX of DC c...

Page 16: ...USER S MANUAL 16 Remote Control V V CH CH SLEEP TS FAV CH REC GUIDE TEXT AUDIO P MODE S MODE P SIZE SUBTITLE DTV RADIO SOURCE INFO MENU EXIT GUIDE...

Page 17: ...ess the button to select ON or OFF Note Searching for platform will take a long time please be patient Channel Press MENU button to display the main menu Press button to select CHANNEL in the main men...

Page 18: ...the menu Picture You can select the type of picture which best corresponds to your viewing Pressthe MENU buttontoentertheOSDmenu Thenpress buttontoselectthe PICTURE menu Press button to select Picture...

Page 19: ...ton to select On or Off 2 Press buttontoselect channellocks andpressthe button to select channels to lock 3 Press button to select Parental Rating and press the button to set 4 Press button to select...

Page 20: ...restore all setting to default setting PC Pressthe MENU buttontoentertheOSDmenu Thenpress button to select the PC Setting menu Only available in PC model Press button to select Auto Adjust menu and pr...

Page 21: ...o Check details at PVR s Schedule List introduction Press Blue button to enter remind setting Press the button to select CH and press the buttontoselectthechannelnumbertoseethecurrentchannel s program...

Page 22: ...er 3 Press BLUE button to enter the sub menu to set 4 Press the exit button to back to the previous menu Text 1 Press button to select TEXT in the main menu then press enter button to enter 2 Press bu...

Page 23: ...e SOURCE button the remote then press the button repeatedly to select the TV source Poor picture sound OK Check the cable between TV and antenna external AV device Try another channel the station may...

Page 24: ...ontrast ratio 1000 1 Response time 5ms Speaker system details 2 x 6 Watt Screen mode 4 3 16 9 TV tuner reception system PAL SECAM Dolby Digital Plus E AC 3 Stereo reception system B G D K I L L M N DB...

Page 25: ...serwis manta com pl od poniedzia ku do pi tku w godz 9 00 17 00 Producent zastrzega sobie mo liwo wprowadzenia zmian w specyfikacj produktu bez uprzedzenia Strona g wna www manta com pl Strona wsparci...

Reviews: