background image

20

MATTOC PRO SERVICE MANUAL

DAMPER SERVICE

1

2

Using a 2mm Hex wrench remove the 

screw of the MC2 knob.

Note:

 Be sure to hold the HBO knob still 

while removing the screw/nut.  These 

tend to move and can damage the 

damper if the knob is over turned.

Remove the black high speed 

compression knob while keeping the 

silver HBO knob in place.

Summary of Contents for Mattoc Pro

Page 1: ...pro 2017...

Page 2: ...es Bay Rd Mequon WI 53092 Tel 888 686 3472 Email techsupport hayesbicycle com Web www hayescomponents com Hayes Components Europe Dirnismaning 20 a 85748 Garching b Munich Germany ph 49 0 89 203237450...

Page 3: ...essures Warnings contained in this manual must be observed to avoid damage to fork serious injury or even death We highly recommend that service to this fork be performed by a certified bicycle mechan...

Page 4: ...OF CONTENTS SECTION PAGENUMBER REQUIRED TOOLS 5 EXPLODED DIAGRAM 6 10 CASTING REMOVAL SERVICE 12 14 AIR SPRING SERVICE 15 19 DAMPER SERVICE 20 23 CASTING INSTALLATION 24 26 COMPRESSION DAMPER INSTALL...

Page 5: ...t number 85 0022 5wt Maxima Fork oil Manitou part number 85 0023 Manitou Tool Kit Manitou part number 172 31133 This includes the Manitou Cassette Tool 8mm thin wall socket and flat ground 24mm socket...

Page 6: ...6 MATTOC PRO SERVICE MANUAL MAttocPro110 27 5 Explodedview...

Page 7: ...7 MATTOC PRO SERVICE MANUAL MagnumPro110 27 5 29 Explodedview...

Page 8: ...8 MATTOC PRO SERVICE MANUAL MAttocPro110 29 Explodedview...

Page 9: ...9 MATTOC PRO SERVICE MANUAL MAttocPro100 26 Explodedview...

Page 10: ...10 MATTOC PRO SERVICE MANUAL MAttocPro100 27 5 Explodedview...

Page 11: ...ms which are not defective shall be the BUYER s responsibility If permitted by local law this warranty is expressly in lieu of all other warranties except as to title express or implied and in particu...

Page 12: ...ve rebound knob using a 2mm Hex wrench Insert a 8mm Hex wrench into the end of the rebound rod and loosen clockwise until rebound rod disengages from the casting threads 2 3 Unscrew air cap and depres...

Page 13: ...ngaged from the casting threads Remove casting from fork It is recommended this be done over a drain pan as the lower casting contains semi bath oil Allow oil in casting to drain out before continuing...

Page 14: ...wiper rings Apply semi bath fluid to the new foam wiper rings and install into fork casting Remove springs from lip of dust seals Clean seal area with Isopropyl alcohol Using the Manitou 34mm Seal Pre...

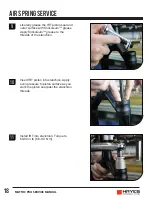
Page 15: ...NUAL AIRSPRINGSERVICE 1 2 3 Make sure the air is released from the fork Depress IRT and Compression Rod Schrader valves a few times to ensure all air is released Remove IRT using a 24mm socket Pull IR...

Page 16: ...ved clean the inside of the stanchion with isopropyl alcohol and a lint free towel Be careful to not scratch the inner surface of the stanchion Inspect the inside and outside of the stanchion for scra...

Page 17: ...Slickoleum grease to the top of the air piston Add Slickoleum grease to the stanchion threads before inserting the air spring assembly Spread grease across entire thread surface AIRSPRINGSERVICE 8 Ins...

Page 18: ...to piston surface as you work the piston seal past the stanchion threads Liberally grease the IRT piston seal and outer surface with Slickoleum grease Apply Slickoleum grease to the threads of the st...

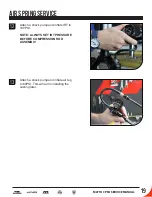
Page 19: ...L 12 13 Attach a shock pump and inflate IRT to 100PSI NOTE ALWAYS SET IRT PRESSURE BEFORE COMPRESSION ROD ASSEMBLY Attach a shock pump and inflate air leg to 60PSI This will aid in installing the cast...

Page 20: ...nch remove the screw of the MC2 knob Note Be sure to hold the HBO knob still while removing the screw nut These tend to move and can damage the damper if the knob is over turned Remove the black high...

Page 21: ...d the exposed nut and remove the red low speed adjustment knob Note Be sure to hold the knob still while removing the screw nut These tend to move and can damage the damper if the knob is over turned...

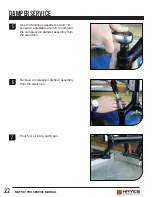
Page 22: ...MPERSERVICE 5 6 Use the Manitou cassette tool and 1 2 socket or adjustable wrench to unthread the compression damper assembly from the stanchion Remove compression damper assembly from the stanchion 7...

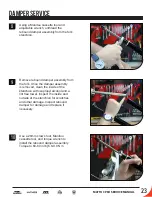
Page 23: ...the fork Once the damper assembly is removed clean the inside of the stanchion with isopropyl alcohol and a lint free towel Inspect the inside and outside of the stanchion for scratches and other dam...

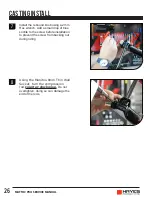
Page 24: ...we must first install the casting This ensures a correct oil level First apply a generous amount of Slickoleum grease to the oil seal dust seal area of the casting Make sure the air chamber is filled...

Page 25: ...seal lips do not fold over upon installation Insert 15cc of semi bath into each casting leg Once the semi bath is in the legs slide the casting the rest of the way onto the stanchion assembly Using an...

Page 26: ...ll Socket turn the compression rod counter clockwise Do not overtighten doing so can damage the end of the rods Install the rebound knob using a 2mm Hex wrench Add a small drop of blue Loctite to the...

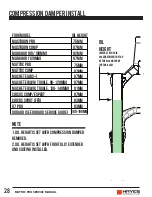
Page 27: ...d compress the fork 10 15 times Pour additional 5wt fork oil into the damper leg until the oil height space from the top of the damper leg to the top of the oil is set at the proper level See followin...

Page 28: ...m 87mm 75mm 87mm 180 190mm oil height refers to the air space between the top of the oil and top of the fork leg tech support techsupport hayesbicycle com fork model oil height markhor 120mm 97mm All...

Page 29: ...er leg Ensure the damper is set in the unlocked position when installing Using the Manitou cassette tool and torque wrench tighten down the MC2 at a torque of 60 80 in lb 6 8 9 0 N m Place the silver...

Page 30: ...damper if the knob is over turned Clean fork and use a shock pump to set to desired pressure Lightly pull the casing away from the CSA as you add air Pressure chart below for reference COMPRESSION DAM...

Page 31: ...31 MATTOC PRO SERVICE MANUAL Pro COMP...

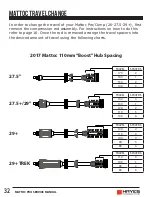
Page 32: ...n how to do this refer to page 16 Once the rod is removed arrange the travel spacers into the desired amount of travel using the following charts 2017 Mattoc 110mm Boost Hub Spacing 1 1 TRAVEL SPACERS...

Page 33: ...change 2017 Mattoc 100mm Hub Spacing 2017 Mattoc Comp IVA 1 2 2 2 2 TRAVEL SPACERS 170 0 160 1 150 2 140 3 TRAVEL SPACERS 160 0 150 1 140 2 TRAVEL SPACERS 170 0 160 1 150 2 140 3 TRAVEL SPACERS 140 4...

Page 34: ...WWW MANITOUMTB COM WWW HAYESCOMPONENTS COM 5800 W DONGES BAY ROAD MEQUON WI 53092...

Reviews: