


2
ENGLISH
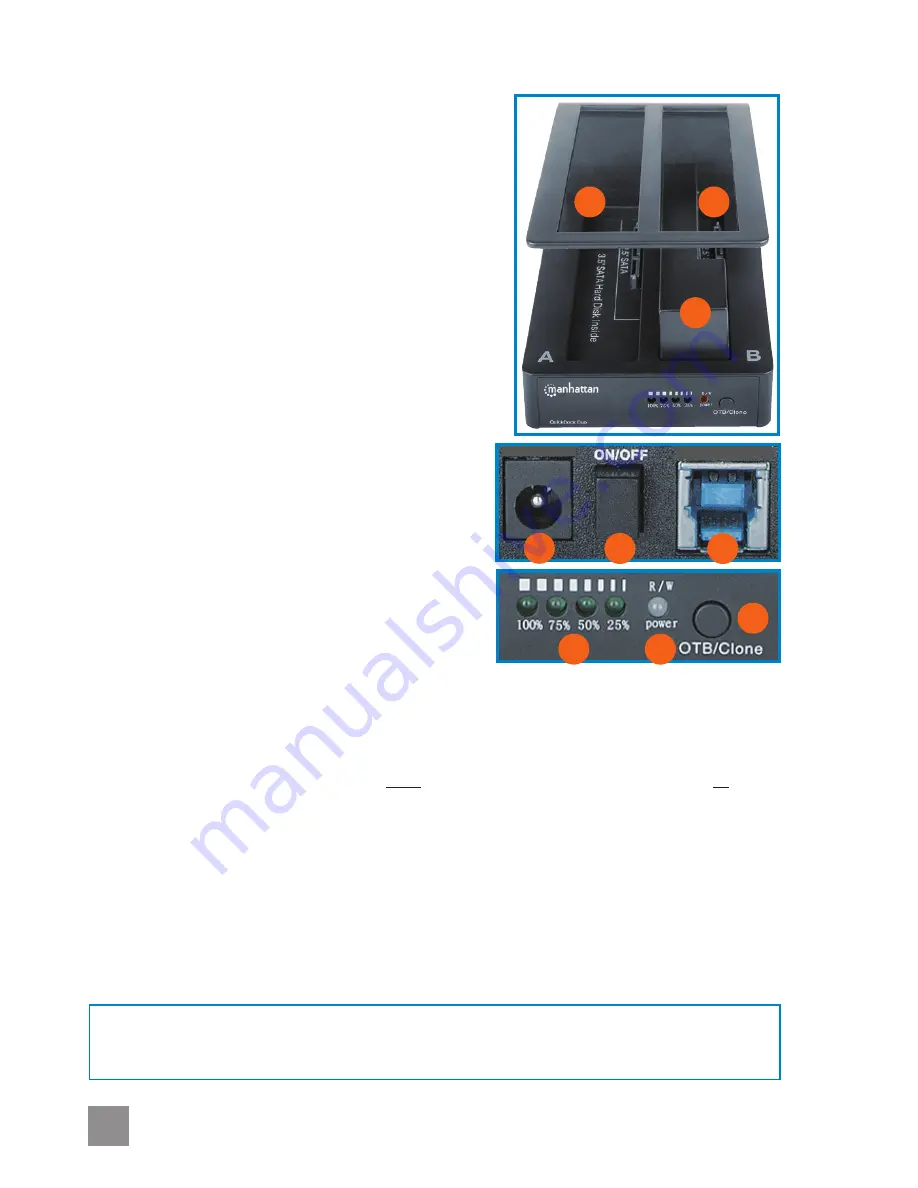
QuickDock Duo
English
DC INPUT
USB 3.0
C
F
G
H
A
B
E
D
I
• Don’t turn off power to the Dock or remove a drive while any LED is blinking; that is, while any data transfer is still in
progress.
• Cloning time depends on the transfer rate: for example, 100 GB / SATA @ 60 MBps would take about a half hour.
• For specifications, go to manhattan-products.com.
Read from / Write to an external drive
A Quick Dock is commonly used simply to work directly
on an external hard disk drive (HDD).
1. Use the included power adapter to connect the DC
Input jack (
C
) to an AC outlet.
2. Use the included USB cable to connect the Dock (
D
)
to your computer.
3. Using one of the spacers (
E
) if needed, insert an
external drive (2.5” or 3.5”) into the Dock (
A
or
B
).
4. Press the On/Off button (
F
) and make sure the R/W
Power LED (
G
) lights. When the external drive displays
on your computer, you can read or write directly to it.
One Touch Backup (OTB) from a PC
The OTB function lets you move selected files from your
PC hard drive to a separate drive placed in the Dock.
The software on the included CD must be installed
before you use OTB.
Note: This PC-based software is
not Mac compatible.
1. Follow Steps 1-4 above.
2. If using OTB for the first time, open the folder
JMS551 on the software CD and follow the
on-screen instructions.
When prompted to enter a
serial number, refer to the label on the back of this
instruction booklet.
3. Press the OTB/Clone button (
H
). The LEDs (
I
) indicate
the progress (25-100%). All four LEDs light when the backup is complete.
Cloning: Copying a hard disk drive (HDD) without using a PC
1. Use the included power adapter to connect the DC Input jack (
C
) to an AC outlet. If
necessary, disconnect the Dock from your computer (
D
).
2. Insert the source drive you’re copying from (
A
) and the target drive you’re copying to (
B
).
Note: The capacity of the target drive must be greater than that of the source drive. Any data
already on the target drive will be lost.
3. Press the On/Off button (
F
) and make sure the R/W Power LED (
G
) lights.
4. Press the OTB/Clone button (
H
) twice. The LEDs (
I
) indicate the progress (25-100%). All four
LEDs light when the copying process is complete.
5. Turn the power off; remove the drives.


