background image

Mammoth Fans INDUSTRIAL SERIES     |      

9

INSTALLATION REQUIREMENT

3.  Concrete structure 

(This accessory sold separately)

4.  Steel, concrete or  

Timber beam structure 
(This accessory sold separately)

Summary of Contents for 211400

Page 1: ...U L LY F O R S A F E I N S T A L L A T I O N A N D F A N O P E R A T I O N I N D U S T R I A L S E R I E S I N S TA L L AT I O N O PE R AT I O N M A I N T E N A N C E WA R R A N T Y I N FO R M AT I O N I N S T R U C T I O N M A N U A L S K U 2114 0 0 2114 01 ...

Page 2: ...ible for their safety 5 Children should be supervised to ensure that they do not play with the appliance 6 An all pole disconnection switch must be incorporated into the fixed wiring in accordance with local wiring rules 7 The structure to which the fan is to be mounted must be capable of supporting 2 times the weight of the product and its own structural loading Check with a structural engineer i...

Page 3: ...TRIAL SERIES 3 PARTS LIST 1 General parts 1 Clamp plate 2 I beam steel structure 3 Extension tube 4 Turnbuckle and clamps 5 PMSM Motor 6 Connector 7 Steel wire 8 Blade retainer 9 Fan blade 10 Winglet 1 7 6 8 3 4 5 10 9 2 ...

Page 4: ...l unit 2 Standard component parts Control cabinet stator shaft clamp plate I beam top plate extension rod connector pressure plate shim rotor disk sunflower heat sink Display window Speed controller Switch Cabinet key lock ...

Page 5: ...S Exclusively distributed by Beacon Lighting 2019 SLOW FAST SUPPORT WARNING Please read the instruction manual before operation Ensure the fan is clear of all obstructions before operation If the fan is unbalanced or noisy immediately shut down and contact Mammoth Support Ensure the power is isolated before any maintenance work is carried out on the fan or controller NOTE Always start the fan on l...

Page 6: ... PARTS LIST NO DESCRIPTION 1 Fan Blade 2 Extension Tube CASE NO DIMENSIONS LxWxHmm Volume m3 Gross weight kg Remark 2 3650 x 420 x 400 0 61 130 Fan blade carton PACKING SPECIFICATION PACKING DETAILS 1 2 ...

Page 7: ...Mammoth Fans INDUSTRIAL SERIES 7 5 Required Installation tools PARTS LIST ADJUSTABLE WRENCH LASER DISTANCE MEASURE ALLEN KEYS WIRE CUTTER SOCKET WRENCH LEVEL MULTIMETER SCREW GLUE ...

Page 8: ...ening the nut The structure to which the fan is to be mounted must be capable of supporting 2 times the weight of the product and its own structural loading Check with a structural engineer if unsure 2 I Beam Steel structure Included as standard Extension tube 0 5 2M Driving unit 0 36M 0 5M R if the object is lower than the fan blade 0 5M if the object is at the same level as the fan blade 0 5M if...

Page 9: ...Mammoth Fans INDUSTRIAL SERIES 9 INSTALLATION REQUIREMENT 3 Concrete structure This accessory sold separately 4 Steel concrete or Timber beam structure This accessory sold separately ...

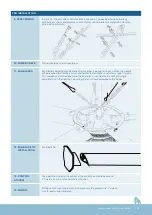
Page 10: ... that you are working Ensure safe practices are followed in regards to working at heights and lifting heavy equipment Follow appropriate guidelines and regulations in your region 4 TOP PLATE Fastening the top plate to the H beam ensuring a tight connection between the beam and the plate Screw glue Loctite or similar should be used 5 EXTENSION TUBE 6 POWER CABLE Ensure you have sufficient length of...

Page 11: ...ites to each other two people will be required to effectively mount and tighten the fan blades and safety support screws This procedure must be done while the fan motor is mounted on the ceiling Trying to compete this on the floor then mounting the fan will cause damage to the blades 12 FAN BLADE TIP INSTALLATION Fan Blade Tip 13 CONTROL SYSTEM The height from floor to the bottom of the control bo...

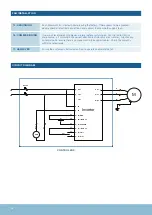
Page 12: ...tching on Run the fan for 15mins and observe is it spinning in the correct direction anti clockwise for summer listen for any abnormal noise ensure there is no movement in the support cables Check the current is within the rated range 17 HANDOVER Ensure the customer is instructed on how to operate and isolate the fan FAN U T1 U V W R L1 S L2 T L3 01 03 55 GND 55 S2 R2 1 50 53 12 18 27 50 10V OUT R...

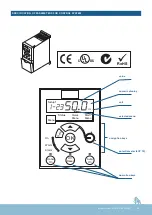
Page 13: ...ICATION OF PARAMETERS FOR CONTROL SYSTEM RoHS US C U L Setup 1 Menu Status Quick Menu Main Menu On Warm Alarm Hand On Off Reset OK Auto On B a c k value numeric display unit selected menu navigation keys potentiometer LCP 12 operation keys Hz ...

Page 14: ... and cleaning is required please refer to the product maintenance manual NOTE Always start the fan on low speed Function switch on control box this feature sets the device to reset stop run operating process is as follows 1 Ensure there are no obstructions or potential danger before switching the fan on 2 Turn the speed dial to the minimum setting 3 Turn the control dial from Stop to Run position ...

Page 15: ... damp cloth can be used to wipe down the blades however ensure not to allow excess water to enter any wiring connections this could damage the fan and cause a safety issue 3 Ensure that the fitting does not come in contact with any organic solvents or cleaners 4 The motor has a permanently lubricated ball bearing which does not require maintenance or re oiling SKU 211400 211401 Model No HVLS D6AAA...

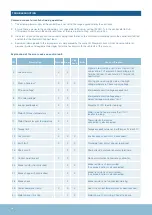
Page 16: ...on to frequency converter 25 Brake resistor short circuited X X Brake resistor is short circuited thus brake function is disconnected 27 Brake chopper short circuited X X Brake transistor is short circuited thus brake function is disconnected 28 Brake check X Brake resistor is not connected working 29 Power board over temp X X X Heat sink cut out temperature has been reached 30 Motor phase U missi...

Page 17: ...r 85 Button disabled X See parameter group 0 4 LCP 86 Copy fail X An error occurred while copying from frequency converter to LCP or vice versa 87 LCP data invalid X Occurs when copying from LCP if the LCP contains erroneous data or if no data was uploaded to the LCP 88 LCP data not compatible X Occurs when copying from LCP if the data are moved between frequency converters with major differences ...

Page 18: ...nvolved in an accident 2 The repairs are not required as a result of normal wear and tear 3 The product was installed by a licensed electrical contractor and to the guidelines outline in the manual 4 A copy of the original receipt of purchase is presented Our goods come with guarantees that cannot be excluded under the Australian Consumer Law You are entitled to a replacement or refund for a major...

Page 19: ..._______________ MODEL NUMBER __________________________________________________________________________________________ PO DATE CODE Sticker here PO NUMBER or DATECODE _________________________________________________________________________________ DATE OF PURCHASE _______________________________________________________________________________________ INSTALLING LICENSED ELECTRICIAN _____________...

Page 20: ...I N D U S T R I A L S E R I E S ...

Reviews: