background image

SECTION 2 - Internet Protocol
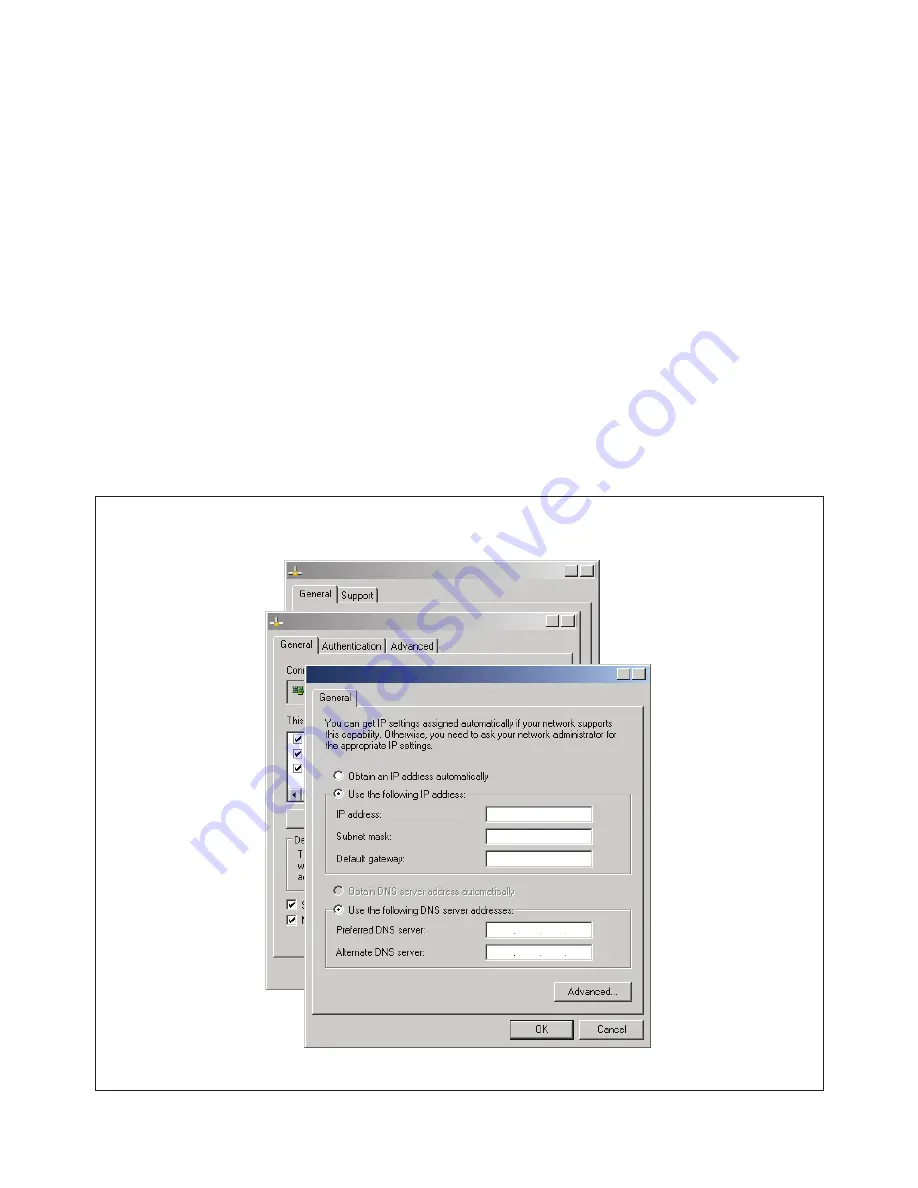
Figure 5

192 . 168 . 1 . 

XX

      .      .       . 

255 . 255 . 255 . 0

X

?

Internet Protocol (TCP/IP) Properties

X

?

Local Area Connection Properties

X

?

Local Area Connection Status

Insure  that  the  laptop/PC  network  settings  are  set  up  correctly.    From  the 

Start


menu,  go  to 

Settings

,

 click 

Network Connections

.  Double-click the 

Local Area Connection

 icon.  Local 

Area Connection Status screen will open.  Click on the 

Properties

 tab.  Local Area Connection 

Properties page will open. Scroll down to 

Internet Protocol (TCP/IP)


and click/highlight.  Now 

click on the 

Properties

 tab on the same screen.  Internet Protocol (TCP/IP) Properties page will 

open.  Click the 

Use the following IP address:

 radio button.  Now punch in a static IP address 

with the same subnet as the appliance as shown in Figure 5.  Example: 192.168.1.XX.  The XX 

can be any number except 10 because the Maverick default IP is 192.168.1.10.  We recommend 

using 192.168.1.11.  Now click on the second line 

Subnet mask

.  It should automatically fill in 

with 255.255.255.0.  If it does not, please input the subnet as shown below.  Default Gateway and 

DNS setup is not required for initial setup.  Fields can be left blank.  Click 

OK

.  Now 

OK

 or 

Close


out of the 

Network Connections

.

If  Windows  wants  to  restart  the  laptop/PC  after  the  network  configuration,  please  do  so.  

Laptop/PC is configured to do initial configuration of the appliance.  Launch the Internet Explorer 

or  Firefox  web  browser.    Delete  everything  in  the  address  box  and  punch  in  the  default  IP 

192.168.1.10.  Press enter. The Maverick will connect, and the 

Password/Clock

 page will be 

served up by the appliance to force the user to change the password.

2.1.0

© Copyright 2009

® Registered trademark MAMAC SYSTEMS, Inc.

8 of 17

DN IS-IPSM101.1

Summary of Contents for Maverick IP Sub IP-SM-101

Page 1: ...13 Fax 01384 271114 4 Arminger Court Unit 2 Holden Hill S A 5088 Australia 08 8395 4333 Fax 08 8395 4433 155 McIntosh Drive Units 5 6 Markham Ontario L3R ON6 Canada 905 474 9215 Fax 905 474 0876 No 22...

Page 2: ...atic IP 3 0 1 Network Configuration DHCP IP 3 1 0 Main Page 3 1 2 Data Logging 3 2 0 Reset Button 3 3 0 XML Page 13 Page 14 Page 15 Page 15 16 Page 16 Page 16 17 SECTION 2 Initial Configuration Page 7...

Page 3: ...rbances induced by radio frequency fields EN 61000 4 11 Voltage dips short interruptions and voltage variations immunity test 1 0 1 RoHS Compliant MAMAC Systems Inc products designated RoHS Compliant...

Page 4: ...custom software to load no discovery routines no custom cables or training The Sub Metering Maverick serves up static web pages with dynamic energy consumption data updates every second or two Most us...

Page 5: ...right 2009 DN IS IPSM101 1 Registered trademark MAMAC SYSTEMS Inc 4 of 17 MAMAC SYSTEMS 24 VAC VDC Neutral Com Ground Earth L A N L i n k H e a r t b e a t P o w e r RESET Button LEDs Pulse Figure 1 P...

Page 6: ...cian Figure 2 Warning Caution Disconnect power supply before installation to prevent electrical shock and equipment damage Make all connections in accordance with national and local electrical codes U...

Page 7: ...NING Maximum supply voltage MUST NOT EXCEED 35VAC 35VDC 24 VDC VAC Note Use 18 gauge conductor for ground Note Always disconnect power from unit before wiring a sensor Figure 3 24 VAC VDC TRANSFORMER...

Page 8: ...ut and output terminal blocks and leave only the power terminal block plugged in Attach the crossover cable to the appliance and the other end to the laptop ethernet jack as shown in Figure 4A If usin...

Page 9: ...in Figure 5 Example 192 168 1 XX The XX can be any number except 10 because the Maverick default IP is 192 168 1 10 We recommend using 192 168 1 11 Now click on the second line Subnet mask It should...

Page 10: ...ase or lowercase Main Page Refresh Rate The Maverick appliance uses AJAX and XML to automatically refresh the Main page The default refresh rate is 1 0 second If the user desires to slow down the refr...

Page 11: ...not all DNS default is used and a DNS Domain Name System server is available on the network to resolve the host name to an IP address If a power cycle email is desired click the Enabled button For st...

Page 12: ...put the meter constant The meter constant is the value per pulse For example if each pulse is equal to 100 Watts and the unit of measure is KWH the meter constant will be 0 100 Similarly if the water...

Page 13: ...rt is desired click on the Alert Enable radio button Enter the value in the Alert Value field The value can be 1 to 155575069890 The appliance also logs consumption by the minute hour day week and mon...

Page 14: ...re available 1 Use a CAT 5 patchcord and plug it into a hub or switch and connect the hub switch to a router on the web 2 Use a CAT 5 cable to connect directly to the router 3 Configure an Ethernet Br...

Page 15: ...nce to the Bridge with a CAT 5 cable For more information on wireless 802 11 B G configuration please refer to AN IP802 11 Connect the pulse input as shown in Figure 3 Section 1 4 2 Power up the appli...

Page 16: ...eset All current data hour day week month year except current minute consumption is stored in power backed up RAM memory and protected for seven 7 days without power In the event of a power outage onl...

Page 17: ...ess Username and Password configuration will revert back to factory defaults XML The appliance has XML embedded with formatted input and output data Each data field has an XML tag defined To view all...

Page 18: ...MinuteAlert Normal MinuteAlert Units KWH Units Minute Hour id hour CurrentHour 34860 CurrentHour PreviousHour 49620 PreviousHour HourAlert Normal HourAlert Units KWH Units Hour Day id day CurrentDay...

Reviews: