background image

Continuing to use the product in anti-freeze mode even when temperatures have risen and
returned to normal may result in the engine failing to start properly or in the engine failing
to operate at its normal speed, and for this reason you should always be sure to return the
unit to normal operating mode if there is no danger of icing occurring.
     
When using the saw with the anti-freeze mode, frequently check the screen and keep it
clean of saw dust.

CHAIN BRAKE

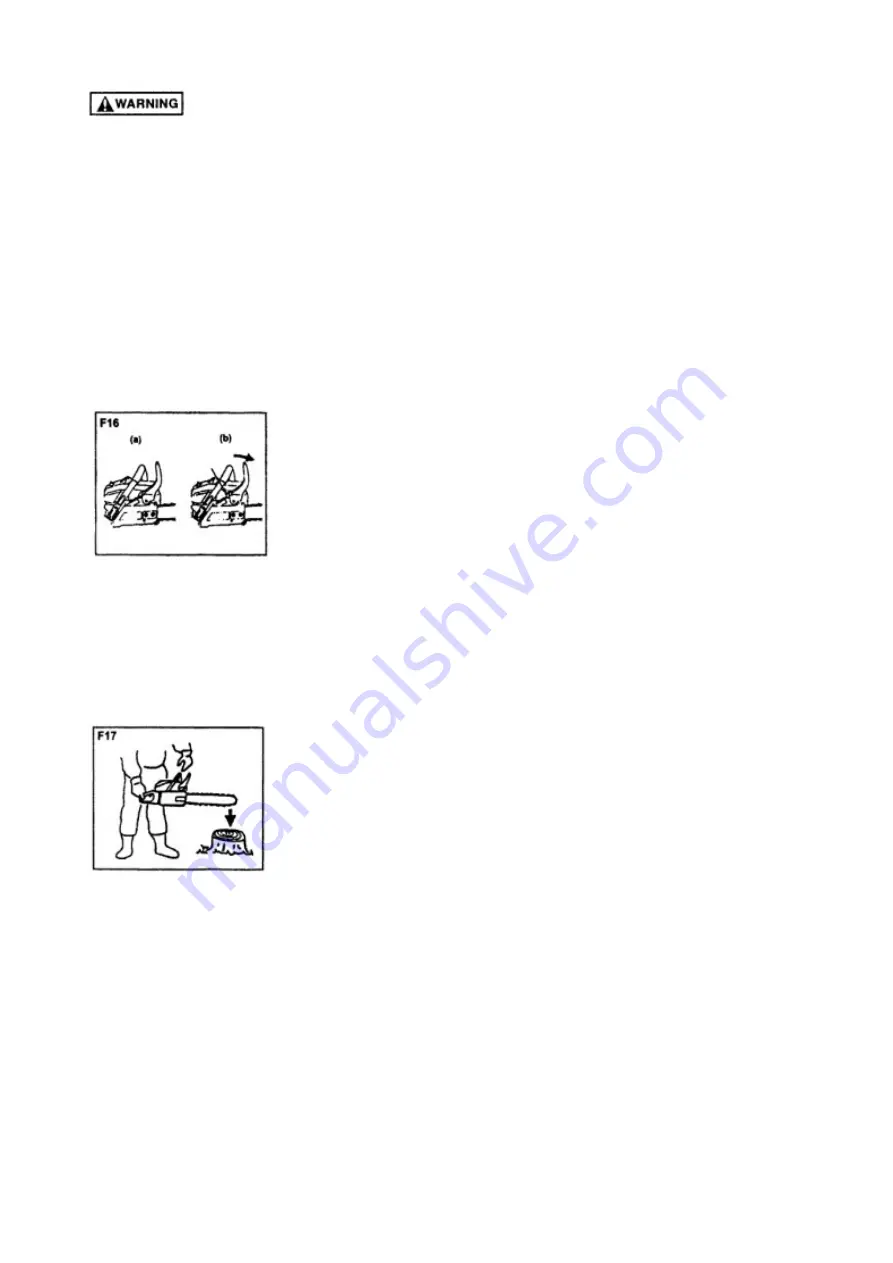
This   machine   is   equipped   with   an   automatic   brake   to   stop   saw   chain   rotation   upon
occurrence of kickback while in saw cutting operation. The brake is automatically operated
by inertial force which acts on the weight fitted inside the front guard. This brake can also
be operated manually with the front guard turned down to the guide bar. (F16) To release
brake, pull up the front guard toward the front handle till "click" sound is heard.

[Caution]

Be sure to confirm brake operation on the daily inspection

How to confirm
(1)Turn off the engine.
(2)Holding the chain saw horizontally, release your hand from the front handle, hit the tip of
the guide bar to a stump or a piece of wood, and confirm brake operation. Operating level 
varies by bar size.  (F1 7)

In case the brake is not effective, ask our dealer inspection and repairing. The engine, If
being kept rotated at high speed with the brake engaged, heats the clutch, causing a
trouble, When the brake is operated while in operation, immediately release your fingers
from the throttle lever and keep the engine idling.

STOPPING ENGINGE

1. Release the throttle lever to allow the engine idling for a few minutes.
2.Put the switch to the "O" (STOP) position. (F18)

(1) Switch

Summary of Contents for MasterCut5700W

Page 1: ...MalTec Pi a a cuchowa spalinowa MasterCut5700W Instrukcja Obs ugi...

Page 2: ...je kt rych nale y przestrzega aby zapobiec wypadkom kt re mog prowadzi do powa nych obra e cia a lub mierci Ten znak wskazuje instrukcje kt rych nale y przestrzega w przeciwnym razie prowadzi do awari...

Page 3: ...strze enie Uwaga Je li plomby ostrzegawcze odklej si lub ulegn zabrudzeniu i s niemo liwe do odczytania nale y skontaktowa si ze sprzedawc u kt rego zakupiono produkt aby zam wi nowe plomby i umie ci...

Page 4: ...prze cznika Odwracanie silnika prze czy na kierunek O STOP silnik zatrzymuje si Pozycja ty lewo urz dzenia d Wskazanie dotycz ce ssania Wyci gaj c ga k ssania ssanie zamyka si Pozycja ty po prawej str...

Page 5: ...lic 3 Podczas ulewy burzy z piorunami w czasie silnych lub wichurowych wiatr w lub w innych sytuacjach gdy warunki pogodowe mog sprawi e korzystanie z tego produktu b dzie niebezpieczne e U ywaj c teg...

Page 6: ...OWANIA Z PALIWEM a Silnik tego produktu jest przeznaczony do pracy na mieszanym paliwie zawieraj cym wysoce atwopaln benzyn Nigdy nie przechowuj puszek z paliwem ani nie nape niaj zbiornika paliwa w m...

Page 7: ...ij si e a cuch pi y nie dotyka niczego OPEROWANIE Utrzymuj uchwyty w stanie suchym i wolnym od oleju lub mieszanki paliwowej Nigdy nie dotykaj t umika wiecy zap onowej ani innych metalowych cz ci siln...

Page 8: ...t daleko ani nie tnij powy ej wysoko ci ramion 6 Post puj zgodnie z instrukcjami producenta dotycz cymi ostrzenia i konserwacji pi y a cuchowej 7 U ywaj wy cznie zamiennych prowadnic i a cuch w okre l...

Page 9: ...dnic do jednostki nap dowej Dostosuj po o enie nakr tki napinacza a cucha na os onie a cucha do dolnego otworu prowadnicy F2 8 Dziura 9 Nakr tka napinacza 10 Os ona a cucha Zwr uwag na prawid owy kier...

Page 10: ...Nowy a cuch zwi kszy swoj d ugo na pocz tku u ytkowania Cz sto sprawdzaj i reguluj napr enie poniewa lu ny a cuch mo e atwo wykolei si lub spowodowa szybkie zu ycie jego samego i prowadnicy 10 59...

Page 11: ...tr w 40 80 120 160 200 Trzymaj otwarte p omienie z dala od obszaru w kt rym jest obs ugiwane lub przechowywane paliwo Mieszaj i przechowuj paliwo tylko w zatwierdzonym kanistrze benzyny Wi kszo proble...

Page 12: ...eniu natychmiast po zatrzymaniu silnika pozostaw ga k ssania w pozycji otwartej 5 Trzymaj c pi bezpiecznie na ziemi poci gnij energicznie link rozrusznika F11 Nie uruchamiaj silnika podczas wieszania...

Page 13: ...uchem wskaz wek zegara aby znale pozycj w kt rej pr dko biegu ja owego jest maksymalna a nast pnie cofnij ig o wier 1 4 obrotu w kierunku przeciwnym do ruchu wskaz wek zegara 4 Przekr rub regulacyjn b...

Page 14: ...wet gdy temperatura wzros a i powr ci a do normy mo e spowodowa e silnik nie uruchomi si prawid owo lub silnik nie b dzie dzia a z normaln pr dko ci dlatego nale y zawsze pami ta aby przywr ci urz dze...

Page 15: ...ze cznik w pozycji O STOP F18 1 prze cznik PI OWANIE Przed przyst pieniem do pracy zapoznaj si z sekcj Bezpieczna obs uga Zaleca si najpierw prze wiczy ci cie atwych k d Pomaga to r wnie przyzwyczai s...

Page 16: ...rwacja lub nieprawid owa wymiana prowadnicy lub a cucha mo e zwi kszy ryzyko lub powa ne obra enia cia a spowodowane odrzutem OBALANIE DRZEWA F20 1 Wybierz kierunek cinki bior c pod uwag wiatr pochyle...

Page 17: ...pi uj od do u w jednej trzeciej i zako cz pi owaniem od g ry W obszarze B pi uj od g ry w jednej trzeciej i zako cz pi owaniem od do u Ci cie konaru zwalonego drzewa F23 Najpierw sprawd w kt r stron z...

Page 18: ...daj cego na czubku pr ta F28 1 Port olejowania 2 Port smarowania 3 Ko o z bate 4 Inne Sprawd czy nie ma wyciek w paliwa lu nych mocowa i uszkodze g wnych cz ci Szczeg lnie radz sobie z po czeniami i m...

Page 19: ...atory przednie i tylne Wymie je li sklejona cz jest zdarta lub widoczne jest p kni cie na gumowej cz ci KONSERWACJA A CUCHA I PROWADNICY PI Y A CUCH PI OWY Dla p ynnej i bezpiecznej pracy bardzo wa ne...

Page 20: ...ne 3 Norma g boko ciomierza Upewnij si e ka dy frez ma t sam d ugo i k ty kraw dzi jak na ilustracji F34 4 D ugo no a 5 K t ostrzenia 6 K t p yty bocznej 7 K t ci cia g rnej p yty PROWADNICA Od czasu...

Page 21: ...go ci cia 40cm 13 Ko o z bate 7Tx0 325 14 Typ pi y a cuchowej K2 CARLTON 15 Podzia ka pi y a cuchowej 0 325 in 16 Wska nik a cucha pi y 0 058 in 17 Typ prowadnicy Nos ko a z batego 18 Rozmiar prowadni...

Page 22: ...MalTec Petrol Chainsaw MasterCut5700W Instruction Manual...

Page 23: ...ould lead to serious bodily injury or death This mark indicates instructions which must be followed or it leads to mechanical failure breakdown or damage This mark indicates hints or directions useful...

Page 24: ...please be careful not to make a mistake a The port to refuel the MIX GASOLINE Position fuel tank cap b The port to refuel the CHAIN OIL Position oil cap c The indication regarding the switch Flipping...

Page 25: ...t would be difficult to gain a clear view of the area 3 During rain storms during lightning storms at times of strong or gale force winds or at any other times when weather conditions might make it un...

Page 26: ...highly flammable gasoline Never store cans of fuel or refill the fuel tank in any place where there is a boiler stove wood fire electrical sparks welding sparks or any other source of heat or fire whi...

Page 27: ...e saw chain and be whipped toward you or pull you off balance When cutting a limb that is under tension be alert for spring back to that you won t be struck when the tension in the wood fibers is rele...

Page 28: ...e metallic parts reach high temperatures immediately after stopping the engine Leave all maintenance other than the items listed in the Owner s Manual to your competent servicing dealer TRANSPORTATION...

Page 29: ...ion er screw until the tie straps just touch the bottom side of the bar raiI F4 11 Tighten the nuts securely with the bar tip held up 1 2 1 5 N m Then check the chain for smooth rotation and proper te...

Page 30: ...e container Most engine troubles are caused directly or indirectly by the fuel used on the machine Take special care not to mix a motor oil for 4 cycle engines CHAIN OIL Use motor oil SAE 10W 30 all y...

Page 31: ...y touch your body lt s very dangerous 6 When engine has ignited first push in the choke knob and pull the starter again to start the engine 7 Allow the engine to warm up with the throttle lever pulled...

Page 32: ...times of high humidity may result in ice forming within the carburetor and this in turn may cause the output power of the engine to be reduced or for the engine to fail to operate smoothly This produ...

Page 33: ...operated manually with the front guard turned down to the guide bar F16 To release brake pull up the front guard toward the front handle till click sound is heard Caution Be sure to confirm brake ope...

Page 34: ...it out by force but use a wedge or a lever to open the way GUARD AGAINST KICKBACK F19 This saw is equipped with a chain brake that will stop the chain in the event of kickback if operating properly Y...

Page 35: ...hill side of the log Follow the instructions in For safe Operation to avoid kickback of the saw Before starting work check the direction of bending force inside the log to be cut Always start cutting...

Page 36: ...inside F25 2 Oiling port Dismount the guide bar and check the oiling point or clogging F26 3 Guide bar When the guide bar is dismounted remove Saw dust in the bar groove and the oiling port F27 Grease...

Page 37: ...r Disassemble the filter and wash with gasoline or replace with new one if needed 6 Front and Rear dampers Replace if adhered part is peeled or crack is observed on the rubber part MAINTENANCE OF SAW...

Page 38: ...der round 3 Depth gauge standard Make sure every cutter has the same length and edge angles as illustrated F34 4 Cutter length 5 Filing angle 6 Side plate angle 7 Top plate cutting angle GUIDE BAR Rev...

Page 39: ...40cm 13 Sprocket 7Tx0 325 14 Saw chain type K2 CARLTON 15 Saw chain pitch 0 325 in 16 Saw chain gauge 0 058 in 17 Guide bar type Sprocket nose 18 Guide bar size 16 18 20 in 19 Oil feeding system Autom...

Page 40: ...MalTec Benzin Kettens ge MasterCut5700W Bedienungsanleitung...

Page 41: ...rden m ssen um Unf lle zu vermeiden die zu schweren Verletzungen oder zum Tod f hren k nnen Dieses Symbol weist auf Anweisungen hin die unbedingt befolgt werden m ssen da es sonst zu mechanischem Vers...

Page 42: ...g Wenn sich die Warnsiegel l sen oder verschmutzt und unleserlich werden wenden Sie sich an den H ndler bei dem Sie das Produkt gekauft haben um neue Siegel zu bestellen und die neuen Siegel an der ge...

Page 43: ...inf lldeckel c Anzeige des Schalters R ckw rtsfahren des Motors Umschalten in Richtung O STOP der Motor bleibt stehen Position hinten links d Anzeige der Absaugung Durch Herausziehen des Ansaugknopfes...

Page 44: ...g klar zu erkennen 3 Bei starkem Regen Gewitter starkem oder st rmischem Wind oder in jeder anderen Situation in der die Witterungsbedingungen die Verwendung dieses Produkts unsicher machen k nnten e...

Page 45: ...ndliches Benzin enth lt Lagern Sie die Kraftstoffkanister oder f llen Sie den Kraftstofftank niemals in der N he von Heizkesseln holzbefeuerten Kaminen elektrischen Funken Schwei funken oder anderen...

Page 46: ...unmittelbar nach dem Abstellen des Motors Dies kann zu schweren Verbrennungen oder Stromschl gen f hren Seien Sie beim Schneiden von kleinem Gestr pp und Sch sslingen u erst vorsichtig da sich das d...

Page 47: ...ber Schulterh he 6 Befolgen Sie die Anweisungen des Herstellers zum Sch rfen und Warten Ihrer Kettens ge 7 Verwenden Sie nur vom Hersteller angegebene oder gleichwertige Ersatzschienen und ketten WART...

Page 48: ...tz auf das untere Loch der Schiene ein F2 osition der Kettenspannermutter am Kettenschutz auf das untere Loch der Schiene ein F2 8 Bohrung 9 Mutter der Spannvorrichtung 10 Kettenschutz Achten Sie auf...

Page 49: ...Betriebsstunden 25 1 Mischungsverh ltnis 25 1 Benzin Liter 1 2 3 4 5 Zweitakt l Milliliter 40 80 120 160 200 Halten Sie offene Flammen von dem Bereich fern in dem Kraftstoff gehandhabt oder gelagert...

Page 50: ...sofort nach dem Abstellen wieder anlassen lassen Sie den Ansaugknopf in der offenen Position 5 Halten Sie die S ge fest auf dem Boden und ziehen Sie kr ftig am Starterkabel F11 Starten Sie den Motor...

Page 51: ...e den Motor und lassen Sie ihn bei Halbgas warmlaufen 3 Drehen Sie die Nadel L langsam im Uhrzeigersinn um die Position zu finden in der die Leerlaufdrehzahl am h chsten ist und drehen Sie die Nadel d...

Page 52: ...rwendet auch wenn die Temperatur gestiegen und wieder normal geworden ist kann dies dazu f hren dass der Motor nicht richtig anspringt oder nicht mit normaler Drehzahl l uft denken Sie daher immer dar...

Page 53: ...eerlauf laufen ABSCHALTEN DES MOTORS 1 Lassen Sie den Gashebel los damit der Motor einige Minuten im Leerlauf laufen kann 2 Stellen Sie den Schalter in die Position O STOP F18 1 Schalter S GEN Lesen S...

Page 54: ...ung Es ist u erst wichtig vor jedem Einsatz zu pr fen ob die Kettenbremse ordnungsgem funktioniert und ob die Kette scharf ist um die R ckschlagsicherheit dieser S ge zu gew hrleisten Das Entfernen vo...

Page 55: ...Sie auf halber Strecke rollen Sie den Stamm auf und schneiden Sie die gegen berliegende Seite ab Vom Boden h ngender Baumstamm F22 S gen Sie im Bereich A von unten ein Drittel durch und s gen Sie absc...

Page 56: ...der Schmier ffnung F27 Schmieren Sie das vordere Kettenrad von der Einf ll ffnung an der Spitze der Stange aus F28 1 leinf ll ffnung 2 Schmier ffnung 3 Zahnrad 4 Sonstiges Pr fen Sie ob Kraftstoff aus...

Page 57: ...ls durch einen neuen 6 Vordere und hintere Sto d mpfer Ersetzen Sie es wenn der geklebte Teil abgenutzt ist oder ein Riss im Gummiteil sichtbar ist WARTUNG VON S GEKETTE UND F HRUNGSSCHIENE S GEKETTE...

Page 58: ...ssern Sie sich dass jedes Messer die gleiche L nge und den gleichen Kantenwinkel hat wie abgebildet F34 4 L nge der Klinge 5 Sch rfungswinkel 6 Winkel der Seitenplatte 7 Schnittwinkel der oberen Platt...

Page 59: ...325 14 Kettens ge Typ K2 CARLTON 15 Kettens gen Teilung 0 325 in 16 Teilung der S gekette 0 058 in 17 Art der F hrungsscheine Nase des Kettenrads 18 Gr e der F hrungsscheine 16 18 20 in 19 lzufuhrsyst...

Reviews: