background image


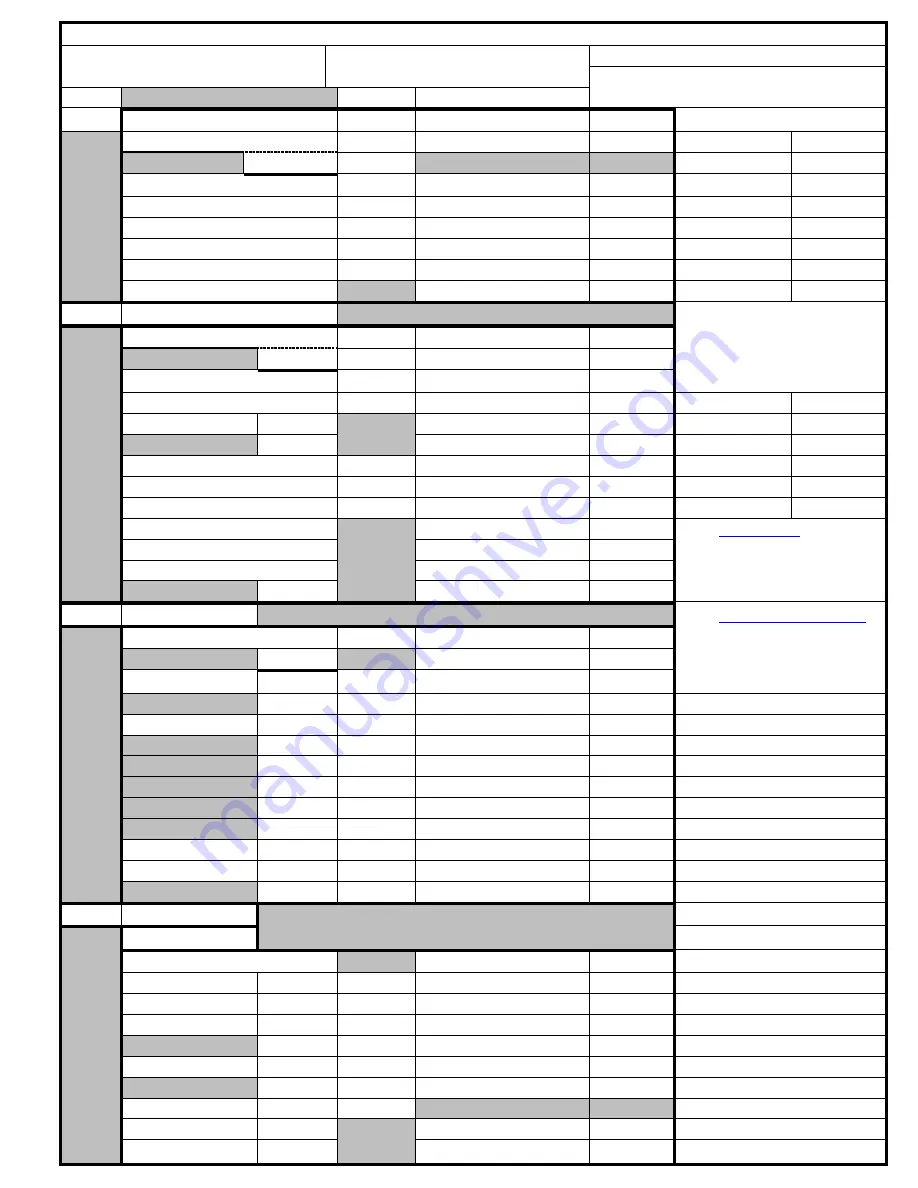
Mallincam Signature Settings 

Object Observed: 

Telescope (Aperture, F ratio): 

Monitor Type: 
Computer Config: 

MENU   

Setting 

Settings 

1 OF 4 

LUMINANCE MENU 1 

On/Off/Auto 


Value 

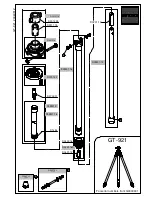
Telescope Accessories Etc. 


ALC 


Luminance Level 


Filter(s) 


FLC 


AES 


Luminance Level 


Barlow 


FIX SHUTTER 


Shutter Speed 


PEAK AVERAGE 


Peak Mix Level 


Focal Reducer 


BACK LIGHT 


Area 


XDR 


Low/Med/ High 


Spacers 


GAMMA 


1.0, 0.45, CRT, LCD  


2 OF 4 

LUMINANCE  MENU 2 


Other 


AGC                             AUTO 


Max Gain  Level  dB 


FIX 


Fix  Gain  Level   dB 


SLOW SHUTTER 


Limit  Time  Sec 


DNR 


Low,  Med,  High 


Site  type 


DAY/NIGHT 


Day,  Night,  Compl 


AUTO 

Hold Time   Sec 


Seeing 


FOG REDUCTION 


Low,  Med,  High 


ECLIPSE 


Low,  Med,  High 


Transparency 


SHARPNESS 


ENHANCE                           HDV   


See:  

http://www

Skyandtelescope.com// 
Resources/darksky/3304011. 
html  for site type  or 


SDV 


3 OF 4 

COLOR MENU 


See:  

http://www.astromax

Org/faq/aa01faq14.htm 
For  seeing and  
transparency  


COLOR MODE 


Gain Control 


AUTO 


AGC Suppress Level 


WHITE BALANCE 

ATW 


Color  Offset 


AWB 


Color  Offset 


Notes: 

UV MATRIX 


R   


G   


B   


R   


G   


B   


COLOR GAIN 


Gain Control 


COLOR TONE  


R-Y  Level 


B-Y  Level 


4 OF 4  SETUP MENU 


SPECIAL FUNC  1 


PRIORITY 


AGC,  SLOW SHUTTER 


MOTION  DETECT   


AREA SENSE LEVEL 


DISPLAY 


TIME 


DIGITAL ZOOM 


MAG 


POSITION 


DISPLAY MODE 

HDV/SDV   

720P60 ETC/ 4:3,  16:9 


ASPECT 


NORMAL/FULL 


DIGITAL OUT 

CODE 


CLOCK 


POSI,  NEGA 


RANGE 

NORMAL,  FULL 


Summary of Contents for Signature

Page 1: ...Signature to your computer along with explanations of the camera s various settings Imaging techniques with the various hardware and software options will be covered Both the standard CVBS video outp...

Page 2: ...on Sheet Signature User Manual Page ii Revision History Version Date Revision Description 1 0 3 22 2014 Template Creation 1 1 3 23 2014 Typo s 1 2 3 24 2014 Added Appendix F specifically for RS485 Ada...

Page 3: ...5 The Camera Connection Diagram 7 The Camera RS 485 Connection 7 Hooking up Hardware 8 Software 9 2 Overview 9 Functional Description 9 HD SDI 10 CVBS 11 3 Instructions 13 Connecting Signature to Comp...

Page 4: ...TUP MENU 4 4 35 LANGUAGE 35 TITLE 35 DEFAULT 35 SPECIAL FUNCTIONS 1 2 36 PRIORITY 36 MOTION DETECT 36 DIGITAL ZOOM 36 H V REVERSE 36 DISPLAY MODE 37 SPECIAL FUNCTIONS 1 2 37 PRIVACY MASK 37 CROSS LINE...

Page 5: ...nnection Options 53 US Converters RS485 422 cable converter Model Number XS890 53 Connecting Hardware 53 Installing Driver Software 54 US Converters RS232 RS485 Converter Model Number XS201A 55 Connec...

Page 6: ...e camera for specific Solar System objects Many special thanks to Rock Jack Bob Bryan Shevill and others whose advice and techniques are incorporated in this manual This manual is based on the RED LED...

Page 7: ...o Output Image Aspect Full Normal HDV 16 9 SDV 4 3 16 9 720p60 1080p30 720p30 1080i60 720p50 1080p25 720p25 1080i50 Analog Video Out CVBS Digital Video Out HD SDI HD SDI Bit Rate 1 485 GBits sec Gain...

Page 8: ...Signature User Manual March 23 2014 Signature User Manual Page 5 The Camera its Anatomy The Signature camera is 4 5 x 2 x 2 and weighs in at about 1 lb...

Page 9: ...anual March 23 2014 Signature User Manual Page 6 The Signature Camera also comes with comes with 120 Volts AC Power Supply 1 25 Eyepiece Adapter 25 foot Power Video analog Combination Cable and RS485...

Page 10: ...e User Manual Page 7 The Camera Connection Diagram The Camera RS 485 Connection The Signature communicates via a 3 pip RS485 port on the back of the camera Note Only the Red LED Version of the Signatu...

Page 11: ...need to connect the Mallincam RS485 Port Connector to the back of the Signature Camera and then connect the three cables to the green thingy this is the technical term we use in the industry that cam...

Page 12: ...and Documentation The folder is located at http sdrv ms Lb3wV3 See below in Chapter 3 on how to install and use these two programs 2 Overview The Signature Camera was designed for imaging Solar Syste...

Page 13: ...ended cable that meets the SMPTE standards and a HD SDI capture device A Google search can find various lengths of specific HD SDI cable from many broadcasting vendors I purchased mine form Markertek...

Page 14: ...ptured by any analog capture device such as the Mallincam MCV video capture device CVBS stands for Composite Video Blanking and Sync and is nothing more than the standard composite signal and thus req...

Page 15: ...HDMI upscaler This device Up Scales Composite Video S Video and HDMI to 720p 1080p selectable HDMI It provides Motion Compensated 3D Wavelet Video Coding Technology is applied to make the converted p...

Page 16: ...uctions on how to install the Mallincam MCV Video adapter 4 Connect other end of Video cable RCA to the Video Capture Device MCV 5 Power the Signature plug in the AC to DC adapter and connect to the S...

Page 17: ...in the Appendix for detailed instructions on how to install and connect to the Blackmagic Ultrastudio Video adapter 4 Connect other end of SDI Video cable to the Video Capture Device Blackmagic Ultras...

Page 18: ...Arrow Buttons on the back of the camera and you select an option by pressing the CENTRE ENTER Button The LEFT and RIGHT Buttons take you other related screens For example with the LUMINANCE MENU1 1 4...

Page 19: ...4 4 when you are inside the SUB MENU you choose the RETURN option to return to MAIN MENU that called the SUB MENU Again you can uses the LEFT and RIGHT Buttons to move from one SUB MENU to another if...

Page 20: ...epending upon what the Signature is set to Using the UP or DOWN Button select ON and hit the CENTRE Button to select it The arrow should be pointing to the SHUTTER SPEED selection Use the UP and DOWN...

Page 21: ...ra As you will notice the amount of settings you can adjust on the Signature is astronomical sorry and each specific settings will be unique to you and your equipment and seeing conditions See the APP...

Page 22: ...ons of the camera There are two versions one that listens for the Signature to respond this version is called Back Buttons with Protocol while the other version Back Buttons just sends the command and...

Page 23: ...is Windows 7 Click on the Start Button Windows 8 1 Hold down the WIN key and press the X key Choose and enter into the Control Panel Go into Hardware and Sound Click on the Device Manager Click on Por...

Page 24: ...if required my software will do that automatically but if you feel the urge then the following are the settings for the Signature Camera Communication Speed 19200 Data length 8 bit Parity None Stop Bi...

Page 25: ...able COM ports on your computer and it should display them in the PC Com Port Box On the above sample image it is displaying COM3 You will need to click on the COM button to display all of the availab...

Page 26: ...the Menu choice just click on the Activate Emulation button on my software Remember the Signature Camera will automatically close down the OSD Menu if it senses no activity When you are finished with...

Page 27: ...ions Starting the Software When the Signature camera is powered up and your video software is running so you have a wonderful image of something in your display for me it is always corn in the farmer...

Page 28: ...then click on the Com Port that your Signature Camera is connected to In my case my Signature is actually connected to COM5 so I would choose COM5 from the drop down list and now my PC Com Port would...

Page 29: ...s tab and clicking on the Activate Keypad check box note you will have to use these buttons to get to the EXIT menu choice for the Signature onscreen Buttons commands to deactivate Remember if you cha...

Page 30: ...play screen and you will again have manual control Unplugging the Camera also works Worst case selecting factory defaults from the back of the Signature When you are finished with the software hopeful...

Page 31: ...ER and AES Control You can Turn it ON and adjust the Luminance Level OFF or select FLC Flick Less If ALC is set to ON then AES is automatically set to OFF For Astronomy use OFF AES This control will t...

Page 32: ...ter Speed or OFF Shutter Speed settings in seconds 1 30 1 50 1 60 1 100 1 120 1 180 1 350 1 500 1 750 1 1000 1 2000 1 4000 1 10000 If FIX SHUTTER is set to ON then AES is automatically set to OFF For...

Page 33: ...re For Astronomy use Experiment GAMMA Adjusts the brightness of image It is actually the exponent on a power function thus CRT s and Laptops may require different settings to enhance signal For dimmer...

Page 34: ...is used for those dim planets This Slow Shutter affects the timing of everything in the camera If set to say 2s then it will take 2s for the Menu Buttons to respond and display Use caution when using...

Page 35: ...nts on the image When activated FOG REDUCTION is automatically set to OFF and GAMMA is set to 0 45 at least that s what the manual says but I don t see it happening I do turn Gamma to 0 45 in my softw...

Page 36: ...camera provides two type of White Balance control adjusts colours depending upon seeing and brightness Auto Trace White functions by detecting white color in the scene at a color temperature from 2500...

Page 37: ...nd Blue signals because U and V are color difference signal These settings allows you to adjust the colours difference values to help match the colours on the image to what they should be in the real...

Page 38: ...at can appear either at the Top or Bottom of the screen The message length is restricted to 24 characters For Astronomy use Optional DEFAULT Use this setting specifically to reset the Signature to its...

Page 39: ...is setting For Astronomy use Experiment MOTION DETECT This setting doesn t have a use that I can think of in Astronomy Not even included in my software For Astronomy use OFF DIGITAL ZOOM This setting...

Page 40: ...u can even adjust the aspect ratio on your image to better match your equipment For Astronomy use Experiment SPECIAL FUNCTIONS 1 2 PRIVACY MASK This setting allows you to black out certain areas of th...

Page 41: ...becomes white and white becomes black and each colour switches to its complementary colour For Astronomy use OPTIONAL COMM ID This setting is used to set the communication ID for the Signature camera...

Page 42: ...ill turn ON or OFF specific hardware features of the Camera To activate the appropriate hardware features just HOLD DOWN the appropriate button s on the back of the Signature when you POWER UP it up P...

Page 43: ...Ports All OFF CVBS ON SDI OFF CVBS ON SDI ON CVBS OFF SDI ON CENTRE Determines current Video settings on the Signature If both SDV and HDV are active then the camera will display something like this H...

Page 44: ...ctly polarized AC to DC adapter Ensure your 12V DC battery is charged No Video Image from any output port Port s may be deactivated Hold both the LEFT and DOWN buttons on the back of the Signature and...

Page 45: ...er Manual March 23 2014 Signature User Manual Page 42 to get back response from the camera and deactivate SLOW SHUTTER Power Down and then Power Back UP See Chapter 4 in SETUP MENU about how to do a F...

Page 46: ...e port for each device so that I will not have multiple versions of the drivers for multiple USB ports you are just teasing the windows gods if you mix and match and they will get even The MCV 1 and M...

Page 47: ...run exe in the folder of the file you downloaded When you see the green USB 2 0 HD HV Grabber screen CLICK on the option Install Drivers You may receive a Windows warning asking you if you want to all...

Page 48: ...Signature and you should be able to see the camera s images on the video window of your software Oh No the video is not working correctly strange stuff is happening and it is not my camera After you h...

Page 49: ...r with USB 3 0 Port Signature Camera Power Supply for signature Camera Blackmagic UltraStudio SDI HD SDI Video Cable SD59 BB50 dual BNC connectors USB 3 0 Cable Procedure Connect the SDI Video cable f...

Page 50: ...Signature User Manual March 23 2014 Signature User Manual Page 47 After the UltraStudio has been connected to your computer it is now time to install the Blackmagic Drivers onto your computer...

Page 51: ...ware wizard will appear Select install automatically and the system will nd the required Desktop Video drivers You will then receive another dialog bubble saying your new hardware is ready for use 5 N...

Page 52: ...image with the Dell XPS Laptop But you can use the Blackmagic WDM to obtain an image with SharpCap or Virtual Dub both have the capability to grab 1080p data These two software packages are how I nor...

Page 53: ...ar the bottom select it Step 6 Match my settings as seen in picture below Check Use 1080p not 1080psf Step 7 Select OK to accept these settings and close the Control Panel Step 8 Start the Blackmagic...

Page 54: ...video with other software rather than the Blackmagic Media Express For example using the SharpCap select the camera to Blackmagic WDM Capture In the Video Control Panel of Sharpcap ensure you have 25f...

Page 55: ...Express that software has to capture 1920 x 1080 otherwise you will see only a zoomed portion of the actual screen I use the SharpCap software The crucial thing to remember when using SDI output is th...

Page 56: ...d Rock s Signature Connector This is a high quality Plug and Play USB to RS485 RS422 converter optimized for Windows 7 and Windows 8 but will also work perfectly fine with Windows 98 2000 XP and Vista...

Page 57: ...o the USB to RS485 422 Cable You should now have connection path that allows you to attach one end to a USB Port on your computer and the other end to the RS 485 Port on the back of the Signature came...

Page 58: ...an be purchased at the US Converters online website http www usconverters com for about 20 US but you will need a USB to RS232 Adapter and RS232 Cable extender Male to Female of a length that meets yo...

Page 59: ...Board and Yellow GND wire to 3rd pin on the Screw Terminal Board Once attached you should now have connection path that allows you to attach one end to a USB Port on your computer and the other end t...

Page 60: ...y Night Compl AUTO Hold Time Sec Seeing FOG REDUCTION Low Med High ECLIPSE Low Med High Transparency SHARPNESS ENHANCE HDV H See http www Skyandtelescope com Resources darksky 3304011 html for site ty...

Page 61: ...pl night AUTO Hold Time Sec Seeing FOG REDUCTION Off Low Med High ECLIPSE Off Low Med High Transparency SHARPNESS ENHANCE HDV H See http www Skyandtelescope com Resources darksky 3304011 html for site...

Page 62: ...w Skyandtelescope com Resources darksky 3304011 html for site type or V 35 SDV H 50 V 50 3 OF 4 COLOR MENU See http www astromax Org faq aa01faq14 htm For seeing and transparency COLOR MODE On Gain Co...

Page 63: ...R GAMMA 2 OF 4 LUMINANCE MENU 2 AGC SLOW SHUTTER DNR DAY NIGHT FOR REDUCTION ECLIPSE SHARPNESS ENHANCE 3 OF 4 COLOR MENU COLOR MODE WHITE BALANCE UV MATRIX V UV MATRIX H COLOR GAIN COLOR TONE R Y COLO...

Page 64: ...HIGH OFF DAY NIGHT DAY DAY FOR REDUCTION OFF OFF ECLIPSE OFF OFF SHARPNESS ON ON ENHANCE H 30 V 30 3 OF 4 COLOR MENU COLOR MODE AUTO ON WHITE BALANCE ATW ATW UV MATRIX V 0 0 0 R 128 G 128 B 128 UV MAT...

Page 65: ..._____________________ _______________________________________ _______________________________________ _______________________________________ _______________________________________ __________________...

Reviews: