background image


18 

7-2


Wireless LAN


Your Notebook PC comes with a built-in Wifi wireless card that you can click <Fn>+<F2> 

to turn the wireless network on or off. When the wireless network turns on, the WIFI 

Indicator 

  turns on and the icon of WIFI will display on the right-bottom corner of the 

desktop. 


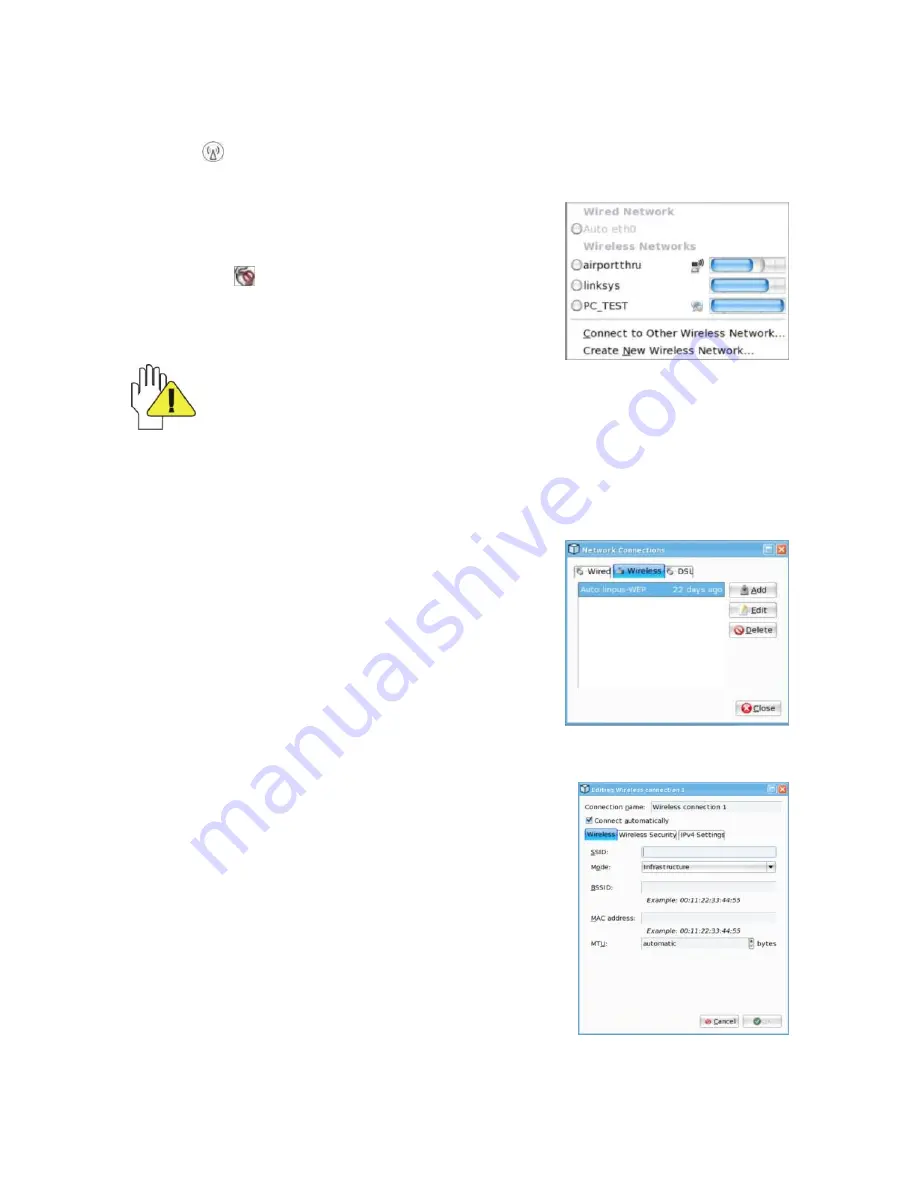
If you are using wireless network with DHCP- 

configure, click the left button of the mouse on 

the icon 

  and the system will auto search the 

list with the available network name as shown 

right: 


Some network may need you to confirm by inputting the password that you 

should operate according to the prompt information from the system. 


If you need to set a new wireless network connection, please refer to the below 

operation: 


1. 

Remove the left/right direction button to select 

“Wireless” to enter the window of “Network 

connections

”, see as the right picture: 


2. 

Click 

“Add” in the list on the above window to 

enter the menu as shown below, there are three submenus on the window. 


Wireless 

On the


menu, you only need to input the desired network 

name in the item 

“SSID” as shown right: 


Summary of Contents for PC-81006

Page 1: ...s etc Other trademarks and trade name may be used in this manual to refer to either the entities claiming the marks and names or their products The manufacture disclaims any proprietary interest in trademarks and trade names other than its own Information in this manual is subject to change without notice Reproduction in any manner whatsoever without the written permission from the manufacture is ...

Page 2: ... suspend mode 11 4 Keep the data for future possible use 12 4 1 HDD Partition 12 4 2 Class the data in the HDD 12 5 Getting Started 13 5 1 Install the Rechargeable Battery 13 5 2 Remove the Battery Pack 13 5 3 Connecting the Power Adapter 14 6 Using Your Notebook PC 15 6 1 Turning on the Notebook PC 15 6 2 Adjust the Brightness of LCD Screen 15 6 3 Keyboard Usage 15 6 4 Card Reader Usage 16 6 5 Th...

Page 3: ...de 23 8 2 2 Suspend mode 23 8 2 3 Log Off 23 8 2 4 Restart the System 24 8 3 Power Saving 24 8 3 1 Connect the Adapter without using Battery Pack 24 8 3 2 Adjust the brightness of LCD Screen 24 9 Upgrading Your Notebook PC 25 9 1 Connect the External Monitor 25 9 1 1 How to connect the External Monitor 25 9 1 2 Connect Keyboard and Mouse 25 9 1 3 Connect Audio Device 25 9 1 4 Lock Port 26 9 2 Ente...

Page 4: ...ler for recycling advice 11 The Notebook PC and the Adapter may occur some heat during operating or charging DO NOT leave the Notebook PC on your lap or any part of the body in order to prevent discomfort or injury from heat exposure 12 INPUT RATING Refer to the rating label on the Notebook PC and be sure that the Power Adapter complies with the rating Only use attachments or accessories specified...

Page 5: ...the separation between the equipment and receiver Connect the equipment into an outlet on a circuit different from that to which the receiver is connected Consult the dealer or an experienced technician for help This device complies with part 15 of the FCC Rules Operation is subject to the following two conditions 1 This device may not cause harmful interference and 2 This device must accept any i...

Page 6: ...D Status Indicator Light is green when the HDD is in active mode 8 WiFi Indicator 9 Numeric Keypad Indicator Click Fn Num Lk to turn on the light and the numeric keypad is unlocked 10 Cap Lock Indicator Light is green when the cap keypad is unlocked 11 Charge Indicator Light is orange during being charged and is green when the battery is fully charged 12 Left key 13 Right key 14 Touch Pad ...

Page 7: ...Side 1 Power Jack 2 Ethernet LAN Port 3 USB Port 2 0 4 Headphone Jack 5 Microphone Jack 6 Express Card Port The USB card can only be inserted in one orientation Force to insert the card may in result of damage 1 5 Bottom Side 1 Lithium Rechargeable Battery 2 Battery Latch 3 Speakers ...

Page 8: ...t down the LCD Screen if the Notebook PC will not be used for a long time DO NOT clean the LCD Screen with chemical cleaners The LCD Screen DOES NOT come into contact with hard objects E g cloth button watchband Use a soft and lint free dry cloth to wipe the LCD Screen smoothly DO NOT use your hand to wipe the LCD Screen directly DO NOT spill liquid into the Notebook PC as it can damage the compon...

Page 9: ...board But the deteriorate of the Printed circuit board will occur and will result in malfunction of the keyboard Contact your dealer for advises at this moment 2 5 Touch Pad Keep your hand clean when using the Touch Pad or else the cursor is out of control If the Touch Pad is dirty moisten a soft lint free cloth with water and wipe the Touch Pad smoothly The Touch Pad is pressure sensitive DO NOT ...

Page 10: ...the Notebook PC lightly Use the fanner to dry the Notebook PC and the accessories and then send it to the service center for advice DO NOT use hair drier to dry the Notebook PC or the high temperature may distort it DO NOT place the Notebook PC into the dirty carrying case again 2 8 Other Notes DO NOT expose the Notebook PC in hot environment for a long time especially in the car Or the parts of t...

Page 11: ...only need to buy the different power cords to connect the different outlets or the hotel may provide universal outlets to support your power cord as well as voltages If you drive your car with the Notebook PC DO NOT leave the Notebook PC facing the sun Place it in the shady and cool area DO NOT remove the HDD immediately while or after operating Set the Notebook PC into the Standby mode or Hiberna...

Page 12: ...to avoid losing the data In order to improve the performance of your Notebook PC the HDD of your Notebook PC can be formatted with some partitions C D and so on Save files to the any partitions except C partition Then you can retrieval or reinstall the operating system without damaging your data Select the available software to part the HDD as you like 4 2 Class the data in the HDD 1 Files Office ...

Page 13: ...ect all lines 2 Shut down and turn over the computer to access its base in flat and clean work surface 3 Slide the Battery Latch toward the arrow 4 Draw the Battery Pack towards the arrow to release the Battery Pack from the Notebook PC WARNING For safety reasons DO NOT disassemble the Battery Pack DO NOT short the circuit DO NOT throw the Battery Pack into fire and keep it away from children When...

Page 14: ...dapter with the power cord 2 Plug the DC end of adapter into the power jack of the Notebook PC 3 Insert the AC end to the wall outlet 4 Check the connections above correctly before turning on the Notebook PC DO NOT remove the Notebook PC if the HDD is being read or written that may result in the loss of the data and the damage of the disk Follow the system steps to turn off the Notebook PC Your No...

Page 15: ... Display OSD Click Function Fn F10 Shift between LCD Screen and external monitor Fn F11 Decrease the brightness of screen Fn F12 Increase the brightness of screen LCD Screen is made of glass and may be damaged if the Notebook PC is dropped or shoves any hard object 6 3 Keyboard Usage The Notebook PC s integrated a U S standard keyboard with 85 keys Click the numeric symbol keys to input the desire...

Page 16: ... F10 Shift between LCD Screen and external monitor Fn F11 F12 Decrease Increase brightness of LCD Screen 6 4 Card Reader Usage The Notebook PC has a single built in memory card reader that can read the following flash memory cards Secure Digital Multi Media Card Memory Stick See the manual of the relevant card for more information 6 5 The Memory Card 6 5 1 Insert The Memory Card The card only can ...

Page 17: ...s on the popup menu to enter the menu as shown right 2 On the above menu select one way to connect the network Wired and click Edit in the list to enter the Editing Wired connection 1 window as shown below refer to the following point 3 there are three submenus on the window 3 Select IPv4 Settings item on the window to enter its menu as shown right On the menu you need to input the IP addresses su...

Page 18: ...st with the available network name as shown right Some network may need you to confirm by inputting the password that you should operate according to the prompt information from the system If you need to set a new wireless network connection please refer to the below operation 1 Remove the left right direction button to select Wireless to enter the window of Network connections see as the right pi...

Page 19: ...shed the settings and click the icon in the right bottom corner of the screen to check if the connection is successful or not Some Methods of WiFi Encrypted in common 1 WEP 40 128 bit Hexadecimal 3 WPA WPA2 Personal 2 WEP 40 128 bit ASCII 4 WPA WPA2 Enterprise 7 3 DSL 1 Click the right button of the mouse on the icon in the right bottom corner of the desktop and select Edit Connections on the popu...

Page 20: ... defaulted by the system without necessary to fill in 7 4 The wireless LAN Express Card The Notebook PC supplies Express Card 34 port The Express Card that comes with the wireless LAN Access Point can be purchased separately and is designed for building a wireless LAN environment See the manual of the Express Card for more information If your computer cannot connect with network you may have to re...

Page 21: ...ode see as below You can also click Set Active Scheme to select any mode to activate on the KPowersave Setting Click the left button of the mouse on the icon on the right bottom corner of the desktop to check the power of the battery DO NOT attempt to remove the Battery Pack while the Notebook PC is turned on as this may result in loss of working data and damage of the Notebook PC When you use you...

Page 22: ... weak 8 1 3 Low Power Warning The system will display the warning windows and advise you to connect the adapter when battery power is low Save your working data if you don t have the adapter at this moment The warning function will be set in the KPowersave menu 8 1 4 Battery Power The Battery Pack s actual figure varies will depend on how you use the power saving features your general work habits ...

Page 23: ... life The life expectancy of the Battery Pack is approximately 300 recharges Store the Battery Pack in cool and dry place the ideal temperature is from 10 to 30 The Battery Pack will discharge quickly in hot environment and the life of the Battery Pack will be shortened DO NOT throw the Notebook PC in municipal waste Check local regulations for disposal of electronic products DO NOT put the Batter...

Page 24: ...e operating programs Press and hold the POWER button for over 4 seconds to turn off the Notebook PC if the system halts Press and hold the POWER button for over 2 seconds to turn off in normal mode 8 3 Power Saving When you use a battery as the source power for your Notebook PC you can take advantage of power management settings to conserve battery life 8 3 1 Connect the Adapter without using Batt...

Page 25: ...ant to use the external keyboard or mouse connect the external keyboard and external mouse by the USB port When you disconnect the external keyboard or external mouse from the computer grasp the connector not the cable itself and pull firmly but gently to avoid damaging the cable 9 1 3 Connect Audio Device The Notebook PC can be connected headphone sound box and microphone Follow the steps to conn...

Page 26: ...ollow the below steps to enter the BIOS Setup Menu 1 Click F2 button quickly during loading the system then the system will enter Setup Utility as shown below 2 Click the left right direction keys to select Boot and click the Enter button to enter the below menu On the menu click the up down direction keys to select Legacy and click the Enter button to enter the below menu ...

Page 27: ...e startup option Proceed to click F10 to popup the dialogue box and select Yes firstly then click Enter to save the setting as shown below There is no need to change the startup order and click F12 directly to select the temporary startup option after turning on the unit Please upgrade the system as soon as possible through Online Update to make your Notebook PC in an optimal status once you purch...

Page 28: ...o the service center for advice 5 DO NOT place the Notebook PC into the dirty carrying case to again Q4 After entering the standby mode why the system cannot reactivate and how to check this problem A Definition Standby Mode Store your current data and status in RAM turn off the external device but the Power Indicator Light still turns on Press POWER button to operate the system again Suspend Mode...

Page 29: ...opriate setting in the Power Management menu Q8 If the image isn t clear A Check that the lens is clear or not if not clean with the soft cloth Q9 If the mobile moves slowly A The camera needs some light when gathering the data and the speed will be slow if the light condition isn t good Please adjust the screen position of the Notebook PC or the position of the user The image display also shall b...

Page 30: ...ache and 24 kB write back data cache L2 Cache Size 512 kB on die second level cache Memory Min 128 MB Max 2GB Memory Type 200 PINS DDR2 SO DIMMs Memory Access Time Can support 400 533 667 MHz DDRII module GPU Ultra low power integrated 3D graphics Storage HDD Capacities 80GB 120GB 160GB TFT Screen TFT Screen Size 10 2 inch 16 9 Screen Type TFT Description TFT LCD 1024X600 WSVGA Built in Camera ...

Page 31: ...io System Built in speaker Sound Card Type HD Codec Network Card 100Mbps I O Device Mouse Touch Pad Keyboard U S 85 key keyboard Condition Operating Temperature 5 35 Operating Humidity 35 85 Storage Temperature 20 55 Storage Humidity 20 93 Power Adapter AC 100 240V DC 12V Output Power maximum 36W Battery Type Lithium rechargeable battery ...

Page 32: ...nd 2 this device must accept any interference received including interference that may cause undesired operation Voltage 7 4V Port Standard LAN LAN Type 10 100Base T Port RJ45 Audio Port Headphone Port Speaker Built in Microphone Microphone Port USB Port USB A Port x3 USB2 0 SD Card Port Support SD MMC MS Card Express Card Port Express Card 34 VGA Port D 15 Output Physical Features Weight No batte...

Reviews: