Makita VC005GLZ Instruction Manual Download Page 13

13 ENGLISH

Carriage handle

CAUTION:


Lift and carry the appliance with 

due care.

 Failing to do so may result in personal 

injury or damage to the appliance.

When carrying the cleaner, carry it by holding the han

-

dle on the head unit. The handle is retractable on the 

head unit when not in use.

► 

Fig.10

ASSEMBLY

CAUTION:


Always be sure that the appliance 

is switched off and the battery cartridges are 

removed before carrying out any work on the 

appliance.

CAUTION:


Always wear dust mask during 

assembly or maintenance.

Installing powder filter (HEPA) and 

prefilter (for dry dust)

Optional accessory

CAUTION:


Never pick up water or other liq-

uids or wet dusts when using the powder filter.


Picking up such things may cause the powder filter 

breakage.

To use powder filter:

1.

  Remove the filter cage and cloth filter out of the 

tank.

► 

Fig.11:


1.

 Filter cage 

2.

 Cloth filter 

3.

 Tank

2.

  Place the prefilter into the tank aligning the mount-

ing position markings on the prefilter and tank.

3.

  Set the damper into the prefilter, and then place 

the powder filter over the damper aligning the mounting 

position markings on the powder filter and prefilter.

4.

  Mount the head unit over the tank and secure 

them with the locking latches.

► 

Fig.12:


1.

 Head unit 

2.

 Powder filter (HEPA) 

3.

 Damper 

4.

 Prefilter 

5.

 Tank 

6.

 Mounting 

position marking

NOTICE:


Before using the powder filter, make 

sure that prefilter and damper are used together.

 It 

is not allowed to install powder filter alone.

Installing paper pack

Optional accessory

WARNING:


Before using a paper pack, 

make sure that the cloth filter or prefilter is used 

together.

 Failure to use the cloth filter / prefilter 

together may cause unusual noise and heat, resulting 

in a fire.

NOTICE:


Never pick up water or other liquids 

or wet dusts when using a paper pack.

 Picking up 

such things may cause the paper pack breakage.

NOTICE:


When using the cloth filter, make sure 

that the filter cage is used together.

NOTICE:


When using the prefilter, make sure 

that the powder filter and the damper are used 

together.

1.

  Unfold a paper pack.

2.

  Align the paper pack opening with the dust intake 

of the tank.

3.

  Install the paper pack into the tank with its card

-

board opening hooked on the paper pack holder.

► 

Fig.13:


1.

 Paper pack 

2.

 Cardboard opening 

3.

 Paper pack holder 

4.

 Dust intake

Installing polyethylene bag

With a polyethylene bag installed in the tank, you can 

easily empty the tank without letting your hands dirty.

Lay a polyethylene bag over the tank, and slip one side 

of the top edge of the bag at its open end in between 

the holder plate and the front wall of the tank.

► 

Fig.14:


1.

 Holder plate 

2.

 Front wall of tank 

3.

 Polyethylene bag

Spread the other top edges of the bag outwards over the 

top rims of the tank. Place the cloth filter or prefilter over the 

polyethylene bag to fasten the opening of the bag securely.

► 

Fig.15:


1.

 Cloth filter / prefilter

NOTE:

 A polyethylene bag available on the 

market can be used. 0.04 mm or thicker one is 

recommended.

NOTE:

 Too much dust will tear the bag easily, so 

do not collect the dust more than the half of the bag 

capacity.

Emptying tank with polyethylene bag

WARNING:


Always make sure that the cleaner 

is switched off and the battery cartridges are 

removed before emptying the tank.

 Failure to do 

so may cause an electric shock and serious personal 

injury.

NOTICE:


Do not apply a great impact on the 

tank.

 Applying a great impact may cause deformation 

and damage to the parts.

NOTICE:


Empty the tank at least once a day 

although this depends on picked-up dust volume 

in the tank.

 Or, the suction force will weaken and the 

motor may be broken.

NOTICE:


Do not grab the hooks or latches when 

emptying the tank.

 Grabbing the hooks or latches 

may cause them to break.

Release the locking latches and lift the head unit up off the tank.

Shake off dust from the cloth filter or prefilter before 

lifting the filter away from the tank.

Then remove the polyethylene bag out of the tank, 

closing the opening of the bag by hand.

► 

Fig.16:


1.

 Polyethylene bag 

2.

 Tank

Summary of Contents for VC005GLZ

Page 1: ...NLEITUNG 26 IT Aspirapolvere a batteria ISTRUZIONI PER L USO 36 NL Accustofzuiger GEBRUIKSAANWIJZING 46 ES Aspiradora Inalámbrica MANUAL DE INSTRUCCIONES 56 PT Aspirador de Pó a Bateria MANUAL DE INSTRUÇÕES 66 DA Akku støvsuger BRUGSANVISNING 76 EL Φορητή σκούπα αναρρόφησης ΕΓΧΕΙΡΙΔΙΟ ΟΔΗΓΙΩΝ 85 TR Akülü Süpürge KULLANMA KILAVUZU 95 ...

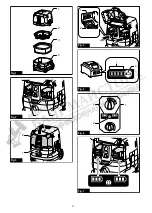
Page 2: ...1 2 3 4 Fig 1 2 1 Fig 2 1 2 Fig 3 1 2 Fig 4 1 2 Fig 5 1 1 2 Fig 6 Fig 7 2 ...

Page 3: ...1 3 2 Fig 8 1 2 3 4 Fig 9 Fig 10 1 2 3 Fig 11 1 2 3 4 5 6 6 6 Fig 12 1 4 2 3 Fig 13 1 2 3 Fig 14 3 ...

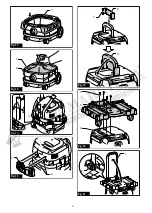
Page 4: ...1 Fig 15 1 2 Fig 16 Fig 17 1 2 Fig 18 1 2 3 Fig 19 2 3 1 Fig 20 1 2 Fig 21 4 ...

Page 5: ...1 2 Fig 22 1 3 2 Fig 23 1 2 3 Fig 24 Fig 25 2 1 Fig 26 1 2 2 Fig 27 2 1 Fig 28 Fig 29 5 ...

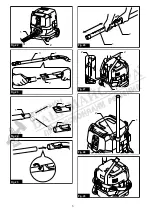
Page 6: ...1 Fig 30 Fig 31 6 ...

Page 7: ...d voltage D C 36 V 40 V max Net weight 7 9 11 0 kg Protection degree IPX4 Due to our continuing program of research and development the specifications herein are subject to change without notice Specifications and battery cartridge may differ from country to country The weight does not include accessories but battery cartridge s The lightest and heaviest combination weight of the appliance and bat...

Page 8: ...EN60335 2 69 Vibration emission ah M 2 5 m s 2 or less Uncertainty K 1 5 m s 2 NOTE The declared vibration total value s has been measured in accordance with a standard test method and may be used for comparing one tool with another NOTE The declared vibration total value s may also be used in a preliminary assessment of exposure WARNING The vibration emission during actual use of the power tool c...

Page 9: ...ut service or repair opera tions all contaminated items which cannot be satisfactorily cleaned are to be disposed of such items shall be disposed of in impervious bags in accordance with any current regula tion for the disposal of such waste 24 REPLACEMENT PARTS When servicing use only identical replacement parts 25 When not in use always store the cleaner indoors 26 Be kind to your cleaner Rough ...

Page 10: ...rding agents special requirement on pack aging and labeling must be observed For preparation of the item being shipped consult ing an expert for hazardous material is required Please also observe possibly more detailed national regulations Tape or mask off open contacts and pack up the battery in such a manner that it cannot move around in the packaging 11 When disposing the battery cartridge remo...

Page 11: ...operation To give priority back to the left battery slot after installing a recharged battery restart the cleaner With a single battery Only one battery is required as a power source in either the left or right battery slot The cleaner automatically determines which battery slot is available according to operating conditions Installation and uninstallation To install battery cartridges release the...

Page 12: ... low the appliance stops auto matically If the appliance does not run along with the switch opera tion remove the batteries from the appliance and recharge them Protections against other causes Protection system is also designed for other causes that could dam age the appliance and allows the appliance to stop automatically Take all the following steps to clear the causes when the appliance has be...

Page 13: ...er cage is used together NOTICE When using the prefilter make sure that the powder filter and the damper are used together 1 Unfold a paper pack 2 Align the paper pack opening with the dust intake of the tank 3 Install the paper pack into the tank with its card board opening hooked on the paper pack holder Fig 13 1 Paper pack 2 Cardboard opening 3 Paper pack holder 4 Dust intake Installing polyeth...

Page 14: ...ke hose inlet of the cleaner then turn it clockwise until it locks in place Fig 22 1 Hose 2 Dust intake hose inlet Installing or removing cleaner attachments CAUTION After installing an attachment check if it is securely installed If the attachment is installed imperfectly it may come off and cause personal injury Attachments with lock function NOTICE When installing the attachment with lock funct...

Page 15: ...in poor suction performance Routinely wipe and shake dust off filters and damper by hand Occasionally wash the powder filter in water rinse and dry thoroughly in the shade before use Never wash filters in a washing machine Fig 31 NOTE Do not rub or scratch the powder filter the prefilter and the damper with hard objects such as a brush and a paddle NOTE The filters wear out in course of time It is...

Reviews: