


18 ENGLISH
WIRELESS ACTIVATION
FUNCTION
What you can do with the wireless
activation function
The wireless activation function enables clean and
comfortable operation. By connecting a supported tool
to the cleaner, you can run the cleaner automatically
along with the switch operation of the tool.
►
Fig.27
NOTICE:
Be sure to refer to the instruction man-
ual of the tool when using the cleaner with wire-
less activation function.
NOTICE:
Do not disassemble or tamper with the
wireless unit.
NOTICE:
To prevent dust coming into the slot
of the wireless unit, always close the lid securely
during operation and storage.
NOTICE:
Do not remove the wireless unit while
the power is being supplied.
Doing so may cause a
malfunction of the wireless unit.
NOTICE:
Do not press the wireless activation
button too hard and/or press the button with an
object with a sharp edge.
NOTE:
Wireless activation needs Makita tools
equipped with the wireless unit.
NOTE:
Prior to the initial use of the wireless activa
-
tion function with each tool, the tool registration is
required. Once the registration is finished with the
tool, the re-registration is not required unless it is
cancelled.
NOTE:
Before registration, be sure that the wireless
unit is properly inserted.
NOTE:
One wireless unit can register up to 10 links
with other wireless units. If more than 10 other wire-
less units are registered to one wireless unit, the one
registered earliest will be cancelled automatically.
NOTE:
The position of the wireless activation button
varies depending on the tool.
NOTE:
The cleaner also starts by pressing the power
button when the stand-by switch is set to "AUTO".
However the power button will not actuate when the
wireless activation function is used.
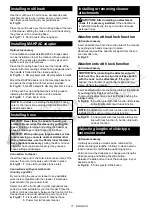
Installing the wireless unit
CAUTION:
Place the cleaner on a flat and
stable surface when installing the wireless unit.
NOTICE:
Clean the dust and dirt on the cleaner
before installing the wireless unit.
Dust or dirt may cause
malfunction if it comes into the slot of the wireless unit.
NOTICE:
To prevent the malfunction caused by
static, touch a static discharging material, such as
a metallic part, before picking up the wireless unit.
NOTICE:
When installing the wireless unit,
always be sure that the wireless unit is inserted
in the correct direction and the lid is completely
closed.
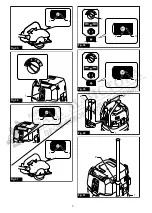
1.
Open the lid on the cleaner as shown in the figure.
►
Fig.28:
1.
Lid
2.
Insert the wireless unit to the slot and then close
the lid.
When inserting the wireless unit, align the projections
with the recessed portions on the slot.
►
Fig.29:
1.
Wireless unit
2.
Projection
3.
Lid
4.
Recessed portion
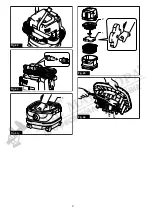
When removing the wireless unit, open the lid slowly.
The hooks on the back of the lid will lift the wireless unit
as you pull up the lid.
►
Fig.30:
1.
Wireless unit
2.
Hook
3.
Lid
After removing the wireless unit, keep it in the supplied
case or a static-free container.
NOTICE:
Always use the hooks on the back of
the lid when removing the wireless unit.
If the
hooks do not catch the wireless unit, close the lid
completely and open it slowly again.
Tool registration for the cleaner
NOTE:
A Makita tool supporting the wireless activa
-
tion function is required for the tool registration.
NOTE:
Finish installing the wireless unit to the tool
before starting the tool registration.
NOTE:
During the tool registration, do not pull the
switch trigger on the tool or turn on the power switch
on the cleaner.
NOTE:
Refer to the instruction manual of the tool, too.
If you wish to activate the cleaner along with the
switch operation of the tool, finish the tool registration
beforehand.
1.
Install the wireless units to the cleaner and the
tool, respectively.
2.
Install the batteries to the cleaner and the tool.
3.
Set the stand-by switch on the cleaner to "AUTO".
►
Fig.31:
1.
Stand-by switch
4.
Press the wireless activation button on the cleaner
for 3 seconds until the wireless activation lamp blinks in
green. And then press the wireless activation button on
the tool in the same way.
►
Fig.32:
1.
Wireless activation button
2.
Wireless
activation lamp
Summary of Contents for VC004GL
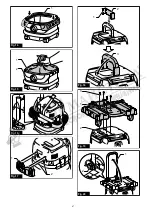
Page 2: ...2 1 2 3 4 5 Fig 1 2 1 Fig 2 1 2 Fig 3 1 2 Fig 4 1 2 Fig 5 1 1 2 Fig 6 Fig 7 ...
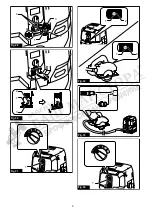
Page 3: ...3 1 3 2 Fig 8 1 2 3 4 Fig 9 Fig 10 1 2 3 4 5 6 6 6 Fig 11 1 4 2 3 Fig 12 1 2 3 Fig 13 ...
Page 4: ...4 1 Fig 14 1 2 Fig 15 Fig 16 1 2 Fig 17 1 2 3 Fig 18 2 3 1 Fig 19 1 2 Fig 20 ...
Page 5: ...5 1 2 Fig 21 1 2 3 4 Fig 22 Fig 23 1 3 2 Fig 24 1 2 3 Fig 25 2 1 Fig 26 Fig 27 1 Fig 28 ...
Page 6: ...6 1 2 3 4 Fig 29 1 2 3 Fig 30 1 Fig 31 2 1 2 1 Fig 32 Fig 33 1 Fig 34 ...
Page 7: ...7 2 1 Fig 35 1 Fig 36 2 1 2 1 Fig 37 3 2 1 Fig 38 2 1 Fig 39 1 2 2 Fig 40 1 2 Fig 41 ...