background image

15 ENGLISH

Reverse button for debris removal

WARNING:


Switch off the tool and remove 

the battery cartridge before you remove entan-

gled weeds or debris which the reverse rotation 

function can not remove.

 Failure to switch off and 

remove the battery cartridge may result in serious 

personal injury from accidental start-up.

This tool has a reverse button to change the direction of rotation. 

It is only for removing weeds and debris entangled in the tool.

To reverse the rotation, tap the reverse button and pull 

the switch trigger while depressing the lock-off lever when 

the cutting tool is stopped. The speed indicators and 

ADT indicator start blinking, and the cutting tool rotates in 

reverse direction when you pull the switch trigger.

To return to regular rotation, release the trigger and wait 

until the cutting tool stops.

3

1

2

►  


1.

 Speed indicator 

2.

 ADT indicator 

3.

 Reverse button

NOTE:

 During the reverse rotation, the tool operates only 

for a short period of time and then automatically stops.

NOTE:

 Once the tool is stopped, the rotation returns 

to regular direction when you start the tool again.

NOTE:

 If you tap the reverse button while the cutting 

tool is still rotating, the tool comes to stop and to be 

ready for reverse rotation.

Electric brake

This tool is equipped with an electric brake. If the tool 

consistently fails to quickly stop after the switch trigger 

is released, have the tool serviced at our service center.

CAUTION:


This brake system is not a substi-

tute for the protector. Never use the tool without 

the protector.

 An unguarded cutting tool may result 

in serious personal injury.

Electronic function

Constant speed control

The speed control function provides the constant rota-

tion speed regardless of load conditions.

Soft start feature

Soft start because of suppressed starting shock.

ASSEMBLY

WARNING:


Always be sure that the tool is 

switched off and battery cartridge is removed 

before carrying out any work on the tool.

 Failure to 

switch off and remove the battery cartridge may result 

in serious personal injury from accidental start-up.

WARNING:


Never start the tool unless it is 

completely assembled.

 Operation of the tool in a 

partially assembled state may result in serious per-

sonal injury from accidental start-up.

Installing the handle

For UR002G

1.

  Insert the shaft of the handle into the grip. Align 

the screw hole in the grip with the one in the shaft. 

Tighten the screw securely.

1

2

3

►    

1.

 Grip 

2.

 Screw 

3.

 Shaft

NOTICE:


Note the direction of the grip. The 

screw holes will not be aligned if the grip is not 

inserted in the correct direction.

2.

  Adjust the handle position, and then tighten the 

knob to fix the handle.

1

►    

1.

 Knob

Summary of Contents for UR002GD201

Page 1: ...INSTRUCTION MANUAL Cordless Grass Trimmer UR002G UR003G ENGLISH Original instructions Read before use ...

Page 2: ...out notice Specifications may differ from country to country The weight may differ depending on the attachment s including the battery cartridge The lightest and heavi est combination according to EPTA Procedure 01 2014 are shown in the table Applicable battery cartridge and charger Battery cartridge BL4020 BL4025 BL4040 BL4050F Recommended battery Charger DC40RA DC40RB DC40RC Some of the battery ...

Page 3: ...tion NOTE The declared noise emission value s has been measured in accordance with a standard test method and may be used for comparing one tool with another NOTE The declared noise emission value s may also be used in a preliminary assessment of exposure WARNING Wear ear protection WARNING The noise emission during actual use of the power tool can differ from the declared val ue s depending on th...

Page 4: ...ave a negative impact on the environment and human health Do not dispose of electrical and electronic appliances or batteries with household waste In accordance with the European Directive on waste electrical and electronic equipment and on accumulators and batteries and waste accumu lators and batteries as well as their adaptation to national law waste electrical equipment batteries and accumulat...

Page 5: ...ool in unexpected situations 6 Dress properly Do not wear loose clothing or jewellery Keep your hair and clothing away from moving parts Loose clothes jewellery or long hair can be caught in moving parts 7 If devices are provided for the connection of dust extraction and collection facilities ensure these are connected and properly used Use of dust collection can reduce dust related hazards 8 Do n...

Page 6: ...tion for lubricating and chang ing accessories Important safety instructions for the tool WARNING Read all safety warnings and all instructions Failure to follow the warnings and instructions may result in electric shock fire and or serious injury Save all warnings and instruc tions for future reference Intended use 1 This tool is only intended for cutting grass weeds bushes and undergrowth It sho...

Page 7: ...et place If the terminal gets wet or liquid enters inside of bat tery the battery may be short circuited and there is a risk of overheat fire or explosion 13 After removing the battery from the tool or charger be sure to attach the battery cover to the battery and store it in a dry place 14 If the battery cartridge gets wet drain the water inside and then wipe it with a dry cloth Dry the battery c...

Page 8: ... be sure that the cut ting tool is not touching the ground and other obstacles such as a tree 22 During operation always hold the tool with both hands Never hold the tool with one hand during use 23 Do not operate the tool in bad weather or if there is a risk of lightning 24 When you use the tool on muddy ground wet slope or slippery place pay attention to your footing 25 Avoid working in poor env...

Page 9: ...e Discoloration deformation or cracks of the plastic components may result 5 After each use tighten all screws and nuts 6 Do not attempt any maintenance or repair not described in the instruction manual Ask our authorized service center for such work 7 Always use our genuine spare parts and acces sories only Using parts or accessories supplied by a third party may result in the tool breakdown prop...

Page 10: ...t it cannot move around in the packaging 11 When disposing the battery cartridge remove it from the tool and dispose of it in a safe place Follow your local regulations relating to disposal of battery 12 Use the batteries only with the products specified by Makita Installing the batteries to non compliant products may result in a fire exces sive heat explosion or leak of electrolyte 13 If the tool...

Page 11: ...ue Drive Technology 3 Caution lamp 4 Main power button 5 Reverse button 6 Battery cartridge 7 Lock off lever 8 Switch trigger 9 Hanger 10 Handle 11 Barrier country specific 12 Protector 13 Protector extension for nylon cutting head plastic blade 14 Shoulder harness NOTE The protector supplied as the standard accessory varies depending on the countries ...

Page 12: ...ily it is not being inserted correctly Tool battery protection system The tool is equipped with a tool battery protection system This system automatically cuts off power to the motor to extend tool and battery life The tool will automatically stop during operation if the tool is placed under one of the following conditions Caution lamp Status Color On Blinking Green Overload Red tool battery Overh...

Page 13: ...y turned off if it is left without any operations for a certain period of time Switch action WARNING For your safety this tool is equipped with lock off lever which prevents the tool from unintended starting NEVER use the tool if it runs when you simply pull the switch trigger without pressing the lock off lever Return the tool to our authorized service center for proper repairs BEFORE further usa...

Page 14: ...edium 0 5 300 min 1 Low 0 3 500 min 1 Automatic Torque Drive Technology When you turn on the Automatic Torque Drive Technology ADT the tool runs at optimum rotation speed and torque for the condition of grass being cut To start ADT press and hold the reverse button until the ADT indicator turns on After that tap the main power button to select the cutting tool attached to the tool Light the lamp b...

Page 15: ...rse rotation Electric brake This tool is equipped with an electric brake If the tool consistently fails to quickly stop after the switch trigger is released have the tool serviced at our service center CAUTION This brake system is not a substi tute for the protector Never use the tool without the protector An unguarded cutting tool may result in serious personal injury Electronic function Constant...

Page 16: ...untry specific If the barrier is included in your model attach it to the handle using the screw on the barrier 1 2 1 Barrier 2 Screw CAUTION After assembling the barrier do not remove it The barrier works as a safety part to prevent you from contacting the cutting blade accidentally Hex wrench storage CAUTION Be careful not to leave the hex wrench inserted in the tool head It may cause injury and ...

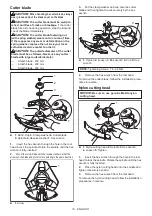
Page 17: ...e care not to injure yourself on the cutter for cutting the nylon cord Attach the protector to the clamp using bolts After that install the protector extension Insert the protector extension to the protector and then snap the clips on Make sure that the tabs on the protector extension fit into the slots on the protector 1 2 4 3 6 5 1 Protector 2 Clip 3 Protector extension 4 Cutter 5 Slot 6 Tab To ...

Page 18: ...n the tool head to lock the spindle Rotate the spindle until the hex wrench is fully inserted 2 Mount the cutter blade onto the receive washer so that the arrows on the blade and protector are pointing in the same direction 1 1 1 Arrow 3 Put the clamp washer and cup onto the cutter blade and then tighten the nut securely by the box wrench 3 5 1 2 4 1 Tighten 2 Loosen 3 Box wrench 4 Cup 5 Hex wrenc...

Page 19: ...n the tool package but use the hanging band recommended by Makita If you put on the shoulder harness included in the tool package and the shoulder harness of the back pack type power supply at the same time removing the tool or backpack type power supply is difficult in case of an emergency and it may cause an accident or injury For the recommended hanging band ask Makita Authorized Service Center...

Page 20: ... 2 Hanger 3 Adjust the shoulder harness to a comfortable working position The shoulder harness features a means of quick release Simply squeeze the sides of the buckle to release the tool from the shoulder harness 1 1 Buckle Adjusting the hanger position For UR002G only For more comfortable handling of the tool you can change the hanger position 1 Loosen the hex socket head bolt on the hanger and ...

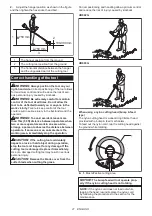
Page 21: ...one area Also arrange a person to observe the distance between operators If someone or an animal enters the working area immediately stop the operation CAUTION If the cutting tool accidentally impacts a rock or hard object during operation stop the tool and inspect for any damage If the cutting tool is damaged replace it immediately Use of a damaged cutting tool may result in serious personal inju...

Page 22: ...Centers always using Makita replacement parts Replacing the nylon cord WARNING Use only the nylon cord with diameter specified in this instruction manual Never use heavier line metal wire rope or the like Failure to do so may cause damage to the tool and result in serious personal injury WARNING Always remove the nylon cutting head from the tool when replacing the nylon cord WARNING Make sure that...

Page 23: ...23 ENGLISH 95 M10L 1 2 3 5 4 6 7 8 4 m 80 mm 100 mm ...

Page 24: ...24 ENGLISH 96 M10L 1 2 4 3 5 6 4 m 100 mm ...

Page 25: ...25 ENGLISH B F ECO 4L 1 2 3 4 5 6 7 8 4 m 100 mm 80 mm ...

Page 26: ...ttery If recharging is not effective replace battery Overheating Stop using of tool to allow it to cool down It does not reach maximum RPM Battery is installed improperly Install the battery cartridge as described in this manual Battery power is dropping Recharge the battery If recharging is not effective replace battery The drive system does not work correctly Ask your local authorized service ce...

Page 27: ... manual The use of any other accessories or attachments might present a risk of injury to persons Only use accessory or attachment for its stated purpose If you need any assistance for more details regard ing these accessories ask your local Makita Service Center Cutter blade Nylon cutting head Nylon cord cutting line Plastic blade Protector Makita genuine battery and charger NOTE Some items in th...

Page 28: ...www makita com Makita Europe N V Makita Corporation 3 11 8 Sumiyoshi cho Anjo Aichi 446 8502 Japan Jan Baptist Vinkstraat 2 3070 Kortenberg Belgium 885860A225 EN 20210317 ...

Reviews: