background image

8

5.

Maintain power tools and accessories. Check for 
misalignment or binding of moving parts, 
breakage of parts and any other condition that 
may affect the power tool’s operation. If damaged, 
have the power tool repaired before use.

 Many 

accidents are caused by poorly maintained power 
tools.

6.

Keep cutting tools sharp and clean.

 Properly 

maintained cutting tools with sharp cutting edges are 
less likely to bind and are easier to control.

7.

Use the power tool, accessories and tool bits etc. 
in accordance with these instructions, taking into 
account the working conditions and the work to 
be performed.

 Use of the power tool for operations 

different from those intended could result in a 
hazardous situation.

8.

Keep handles and grasping surfaces dry, clean 
and free from oil and grease. 

Slippery handles and 

grasping surfaces do not allow for safe handling and 
control of the tool in unexpected situations.

9.

When using the tool, do not wear cloth work 
gloves which may be entangled.

 The entanglement 

of cloth work gloves in the moving parts may result in 
personal injury.

Service

1.

Have your power tool serviced by a qualified 
repair person using only identical replacement 
parts.

 This will ensure that the safety of the power tool 

is maintained.

2.

Follow instruction for lubricating and changing 
accessories.

GEB167-1

PLANER SAFETY WARNINGS

1.

Wait for the cutter to stop before setting the tool 
down.

 An exposed rotating cutter may engage the 

surface leading to possible loss of control and serious 
injury.

2.

Hold the power tool by insulated gripping 
surfaces, because the cutter may contact its own 
cord. 

Cutting a “live” wire may make exposed metal 

parts of the power tool “live” and could give the 
operator an electric shock.

3.

Use clamps or another practical way to secure and 
support the workpiece to a stable platform. 

Holding 

the workpiece by your hand or against the body leaves 
it unstable and may lead to loss of control.

4.

Rags, cloth, cord, string and the like should never 
be left around the work area.

5.

Avoid cutting nails. Inspect for and remove all 
nails from the workpiece before operation.

6.

Use only sharp blades. Handle the blades very 
carefully.

7.

Be sure the blade installation bolts are securely 
tightened before operation.

8.

Hold the tool firmly with both hands.

9.

Keep hands away from rotating parts.

10.

Before using the tool on an actual workpiece, let it 
run for a while. Watch for vibration or wobbling 
that could indicate poor installation or a poorly 
balanced blade.

11.

Make sure the blade is not contacting the 
workpiece before the switch is turned on. 

12.

Wait until the blade attains full speed before 
cutting. 

13.

Always switch off and wait for the blades to come 
to a complete stop before any adjusting. 

14.

Never stick your finger into the chip chute. Chute 
may jam when cutting damp wood. Clean out 
chips with a stick. 

15.

Do not leave the tool running. Operate the tool 
only when hand-held. 

16.

Always change both blades or covers on the 
drum, otherwise the resulting imbalance will 
cause vibration and shorten tool life. 

17.

Use only Makita blades specified in this manual. 

18.

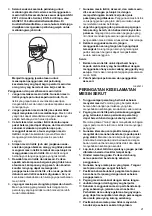
Always use the correct dust mask/respirator for 
the material and application you are working with.

SAVE THESE INSTRUCTIONS.

WARNING:

DO NOT let comfort or familiarity with product (gained 
from repeated use) replace strict adherence to safety 
rules for the subject product.
MISUSE or failure to follow the safety rules stated in 
this instruction manual may cause serious personal 
injury.

FUNCTIONAL DESCRIPTION

CAUTION:

• Always be sure that the tool is switched off and 

unplugged before adjusting or checking function on the 
tool.

Adjusting depth of cut (Fig. 1)

Depth of cut may be adjusted by simply turning the knob 
on the front of the tool so that the pointer points the 
desired depth of cut.

Switch action (Fig. 2)

CAUTION:

• Before plugging in the tool, always check to see that 

the switch trigger actuates properly and returns to the 
"OFF" position when released.

For tool with lock button

CAUTION:

• Switch can be locked in "ON" position for ease of 

operator comfort during extended use. Apply caution 
when locking tool in "ON" position and maintain firm 
grasp on tool.

To start the tool, simply pull the switch trigger. Release the 
switch trigger to stop.
For continuous operation, pull the switch trigger and then 
push in the lock button.
To stop the tool from the locked position, pull the switch 
trigger fully, then release it.

For tool with lock-off button

To prevent the switch trigger from being accidentally 
pulled, a lock-off button is provided.
To start the tool, depress the lock-off button and pull the 
switch trigger. Release the switch trigger to stop.

Summary of Contents for KP0800X

Page 1: ...GB Planer Instruction manual ZHCN 电刨 使用说明书 ID Mesin Serut Petunjuk penggunaan Máy Bào Cầm Tay Hoạt Động Bằng Động Cơ Điện VI Tài liệu hướng dẫn TH กบไฟฟ า คู มือการใช งาน KP0800 ...

Page 2: ...2 1 010336 2 010172 3 010173 4 002564 5 002555 6 002556 7 002565 8 002566 1 2 3 4 5 6 7 8 9 9 10 5 11 12 13 14 5 12 15 16 17 18 19 20 12 21 18 22 23 24 19 17 25 25 26 23 27 11 10 12 ...

Page 3: ...3 9 010175 10 007802 11 010176 12 010177 13 010178 14 002580 15 1085601 16 010372 29 28 30 31 29 32 33 14 34 15 35 ...

Page 4: ...4 17 010333 18 010183 19 003634 20 010184 21 002588 22 002589 23 002590 24 001145 36 37 38 39 40 41 42 ...

Page 5: ...5 25 010335 26 010185 27 010186 43 44 29 44 45 44 ...

Page 6: ...ure reference The term power tool in the warnings refers to your mains operated corded power tool or battery operated cordless power tool Work area safety 1 Keep work area clean and well lit Cluttered or dark areas invite accidents 2 Do not operate power tools in explosive atmospheres such as in the presence of flammable liquids gases or dust Power tools create sparks which may ignite the dust or ...

Page 7: ...rting Ensure the switch is in the off position before connecting to power source and or battery pack picking up or carrying the tool Carrying power tools with your finger on the switch or energising power tools that have the switch on invites accidents 4 Remove any adjusting key or wrench before turning the power tool on A wrench or a key left attached to a rotating part of the power tool may resu...

Page 8: ...d before operation 8 Hold the tool firmly with both hands 9 Keep hands away from rotating parts 10 Before using the tool on an actual workpiece let it run for a while Watch for vibration or wobbling that could indicate poor installation or a poorly balanced blade 11 Make sure the blade is not contacting the workpiece before the switch is turned on 12 Wait until the blade attains full speed before ...

Page 9: ...at the above procedures for the other blade For tool with mini planer blades Fig 4 Fig 7 Fig 8 1 Remove the existing blade if the tool has been in use carefully clean the drum surfaces and the drum cover To remove the blades on the drum unscrew the three installation bolts with the socket wrench The drum cover comes off together with the blades 2 To install the blades loosely attach the adjusting ...

Page 10: ...m clean planing operation connect a Makita vacuum cleaner to your tool Before connecting the vacuum cleaner remove the chip cover from the tool Then connect a hose of the vacuum cleaner to the nozzle optional accessory as shown in the figures For tool with nozzle When you wish to perform clean planing operation connect a Makita vacuum cleaner to your tool Then connect a hose of the vacuum cleaner ...

Page 11: ...gged before attempting to perform inspection or maintenance Never use gasoline benzine thinner alcohol or the like Discoloration deformation or cracks may result Sharpening the planer blades For conventional blades only Always keep your blades sharp for the best performance possible Use the sharpening holder optional accessory to remove nicks and produce a fine edge Fig 21 First loosen the two win...

Page 12: ...所有安全 警告 说明 插图和规格 若不遵循下列说 明 则可能导致触电 起火和 或严重的人 身伤害 1 指针 2 旋钮 3 锁定按钮或锁止按钮 4 开关扳机 5 刨刀片 6 后刨板 7 底脚 8 套筒扳手 9 螺栓 10 刀筒 11 刀筒盖 12 调整板 13 量规定位板内缘 14 刀片边缘 15 螺丝 16 后跟 17 量规基板后缘 18 量规定位板 19 量规基板 20 盘头螺丝 21 刨刀片定位凸片 22 调整板后跟 23 固定板 24 量规定位板内侧面 25 小型刨刀片 26 凹槽 27 内六角法兰头螺栓 28 集尘袋 29 集尘口 30 紧固装置 31 弯管 32 前端 33 尾端 34 切割线 35 边缘导板 附件 36 刨刀夹 37 蝶形螺母 38 刀片 A 39 刀片 B 40 D 侧 41 C 侧 42 界限磨耗线 43 碎屑盖板 44 螺丝刀 45 碳刷夹盖 型号 KP0...

Page 13: ...的 RCD 来使用电源 8 电动工具会产生对用户无害的电磁场 EMF 但是 起搏器和其他类似医疗 设备的用户应在操作本电动工具前咨询其 设备的制造商和 或向医生寻求建议 9 请勿用湿手触摸电源插头 10 如果导线破损 则由制造商或其代理商更 换以避免安全隐患 人身安全注意事项 1 操作电动工具时请保持警惕 注意操作安 全 并运用常识 请勿在疲劳状态下 或 者在麻醉品 酒精或其他药物作用的影响 下操作电动工具 在操作电动工具期间分 心可能会导致严重的人身伤害 2 请使用个人劳防用品 请务必佩带安全眼 镜 正确使用防尘面罩 防滑安全鞋 硬 质帽子或耳罩等劳防用品可减少人身伤害 的危险 3 防止意外启动 在连接至电源和 或电池 组 拿起或搬运工具之前 请确保开关处 于关闭位置 搬运工具时手指放在开关上 或者在开关打开的情况下给工具通电可能 导致意外事故 4 在启动工具之前请取下所有的调节钥匙或 ...

Page 14: ...全性 2 根据说明进行润滑和更换附件 GEB167 1 电刨安全警告 1 待刀具完全停止后方可放下工具 因为暴 露在外的旋转刀具可能会接触放置位置的 表面 导致工具失控或严重人身伤害 2 因为刀具可能会接触到自身的电线 操作 工具时请握住工具的绝缘抓握表面 切割 到 带电 的电线时 电动工具上曝露的 金属部分可能也会 带电 并使操作者触 电 3 请使用螺丝钳或其他可行的方式将工件夹 紧并固定在稳定的平台上 手持工件或将 工件抵在身上 可能会导致工件摆放不 稳 使工具失去控制 4 工作场地不可留有破布 衣裳 导线 索 线等等 5 注意不要切割到铁钉 操作之前请检查并 清除工件上的所有铁钉 6 请仅使用锋利的刀片 装卸刀片时 需十 分小心 7 操作前务必检查刀片安装螺栓是否紧固 8 需用双手握紧工具 9 手应远离旋转的部件 10 在实际的工件上使用工具之前 请先让工 具空转片刻 请注意 振动或...

Page 15: ...装刀片时 首先清除吸附在刀筒或刀片上的 所有碎屑或异物 务必使用相同尺寸和重量的 刀片 否则会造成刀筒振动 从而造成刨削动 作不良 以至损坏工具 将刀片放在量规基板上 使刀片边缘与量规定 位板的内缘完全齐平 将调整板放在刀片上 然后只需按下与量规基板后侧齐平的调整板 后跟 并将调整板上的两个螺丝拧紧即可 现 在将调整板的后跟滑进刀筒凹槽中 然后将刀 筒盖盖上 最后使用套筒扳手均匀而交替地旋 紧所有安装螺栓 安装另一刀片时重复上述步骤 对于使用小型刨刀片的工具 图 4 图 7 及 图 8 1 拆下现有刀片 如果正在使用工具 请仔 细清洁刀筒表面和刀筒盖 拆卸刀筒上的 刀片时 请使用套筒扳手旋下三个安装螺 栓 刀筒盖可与刀片同时拆下 2 安装刀片时 使用盘头螺丝将调整板宽松 连接至固定板 并将小型刨刀片放在量规 基板上 使刀片切割边缘与量规定位板的 内侧面完全齐平 3 将调整板 固定板放在量规...

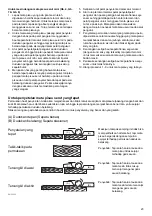
Page 16: ...集尘器与本工具连 接 则可进行更有效和清洁的操作 连接集尘器 图 11 对于没有集尘口的工具 当您想进行清洁刨削操作时 请将 Makita 牧 田 集尘器连接至您的工具 连接集尘器前 请从工具上拆下碎屑盖板 然后如图所示将集 尘器软管接到集尘口 选购附件 上 对于有集尘口的工具 当您想进行清洁刨削操作时 请将 Makita 牧 田 集尘器连接至您的工具 然后如图所示将 集尘器软管接到集尘口上 弯管 选购附件 图 12 使用弯管可改变碎屑排出方向 使操作更加 清洁 对于没有集尘口的工具 拆下碎屑盖板并安装集尘口 选购附件 只需通过滑动即可将弯管 选购附件 连接 到工具的集尘口上 将其拆下时 只需将其 拔出 对于有集尘口的工具 只需通过滑动即可将弯管 选购附件 连接 到工具的集尘口上 将其拆下时 只需将其 拔出 A 前刨板 可移动 B 后刨板 固定 正确的安装 表面有刻痕 前端有凹陷 尾端有凹...

Page 17: ...与工件一侧平齐的情况 下移动工具 否则会导致刨削表面不平 图 17 最大切槽深度为 9 mm 您可能希望通过安装附加木条的方式延长导 板长度 导板上有孔 可方便地插入延伸导 板 选购附件 图 18 斜刨削 进行如图所示的斜刨削时 将前刨板的 V 形 槽与工件边缘对齐 然后进行刨削 图 19 及图 20 保养 小心 检查或保养工具之前 请务必关闭工具电 源开关并拔下插头 切勿使用汽油 苯 稀释剂 酒精或类似 物品清洁工具 否则可能会导致工具变 色 变形或出现裂缝 研磨刨刀片 仅限传统刀片 请保持刀片锐利 以便达到最佳的刨削效果 使用刨刀夹 选购附件 磨除刀锋上的缺口 提高刀刃的锋利度 图 21 首先 松开刨刀夹上的两个蝶形螺母 并插入 刀片 A 及刀片 B 使两刀片背缘分别接 触到 C 及 D 侧 然后旋紧蝶形螺母 图 22 研磨前 将磨刀石浸水 2 或 3 分钟 将固定在 刨刀夹上的两个刀...

Page 18: ...明书所列的 Makita 牧田 电动工具 使用其他附件 或装置可能导致人身伤害 仅可将附件或 装置用于规定目的 如您需要了解更多关于这些选购附件的信息 请咨询当地的 Makita 牧田 维修服务中心 高速钢刨刀片 碳化钨刨刀片 为延长刀片寿命 小型刨刀片 刨刀夹组件 刀口规 固定板套件 边缘导板 导尺 延伸导板套件 磨石 集尘口 集尘袋组件 弯管 套筒扳手 注 本列表中的一些部件可能作为标准配件包 含于工具包装内 它们可能因销往国家之 不同而异 ...

Page 19: ...peringatan dan petunjuk untuk acuan di masa depan Istilah mesin listrik dalam semua peringatan mengacu pada mesin listrik yang dijalankan dengan sumber listrik jala jala berkabel atau baterai tanpa kabel Keselamatan tempat kerja 1 Jaga tempat kerja selalu bersih dan berpenerangan cukup Tempat kerja yang berantakan dan gelap mengundang kecelakaan 1 Penunjuk 2 Tombol 3 Tombol kunci atau Tombol buka ...

Page 20: ... atau dokter mereka sebelum mengoperasikan mesin listrik ini 9 Jangan menyentuh colokan daya dengan tangan basah 10 Jika kabel rusak penggantian harus dilakukan oleh produsen atau agennya untuk menghindari bahaya keselamatan Keselamatan Diri 1 Jaga kewaspadaan perhatikan pekerjaan Anda dan gunakan akal sehat bila menggunakan mesin listrik Jangan menggunakan mesin listrik saat Anda lelah atau di ba...

Page 21: ...aan yang dilakukan Penggunaan mesin listrik untuk penggunaan yang lain dari peruntukan dapat menimbulkan situasi berbahaya 8 Jagalah agar gagang dan permukaan pegangan tetap kering bersih dan bebas dari minyak dan pelumas Gagang dan permukaan pegangan yang licin tidak mendukung keamanan penanganan dan pengendalian mesin dalam situasi situasi tak terduga 9 Ketika menggunakan mesin jangan menggunaka...

Page 22: ... sampai penuh lalu lepaskan Untuk mesin dengan tombol buka kunci Untuk mencegah picu saklar tertarik dengan tidak sengaja tersedia sebuah tombol buka kunci Untuk menjalankan mesin tekan tombol buka kunci dan tarik picu saklar Lepaskan picu saklar untuk berhenti Bagian kaki Gb 3 Setelah operasi pemotongan angkat sisi belakang mesin dan bagian kaki akan muncul di bawah permukaan dudukan belakang Hal...

Page 23: ...sau serut mini ke posisinya Mata pisau akan diposisikan dengan tonjolan penepat mata pisau serut pada pelat pengatur 7 Penyetelan permukaan memanjang mata pisau perlu diposisikan secara manual sehingga ujung mata pisau menjadi bebas dan sama jauhnya antara jarak dari rumahan pada satu sisi dan dari braket logam pada sisi yang lain 8 Kencangkan ketiga baut kepala flensa segi enam dengan kunci sok y...

Page 24: ...mbat PENGGUNAAN PERINGATAN Untuk mengurangi risiko cedera pada seseorang jangan operasikan dengan nosel atau tutup serpihan kayu tidak terpasang Pegang mesin kuat kuat dengan satu tangan pada tombol sementara tangan yang lain pada pegangan saklar ketika menjalankan mesin Pekerjaan penyerutan Gb 13 Pertama tama posisikan dudukan depan mesin mendatar di atas benda kerja dengan kondisi mata pisau tid...

Page 25: ... gunakan sikat karbon yang sama Gb 24 Gunakan obeng untuk melepas tutup serpihan kayu atau nosel Gb 25 Gb 26 Gunakan obeng untuk melepas tutup tempat sikat Tarik keluar sikat karbon yang aus masukkan yang baru dan pasang tutup tempat sikat Gb 27 Untuk menjaga KEAMANAN dan KEANDALAN mesin perbaikan perawatan atau penyetelan lain harus dilakukan oleh Pusat Layanan Resmi Makita selalu gunakan suku ca...

Page 26: ...ể dẫn đến điện giật hỏa hoạn và hoặc thương tích nghiêm trọng Lưu giữ tất cả cảnh báo và hướng dẫn để tham khảo sau này Thuật ngữ dụng cụ máy trong các cảnh báo đề cập đến dụng cụ máy có dây được vận hành bằng nguồn điện chính hoặc dụng cụ máy không dây được vận hành bằng pin của bạn An toàn tại nơi làm việc 1 Giữ nơi làm việc sạch sẽ và có đủ ánh sáng Nơi làm việc bừa bộn hoặc tối thường dễ gây r...

Page 27: ...oảnh khắc không tập trung khi đang vận hành dụng cụ máy cũng có thể dẫn đến thương tích cá nhân nghiêm trọng 2 Sử dụng thiết bị bảo hộ cá nhân Luôn đeo thiết bị bảo vệ mắt Các thiết bị bảo hộ như mặt nạ chống bụi giày an toàn chống trượt mũ bảo hộ hay thiết bị bảo vệ thính giác được sử dụng trong các điều kiện thích hợp sẽ giúp giảm thương tích cá nhân 3 Tránh vô tình khởi động dụng cụ máy Đảm bảo...

Page 28: ...hở của dụng cụ máy có điện và làm cho người vận hành bị điện giật 3 Sử dụng các chốt kẹp hoặc những cách thực tế khác để giữ chặt và đỡ lấy phôi gia công trên bục vững chắc Nắm giữ phôi gia công bằng tay hoặc để tựa lên người của bạn sẽ làm máy không ổn định và có thể dẫn tới mất kiểm soát 4 Giẻ vải dây dẫn dây và các thứ tương tự không bao giờ được để xung quanh khu vực làm việc 5 Tránh cắt phải ...

Page 29: ... hư hỏng Đặt lưỡi bào lên đế cữ sao cho mép lưỡi bào hoàn toàn nằm ngang với mép trong của tấm cữ Đặt tấm điều chỉnh trên lưỡi bào sau đó chỉ cần nhấn phần gáy của tấm điều chỉnh cho nằm ngang với mặt sau của đế cữ và vặn chặt hai vít trên tấm điều chỉnh Bây giờ mới trượt phần gáy của tấm điều chỉnh vào rãnh trên trống sau đó gắn vừa vặn nắp trống lên trên Vặt chặt tất cả các bu lông lắp đặt đồng ...

Page 30: ...y hút bụi Makita vào dụng cụ của bạn Trước khi kết nối máy hút bụi cầm tay hoạt động bằng động cơ điện hãy tháo nắp chắn vụn bào khỏi dụng cụ Sau đó kết nối ống hút của máy hút bụi vào vòi xả phụ kiện tùy chọn như thể hiện trên hình vẽ Đối với các dụng cụ có vòi xả Khi bạn muốn thực hiện thao tác bào sạch hãy kết nối với máy hút bụi Makita vào dụng cụ của bạn Sau đó kết nối ống hút của máy hút bụi...

Page 31: ...giờ dùng xăng ét xăng dung môi cồn hoặc hóa chất tương tự Có thể xảy ra hiện tượng mất màu biến dạng hoặc nứt vỡ Mài sắc các lưỡi bào Chỉ dành cho các lưỡi bào thông thường Luôn giữ cho các lưỡi bào của bạn được sắc bén để có thể hoạt động tốt nhất Sử dụng giá mài phụ kiện tùy chọn để loại bỏ các vết khía và làm mép lưỡi sắc bén Hình 21 Đầu tiên vặn lỏng hai ốc tai vặn ở trên giá mài và lắp các lư...

Page 32: ...ะสามารถใช กับปลั กไฟ ที ไม มีสายดินได 1 ลูกศรชี 2 ปุ มหมุน 3 ปุ มล อคหรือปุ มปลดล อค 4 สวิตช สั งงาน 5 ใบมีดกบ 6 ฐานด านหลัง 7 เท า 8 ประแจบ อกซ 9 สลักเกลียว 10 ทุ น 11 ฝาครอบทุ น 12 แผ นปรับ 13 ขอบด านในของแผ นเกจ 14 คมมีด 15 สกรู 16 ส น 17 ด านหลังของฐานเกจ 18 แผ นเกจ 19 ฐานเกจ 20 สกรูหัวแบน 21 หลักบอกตําแหน งใบมีดกบ 22 ส นของแผ นปรับ 23 แผ นตั ง 24 ส วนข างด านในของแผ นเกจ 25 ใบมีดเล ก 26 ร อง ...

Page 33: ...ช อต 6 หากต องใช งานเครื องมือไฟฟ าในสถานที เป ยกชื น ให ใช อุปกรณ ป องกันกระแสไฟรั ว RCD การใช RCD จะลดความเสี ยงของ การเกิดไฟฟ าช อต 7 แนะนําให ใช แหล งจ ายไฟผ าน RCD ที มีกระแสไฟรั วในอัตราไม เกิน 30 mA เสมอ 8 เครื องมือไฟฟ าอาจสร างสนามแม เหล ก EMF ที ไม เป น อันตรายต อผู ใช อย างไรก ตาม ผู ใช ที ใส เครื องกระตุ นหัวใจและ อุปกรณ ทางการแพทย ที คล ายกันนี ควรติดต อผู ผลิตอุปกรณ และ หรือแพทย เพื ...

Page 34: ...เสียหาย ให นําเครื องมือ ไฟฟ าไปซ อมแซมก อนการใช งาน อุบัติเหตุจํานวนมากเกิดจาก การดูแลรักษาเครื องมือไฟฟ าอย างไม ถูกต อง 6 ทําความสะอาดเครื องมือตัดและลับให คมอยู เสมอ เครื องมือ การตัดที มีการดูแลอย างถูกต องและมีขอบการตัดคมมักจะมี ป ญหาติดขัดน อยและควบคุมได ง ายกว า 7 ใช เครื องมือไฟฟ า อุปกรณ เสริม และวัสดุสิ นเปลือง ฯลฯ ตาม คําแนะนําดังกล าว พิจารณาสภาพการทํางานและงานที จะลง มือทํา การใช เคร...

Page 35: ...างานของ เครื องมือ การปรับความลึกของการไส ภาพที 1 สามารถปรับความลึกในการไสได ด วยการหมุนปุ มหมุนที อยู ด าน หน าของเครื องมือเพื อให ลูกศรชี ไปยังความลึกในการไสที ต องการ การทํางานของสวิตช ภาพที 2 ข อควรระวัง ก อนเสียบปลั กเครื องมือ ให ตรวจสอบว าสวิตช สั งงานสามารถทํา งานได อย างถูกต อง และกลับไปยังตําแหน ง OFF เมื อปล อย สําหรับเครื องมือที มีปุ มล อค ข อควรระวัง สวิตช สามารถล อคในตําแหน ง ON เพ...

Page 36: ...เพื อใส ใบมีด ให คลายแผ นปรับระดับที ติดกับแผ นตั งด วยสกรูหัว แบนและติดตั งใบมีดกบขนาดเล กลงบนฐานเกจเพื อให คมมีดอยู ในระนาบเดียวกับส วนข างด านในของแผ นเกจ 3 ติดตั งแผ นปรับระดับ แผ นติดตั งบนฐานเกจเพื อให หูกําหนด ตําแหน งใบมีดกบบนแผ นติดตั งอยู ในร องใบมีดขนาดเล ก จาก นั นกดที ส นของแผ นปรับระดับให ได ระนาบกับด านหลังของฐาน เกจบนขันสกรูหัวแบนให แน น 4 สิ งที สําคัญคือใบมีดต องวางในระนาบเกียวกั...

Page 37: ... การต อเครื องดูดฝุ น ภาพที 11 สําหรับเครื องมือที ไม มีท อระบาย เมื อคุณต องการที จะทํางานไสไม ที สะอาดเรียบร อย ให ต อเครื องดูด ฝุ น Makita เข ากับเครื องมือของคุณ ก อนทําการต อที ดูดฝุ น ให ถอด ฝาครอบเศษไม ออกจากเครื องมือ จากนั นต อท อของเครื องดูดฝุ น เข ากับท อระบาย อุปกรณ เสริม ตามที แสดงในภาพ สําหรับเครื องมือที มีท อระบาย เมื อคุณต องการที จะทํางานไสไม ที สะอาดเรียบร อย ให ต อเครื องดูด ...

Page 38: ...าพที 17 ความลึกสูงสุดของบังใบคือ 9 มม คุณอาจต องการเพิ มความยาวของกรอบด วยการต อชิ นไม เพิ ม มีรู อยู บนกรอบนี เพื อให ทําได โดยสะดวก และเพื อสําหรับต อตัวนํา เสริม อุปกรณ เสริม ภาพที 18 การไสขอบ เพื อทําการไสโค งดังที แสดงในภาพ ให จัดร องตัว V บนฐานด าน หน าให ตรงกับขอบของชิ นงานแล วทําการไส ภาพที 19 และ ภาพที 20 การบํารุงรักษา ข อควรระวัง ตรวจสอบให แน ใจว าได ป ดสวิตช เครื องมือและถอดปลั กออกก อ...

Page 39: ...ประสงค ที ระบุไว เท านั น หากคุณต องการทราบรายละเอียดเกี ยวกับอุปกรณ เสริมเหล านี โปรด สอบถามศูนย บริการ Makita ใกล บ านคุณ ใบมีดกบเหล กความเร วสูง ใบมีดกบทังสเตนคาร ไบน สําหรับอายุใบมีดที ยาวนานกว า ใบมีดเล ก ชุดตัวจับสําหรับลับใบมีด เกจใบมีด ชุดแผ นติดตั ง กรอบใบมีด ตัวนํา ชุดเพิ มตัวนํา หินลับมีด ท อระบาย ชุดถุงดักฝุ น ข องอ ประแจบ อกซ หมายเหตุ อุปกรณ บางรายการอาจจะรวมอยู ในชุดอุปกรณ พื นฐานของ...

Page 40: ...884915C374 TRD Makita Corporation 3 11 8 Sumiyoshi cho Anjo Aichi 446 8502 Japan www makita com ...

Reviews: