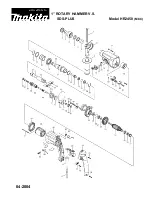
background image

R

epair

P 11 / 22 

< 10 > Disassembling tool holder guide section

( 1 ) After removing change lever ( See page 9), separate gear housing from motor housing as illustrated 
       in Fig. 40 and Fig. 41 in page 10.

( 1 ) Apply grease to spur gear 51 and tool holder guide referring to "< 2 > Lubrication to the machine parts" 
        in page 3.
( 2 ) Mount spur gear 51, compression spring 32 and washer 31.  See Fig. 48.

( 3 ) Pressing the washer 31 toward the spur gear 51 side, with arbor press, mount ring spring 29 as illustrated
        in Fig. 47 and Fig. 46. And mount flat washer 28 to the position illustrated in Fig. 45.

( 4 ) Insert piston cylinder of swash bearing section into tool holder guide. And insert tool holder section into inner
        housing as illustrated in Fig. 45.

( 2 ) Remove inner housing as illustrated in Fig. 44.

( 3 ) Separate tool holder guide section from inner housing.  See Fig. 45.

( 4 ) Remove ring spring 29, while pressing washer 31 which covers ring spring 29, toward the spur gear 51 side.
        See Fig. 46 and 47.  After removing ring spring 29, reduce pressure on the washer 31 slowly. 

( 5 ) Remove washer 31, compression spring 32 and spur gear 51 form tool holder guide.  See Fig. 48.

< 11 > Assembling tool holder guide section

Fig. 44

Fig. 45

Fig. 46

Fig. 47

Fig. 48

Washer 31

Ring 
  spring 29

Round bars 
for arbor

Retaining ring
plier

No. 1R306 
Ring spring 
 extractor

Tool holder 
guide section

Tool holder 
guide section

Swash bearing 
section

Swash bearing 
section

Piston cylinder

Inner 
   housing

Flat washer 28

Washer 31

Ring 
  spring 29

Retaining 
ring plier

Washer 31

Spur gear 51

Tool 
holder guide

Compression 
spring 32

Inner housing

Summary of Contents for HR2450FT

Page 1: ...50 60 Model No HR2450FT HR2450T Bit shank SDS plus type Blows per min bpm min 1 No load speed min 1 rpm Protection against electric shock Net weight Kg lbs Cord length m ft Single blow energy J Variable switch Reverse switch Steel mm Wood mm Concrete mm SDS plus type Yes Yes Yes Yes 2 7 2 7 0 1 100 0 1 100 0 4 500 0 4 500 24 15 16 25mm 1 for USA 13 1 2 13 1 2 24 15 16 32 1 1 4 32 1 1 4 double insu...

Page 2: ...ITA grease Amount g oz Portion to be lubricated Quick change chuck assembly 95 95 Cap 35 Inner lip of bit inserting side Whole part Whole part Whole part Whole part Whole part The inside where 103 tool holder contacts The inside where 21 tool holder guide contacts 96 97 98 98 Stopper 99 99 Steel ball 7 Steel ball 6 Steel ball 6 100 101 102 103 104 104 104 104 Tool holder 103 Steel ball 5 0 Steel b...

Page 3: ...on where 21 tool holder guide contacts Inner hole for reciprocating 24 impact bolt Inner portion where 30 striker reciprocates Tool holder guide 21 X ring 9 23 Whole portion O ring 15 26 Whole portion O ring 9 28 Accepting hole for 34 piston joint Piston cylinder 32 Clutch cam 39 Whole portion Teeth portion O ring 68 48 Swash bearing 10 Helical gear 26 41 42 Teeth portion Spur gear 10 80 Accepting...

Page 4: ... pin of torsion spring 31 through the holes of change ring and change cover And turn the tool holder approx by 75 See Fig 3 Short Pin of torsion spring 31 Long pin of torsion spring 31 Coat the steel ball 6 0 with MAKITA grease N No 1 before mounting Now the steel ball sticks on the hole of tool holder Torsion spring 31 Tool holder Steel ball 6 0 Fig 1 Fig 2 Change cover Change ring Change cover C...

Page 5: ...washer 21 See Fig 14 9 Mount chuck cover See Fig 9 10 While sliding the chuck cover in the direction designated with arrow mount ring spring 19 See Fig 10 Now the parts mounted in Fig 7 Fig 8 and Fig 9 have been secured with the ring spring 19 11 Mount cap 35 as illustrated in Fig 11 Fig 4 Fig 5 Fig 6 Fig 7 Fig 8 Fig 9 Fig 10 Fig 11 Steel ball 5 0 Leaf spring Leaf spring Flat washer 24 Flat washer...

Page 6: ...A 7 Remove tool holder and change ring from change cover See Fig 17 8 Remove torsion spring 31 and steel ball 6 0 from tool holder See Fig 18 1 Mount keyless drill chuck 13 to chuck holder by turning it clockwise See Fig 19 2 Secure the keyless drill chuck by turning flat head screw M6x22 counter clockwise See Fig 19 3 Mount the keyless drill chuck while aligning the flat portion of chuck holder w...

Page 7: ...ssing the long pin of torsion spring 31 through the holes of change ring and change cover And turn the keyless drill chuck 13 approx by 75 See Fig 23 The hole of change ring aligned with the hole of change cover Long pin of torsion spring 31 Approx 75 Fig 23 Steel ball 5 0 Leaf spring Leaf spring If it is difficult to mount leaf spring with your hand mount it with retaining ring plier for shaft Fl...

Page 8: ...ining Ring Plier slightly knock the change cover to the working table several times Then leaf spring can be removed See Fig 29A 3 Remove keyless drill chuck with spacer and change ring from change cover See Fig 30 4 Remove torsion spring 31 from chuck holder See Fig 31 5 Remove spacer from chuck holder See Fig 32 6 Remove flat head screw M6x22 by tuning it clockwise See Fig 33 7 Remove keyless dri...

Page 9: ...ng 17 See Fig 37 3 Insert the change lever in which compression spring 3 and lock button have been temporarily fixed with cap into the assembling hole of gear housing See Fig 38 The change lever can not be inserted completely in this stage 4 Pressing the change lever turn it in the direction of drill mode Then it can be inserted completely in any position of area B See Fig 39 5 Turn the change lev...

Page 10: ... 3 Slightly hitting the edge of gear housing with plastic hammer remove armature from inner housing assembled in gear housing See Fig 42 4 Ball bearings of fan side and commutator side can be removed with No 1R269 Bearing extractor small See Fig 43 Carbon brush Carbon brush Handle cover Tapping screw 4 x 25 3 pcs Tapping s crew 4 x 45 4 pcs Brush holder Brush holder Gear housing Motor housing Gear...

Page 11: ...r housing as illustrated in Fig 45 2 Remove inner housing as illustrated in Fig 44 3 Separate tool holder guide section from inner housing See Fig 45 4 Remove ring spring 29 while pressing washer 31 which covers ring spring 29 toward the spur gear 51 side See Fig 46 and 47 After removing ring spring 29 reduce pressure on the washer 31 slowly 5 Remove washer 31 compression spring 32 and spur gear 5...

Page 12: ...28 showing its cut portion Ring spring Push the cut portion to the out side of the hole Push out ring spring 28 from the inner groove O ring case O ring case Inner housing side Inner housing side 3 Hold tool holder with No 1R038 Armature holder and vise Insert screwdriver between ring spring 28 and O ring case and push out ring spring 28 from the inner groove as illustrated in Fig 50 Inner housing...

Page 13: ...t bolt Ring 10 O ring case with O ring 9 Tool holder guide O ring 15 Fig 52 13 Assembling impact bolt 1 Apply grease to the following parts referring to 2 Lubrication to the machine parts in page 3 Tool holder guide X ring 9 O ring 15 2 Insert X ring 9 sleeve 9 impact bolt ring 10 O ring 15 and O ring case with O ring 9 into tool holder 3 Assemble ring spring 28 to the inner groove of tool holder ...

Page 14: ...ash bearing section Fat washer 5 Compression spring 6 Stop ring E 4 Pin of inner housing Piston cylinder 3 Remove stop ring E 4 flat washer 5 and compression spring 6 with which change plate is fixed from the pin of inner housing as illustrated in Fig 56 4 Swash bearing section is held in inner housing with bearing retainer which is fastened with 2 pcs of hex socket head bolts M4x12 Take off these...

Page 15: ...emove ball bearing 608ZZ with bearing extractor as illustrated in Fig 61 Then flat washer 8 and bearing retainer can be removed from cam shaft 3 Remove helical gear 26 by pressing cam shaft with arbor press as illustrated in Fig 62 1R022 Bearing extractor plate 1R023 Bearing extractor ring Ring 8 Ring 8 1R236 Round bar for arbor 1R236 Round bar for arbor Ball bearing 608ZZ Flat washer 8 Bearing re...

Page 16: ...d swash bearing 10 referring to 2 Lubrication to the machine parts in page 3 2 Mount 2 pcs of flat washer 12 and piston joint to piston cylinder as illustrated in Fig 70 3 Insert the above piston cylinder into inner housing as illustrated in Fig 71 4 Bringing piston cylinder to the dead point for swash bearing 10 mount swash bearing 10 to piston cylinder by inserting its pole into the hole of pist...

Page 17: ... 75 8 Assemble compression spring 7 to cam shaft and secure the parts on cam shaft with retaining ring S 7 as illustrated in Fig 76 9 Assemble compression spring 6 and flat washer 5 to the pin of inner housing And secure them with stop ring E 5 as illustrated in Fig 77 10 Apply 55g of MAKITA grease RA No 1 in gear housing Flat washer 5 Stop ring E 5 17 Removing needle bearing complete Strike the w...

Page 18: ...essor power supply cord etc can be replaced No 1R165 Ring spring setting tool B Needle bearing complete Gear housing Note in assembling Pay attention to the assembling position of needle bearing complete The fat portion of needle bearing complete has to be faced to the belly side of gear housing Belly side Needle bearing complete Flat portion of needle bearing complete Belly side Back side Tapping...

Page 19: ...Clear 1 2 3 4 1 2 C1 C2 M1 M2 Switch Field Noise suppressor Power supply cord Brush holder Brush holder Connected to field ore For some countries noise suppressor of two lead wire type is used or noise suppressor is not used LED job light Blue or red Light circiut HR2450FT ...

Page 20: ... s lead wire blue between brush holder and lead holder Fix field brush holder s lead wire blue and field lead wire black with lead holder as per the illustration Fix lead wires which are passed through this area with any of these lead holders Noise suppressor Noise suppressor is not used in some countries Fix the following lead wires with this lead holder Brush holder s lead wire red 2 field s lea...

Page 21: ...lack White Red Blue Clear 1 2 3 4 1 2 C1 C2 M1 M2 Switch Field Noise suppressor Power supply cord Brush holder Brush holder Connected to field ore For some countries noise suppressor of two lead wire type is used or noise suppressor is not used HR2450T ...

Page 22: ...d lead wire white Fix brush holder s lead wire blue and field lead wire black with lead holder as per the illustration Pass brush holder s lead wire blue under the field lead wire black Do not slack brush holder s lead wire blue between brush holder and lead holder Fix field brush holder s lead wire blue and field lead wire black with lead holder as per the illustration Fix lead wires which are pa...

Reviews: