


9
it gets stuck.
Indication lamp
Color of the indication lamp means the followings.
Blinking green:
Normal status
Blinking red:
Need to recharge the battery cartridge
Lighting-up-red:
Recharge the battery cartridge. Nailing
cannot be performed due to no remaining battery
capacity.
Blinking orange after blinking green and red
alternately:
Fault detection is running. Remove and
reinsert the battery cartridge to reset. If fault detection is
running again, it is malfunction condition. Ask your local
Makita service center to repair it.
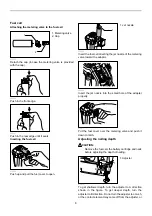
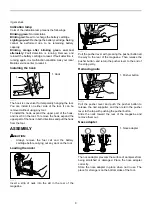
Installing the hook
1
012813
The hook is convenient for temporarily hanging the tool.
You can install it on either side of the tool. It can be
removed without using any tool.
To install the hook, expand the upper part of the hook,
and insert it in the tool. To remove the hook, expand the
upper part of the hook in both directions and pull the hook
from the tool.
ASSEMBLY
CAUTION:
•
Always remove the fuel cell and the battery
cartridge before carrying out any work on the tool.
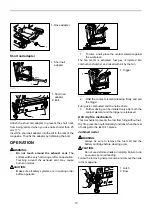
Loading the nailer
012814
Insert a strip of nails into the slit in the rear of the
magazine.
012815
Pull the pusher lever with pressing the pusher button all
the way to the rear of the magazine. Then release the
pusher button, and return the pusher lever to the end of
the strip gently.
Removing nails
1
012816
Pull the pusher lever and push the pusher button to
release the nail supporter, and then return the pusher
lever to the top with pushing the pusher button.
Slide the nails toward the rear of the magazine and
remove them out.
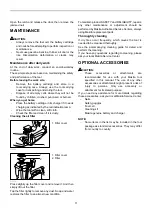
Nose adapter
1
012892
The nose adapter prevents the surface of workpiece from
being scratched or damaged. Place the nose adapter
correctly.
Store the nose adapter in place when not in use. The
place for storage is on the bottom sides of the tool.
1. Nose adapter
1. Pusher button
1. Hook