Makita FS4200TP Instruction Manual Download Page 6

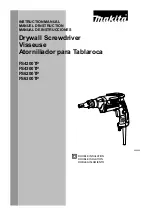
Installing or removing the bit 

To remove the bit, first remove the locator by pulling the 
lock ring away from the gear housing.. 

1

2


009964 

 
Grasp the bit with a pair of pliers and pull the bit out of 
the magnetic bit holder. Sometimes, it helps to wiggle 
the bit with the pliers as you pull. 
To install the bit, push it firmly into the magnetic bit 
holder. Then install the locator by pushing it firmly back 
onto the gear housing. 

1

3

2

4


010095 


Use of locator holder 

1

2

3


009971 

 
The locator can be temporarily held on the locator holder 
during replacing bit or using without locator. To hold the 
locator, position the trapezoidal holes of the locator on 
the swells of the locator holder and push it in. 


OPERATION 


009966 

 
Fit the screw on the point of the bit and place the point of 
the screw on the surface of the workpiece to be fastened. 
Apply pressure to the tool and start it. Withdraw the tool 
as soon as the clutch cuts in. Then release the switch 
trigger. 


CAUTION: 

• 

When fitting the screw onto the point of the bit, be 
careful not to push in on the screw. If the screw is 
pushed in, the clutch will engage and the screw will 
rotate suddenly. This could damage a workpiece or 
cause an injury. 

• 

Make sure that the bit is inserted straight in the 
screw head, or the screw and/or bit may be 
damaged. 

• 

Hold the tool only by the handle when performing 
an operation. Do not touch the metal part. 


MAINTENANCE 


CAUTION: 

• 

Always be sure that the tool is switched off and 
unplugged before attempting to perform inspection 
or maintenance. 

To maintain product SAFETY and RELIABILITY, repairs, 
carbon brush inspection and replacement, any other 
maintenance or adjustment should be performed by 
Makita Authorized or Factory Service Centers, always 
using Makita replacement parts. 


ACCESSORIES 


CAUTION: 

• 

These accessories or attachments are 
recommended for use with your Makita tool 
specified in this manual. The use of any other 
accessories or attachments might present a risk of 
injury to persons. Only use accessory or 
attachment for its stated purpose. 


1. Swells 
2. Trapezoidal 

holes 

3. Locator holder

1. Locator 
2. Bit 
3. Gear housing 
4. Magnetic bit 

holder 

1. Lock ring 
2. Gear housing 

Summary of Contents for FS4200TP

Page 1: ...CTION MANUAL MANUEL D INSTRUCTION MANUAL DE INSTRUCCIONES DOUBLE INSULATION DOUBLE ISOLATION DOBLE AISLAMIENTO Drywall Screwdriver Visseuse Atornillador para Tablaroca FS4200TP FS4300TP FS6200TP FS6300TP 009959 ...

Page 2: ...gerators There is an increased risk of electric shock if your body is earthed or grounded 6 Do not expose power tools to rain or wet conditions Water entering a power tool will increase the risk of electric shock 7 Do not abuse the cord Never use the cord for carrying pulling or unplugging the power tool Keep cord away from heat oil sharp edges or moving parts Damaged or entangled cords increase t...

Page 3: ...sories and tool bits etc in accordance with these instructions taking into account the working conditions and the work to be performed Use of the power tool for operations different from those intended could result in a hazardous situation SERVICE 24 Have your power tool serviced by a qualified repair person using only identical replacement parts This will ensure that the safety of the power tool ...

Page 4: ...ot and could burn your skin SAVE THESE INSTRUCTIONS WARNING MISUSE or failure to follow the safety rules stated in this instruction manual may cause serious personal injury USD101 2 Symbols The followings show the symbols used for tool volts amperes hertz alternating current no load speed revolutions or reciprocation per minute FUNCTIONAL DESCRIPTION CAUTION Always be sure that the tool is switche...

Page 5: ...ee the source of light directly To turn on the lamp pull the trigger Release the trigger to turn it off NOTE Use a dry cloth to wipe the dirt off the lens of lamp Be careful not to scratch the lens of lamp or it may lower the illumination Reversing switch action A B 1 009962 CAUTION Always check the direction of rotation before operation Use the reversing switch only after the tool comes to a comp...

Page 6: ...tting the screw onto the point of the bit be careful not to push in on the screw If the screw is pushed in the clutch will engage and the screw will rotate suddenly This could damage a workpiece or cause an injury Make sure that the bit is inserted straight in the screw head or the screw and or bit may be damaged Hold the tool only by the handle when performing an operation Do not touch the metal ...

Page 7: ...T SHALL MAKITA BE LIABLE FOR ANY INDIRECT INCIDENTAL OR CONSEQUENTIAL DAMAGES FROM THE SALE OR USE OF THE PRODUCT THIS DISCLAIMER APPLIES BOTH DURING AND AFTER THE TERM OF THIS WARRANTY MAKITA DISCLAIMS LIABILITY FOR ANY IMPLIED WARRANTIES INCLUDING IMPLIED WARRANTIES OF MERCHANTABILITY AND FITNESS FOR A SPECIFIC PURPOSE AFTER THE ONE YEAR TERM OF THIS WARRANTY This Warranty gives you specific leg...

Page 8: ...til si votre attention est détournée Sécurité en matière d électricité 4 Les fiches d outil électrique sont conçues pour s adapter parfaitement aux prises de courant Ne modifiez jamais la fiche de quelque façon que ce soit N utilisez aucun adaptateur de fiche sur les outils électriques avec mise à la terre En ne modifiant pas les fiches et en les insérant dans des prises de courant pour lesquelles...

Page 9: ...nte un danger et doit être réparé 19 Débranchez la fiche de la source d alimentation et ou retirez le bloc piles de l outil électrique avant d effectuer tout réglage de changer un accessoire ou de ranger l outil électrique De telles mesures préventives réduisent les risques de démarrage accidentel de l outil électrique 20 Après l utilisation d un outil électrique rangez le hors de portée des enfan...

Page 10: ... Lame de mise à la terre Couvercle de la prise d alimentation mise à la terre 000269 GEB017 3 CONSIGNES DE SÉCURITÉ POUR LE TOURNEVIS NE VOUS LAISSEZ PAS tromper au fil d une utilisation répétée par un sentiment d aisance ou de familiarité avec le produit en négligeant les consignes de sécurité qui accompagnent le produit L utilisation non sécuritaire ou incorrecte de cet outil comporte un risque ...

Page 11: ...eur ne convient toujours pas pour la vis continuez à régler jusqu à ce que vous obteniez le réglage de profondeur voulu 1 1mm 3 64 002619 1 1mm 3 64 002620 Interrupteur 1 2 009961 ATTENTION Avant de brancher l outil assurez vous toujours que la gâchette fonctionne correctement et revient en position d arrêt une fois relâchée Pour mettre l outil en marche appuyez simplement sur la gâchette La vites...

Page 12: ...es aiguilles d une montre ou sur la position côté B pour une rotation dans le sens inverse des aiguilles d une montre Crochet 1 009963 Le crochet est pratique pour accrocher temporairement l outil ASSEMBLAGE ATTENTION Avant d effectuer toute intervention sur l outil assurez vous toujours qu il est hors tension et débranché Installation et retrait du foret Pour retirer l embout retirez d abord le p...

Page 13: ...ut risque d être endommagé Saisissez l outil par sa poignée uniquement lorsque vous effectuez une opération Ne touchez pas la pièce métallique ENTRETIEN ATTENTION Assurez vous toujours que l outil est hors tension et débranché avant d y effectuer tout travail d inspection ou d entretien Pour maintenir la SÉCURITÉ et la FIABILITÉ du produit les réparations l inspection et le remplacement des charbo...

Page 14: ...IT CET AVIS DE NON RESPONSABILITÉ S APPLIQUE À LA FOIS PENDANT ET APRÈS LA PÉRIODE COUVERTE PAR CETTE GARANTIE MAKITA DÉCLINE TOUTE RESPONSABILITÉ QUANT À TOUTE GARANTIE TACITE INCLUANT LES GARANTIES TACITES DE QUALITÉ MARCHANDE ET ADÉQUATION À UN USAGE PARTICULIER APRÈS LA PÉRIODE D UN AN COUVERTE PAR CETTE GARANTIE Cette garantie vous donne des droits spécifiques reconnus par la loi et possiblem...

Page 15: ...cas crean chispas que pueden prender fuego al polvo o los humos 3 Mantenga a los niños y curiosos alejados mientras utiliza una herramienta eléctrica Las distracciones le pueden hacer perder el control Seguridad eléctrica 4 Las clavijas de conexión de las herramientas eléctricas deberán encajar perfectamente en la toma de corriente No modifique nunca la clavija de conexión de ninguna forma No util...

Page 16: ...ienta eléctrica correcta para su aplicación La herramienta eléctrica adecuada hará un trabajo mejor a la velocidad para la que ha sido fabricada 18 No utilice la herramienta eléctrica si el interruptor no la enciende y apaga Cualquier herramienta eléctrica que no pueda ser controlada con el interruptor es peligrosa y debe ser reemplazada 19 Desconecte la clavija de la fuente de energía y o la bate...

Page 17: ...a eléctrica Esta herramienta está equipada con un cable de alimentación y enchufe trifásicos para ajustarse a un receptáculo aterrizado adecuadamente El conductor verde o verde y amarillo del cable es la conexión a tierra Nunca conecte dicho cable a una terminal electrificada Su unidad es para usar en 120 voltios y tiene un enchufe igual al que aparece en la Figura A Fig A Espiga para conexion a t...

Page 18: ...queo de tal manera que la distancia entre la punta del localizador y la cabeza del tornillo sea aproximadamente de 1 mm 3 64 como se muestra en las ilustraciones Coloque un tornillo de prueba en su material o pieza de réplica del material Si la profundidad no corresponde con el tornillo continúe ajustando hasta que obtenga la configuración de profundidad apropiada 1 1mm 3 64 002619 1 1mm 3 64 0026...

Page 19: ... de inversión que se utiliza para cambiar la dirección de la rotación Mueva la palanca del conmutador de inversión a la posición lado A para que el eje de la herramienta rote en el sentido de las agujas del reloj y en la posición lado B para que rote en el sentido opuesto al de las agujas del reloj Gancho 1 009963 El gancho es conveniente para cuando desea colgar la herramienta temporalmente ENSAM...

Page 20: ...ta podrían dañarse Sujete la herramienta sólo del mango al estar realizando una operación No toque la pieza de metal MANTENIMIENTO PRECAUCIÓN Asegúrese siempre que la herramienta esté apagada y desconectada antes de intentar realizar una inspección o mantenimiento Para mantener la SEGURIDAD y FIABILIDAD del producto las reparaciones la inspección y sustitución de las escobillas de carbón y cualqui...

Page 21: ...VENTA O USO DEL PRODUCTO ESTA RENUNCIA SERÁ APLICABLE TANTO DURANTE COMO DESPUÉS DEL TÉRMINO DE ESTA GARANTÍA MAKITA RENUNCIA LA RESPONSABILIDAD POR CUALQUIER GARANTÍA IMPLÍCITA INCLUYENDO GARANTÍAS IMPLÍCITAS DE COMERCIALIDAD E IDONEIDAD PARA UN FIN ESPECÍFICO DESPUÉS DEL TÉRMINO DE UN AÑO DE ESTA GARANTÍA Esta garantía le concede a usted derechos legales específicos y usted podrá tener también o...

Page 22: ...22 ...

Page 23: ...23 ...

Page 24: ...Algunos tipos de polvo creados por el lijado serrado amolado taladrado y otras actividades de la construccion contienen sustancias quimicas reconocidas por el Estado de California como causantes de cancer defectos de nacimiento y otros peligros de reproduccion Algunos ejemplos de estos productos quimicos son plomo de pinturas a base de plomo silice cristalino de ladrillos y cemento y otros product...

Reviews: