


14 ENGLISH
OPERATION
WARNING:
Operators shall be adequately
instructed on the use of the vacuum cleaner.
WARNING:
This vacuum cleaner is not suit-
able for picking up hazardous dust.
CAUTION:
This cleaner is for dry use only.
CAUTION:
This cleaner is for indoor use only.
CAUTION:
Always insert the battery cartridge
all the way until it locks in place.
If you can see the
red indicator on the upper side of the button, it is not
locked completely. Insert it fully until the red indicator
cannot be seen. If not, it may accidentally fall out of
the tool, causing injury to you or someone around
you.
CAUTION:
During operation, be conscious
of the vacuum cleaner on your back.
You may
lose your balance if the vacuum cleaner body bumps
against a wall or the hose is hooked by an obstacles.
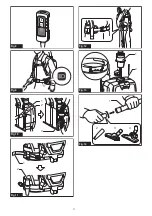
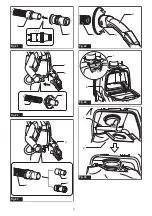
1.
Shoulder the vacuum cleaner body and fas-
ten upper and lower belts. Adjust the tightness as
necessary.
►
Fig.29
2.
Press button to start vacuuming. If you want
to change the suction power, press button until the
desired suction power is selected. Press button to
stop.
►
Fig.30
During the operation, hook the switch box on the D-ring
or the lower belt. The hook can be slanted for lighting
forward when hooked on the lower belt.
►
Fig.31:
1.
D-ring
2.
Lower belt
NOTE:
The vacuum cleaner will automatically
switches off and the LED light flashes when the vac
-
uum cleaner is overheated due to the reduced air-
flow into the machine caused by clogged hose, pipe,
filter or other reasons. In this case, remove the cause
of the problem and cool the vacuum cleaner before
restarting.
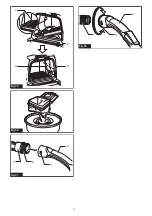
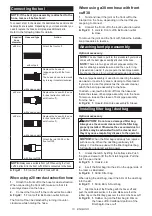
3.
Replace the filter bag when it becomes full. Open
the lid and take out the filter bag. Pull the strip on the
side of the opening to shut the filter bag and dispose of
the filter bag in whole.
►
Fig.32:
1.
Strip
When using a dust bag, take out the dust bag and dis-
pose of the dust by releasing the latch.
►
Fig.33:
1.
Latch
NOTICE:
Periodically check the filter bag if it is
full.
Continuous use with the filter bag full results in
reduced suction power.
NOTICE:
Do not use an used filter bag.
The filter
bag is designed for single use. Using filter bag repeat
-
edly may cause clogging of the filter and results in
damage to the cleaner. If you want to use the bag
repeatedly, use a dust bag.
MAINTENANCE
CAUTION:
Always be sure that the tool is
switched off and the battery cartridge is removed
before attempting to perform inspection or
maintenance.
NOTICE:
Never use gasoline, benzine, thinner,
alcohol or the like. Discoloration, deformation or
cracks may result.
To maintain product SAFETY and RELIABILITY,
repairs, any other maintenance or adjustment should
be performed by Makita Authorized or Factory Service
Centers, always using Makita replacement parts.
Cleaning the HEPA filter
CAUTION:
Do not use the vacuum cleaner
without a filter or continue to use dirty or dam
-
aged filter. Vacuumed dust or particles may be
exhausted from the cleaner and they may cause
respiratory disease to the operator.
NOTICE:
To keep optimum suction power and
clean exhaust, clean the filter periodically. If
enough suction power is not obtained even after
the cleaning, replace the filter with new one.
NOTICE:
To prevent the filter from being dam
-
aged, do not use following tools and similar items
for cleaning :
—
Air duster
—
High pressure washer
—
Tools made of hard materials such as a
metallic brush
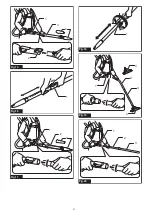
1.
Open the lid and take out the filter bag. Release
the hook on the filter and remove it from the vacuum
cleaner body.
►
Fig.34
2.
Beat the dust off from the filter. The filter can be
washed with water. Rinse away the dust and particles
on the filter every 1 or 2 month. After that, dry the filter
completely in a shaded and well-ventilated place to
prevent unpleasant odor or malfunctions.
3.
To install the filter, insert the side without the flap
into the holder then push the filter downward until the
flap is secured by the rib.
►
Fig.35:
1.
Holder
2.
HEPA filter
3.
Rib
4.
Flap
Cleaning the dust bag
Regularly clean the dust bag with soap and water. Turn
the dust bag inside out and remove the sticky dust.
Wash lightly by hand and rinse well with water. Dry
completely before installing to the vacuum cleaner.
►
Fig.36
NOTICE:
Wet dust bag lowers the vacuuming per-
formance as well as the life of the motor.
Summary of Contents for DVC261ZX4
Page 2: ...1 2 3 Fig 1 1 2 Fig 2 1 2 1 2 Fig 3 1 2 Fig 4 2 1 Fig 5 1 2 Fig 6 1 Fig 7 2 ...
Page 3: ...Fig 8 Fig 9 1 2 3 Fig 10 1 2 Fig 11 Fig 12 1 2 Fig 13 1 2 3 4 Fig 14 3 ...
Page 4: ...2 1 3 4 Fig 15 1 Fig 16 1 2 3 Fig 17 1 Fig 18 1 2 3 4 4 Fig 19 2 3 1 Fig 20 4 ...
Page 5: ...1 2 Fig 21 2 1 1 3 Fig 22 4 1 3 2 Fig 23 1 2 3 Fig 24 1 2 Fig 25 1 2 Fig 26 5 ...
Page 6: ...2 1 3 Fig 27 3 2 1 4 1 Fig 28 Fig 29 Fig 30 2 1 Fig 31 1 Fig 32 1 Fig 33 Fig 34 6 ...
Page 7: ...1 2 3 4 Fig 35 Fig 36 4 1 3 2 Fig 37 1 2 3 Fig 38 7 ...
Page 78: ...78 ...
Page 79: ...79 ...