

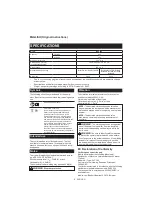


8
ENGLISH
3.
If operating time has become excessively
shorter, stop operating immediately. It may
result in a risk of overheating, possible burns
and even an explosion.
4.
If electrolyte gets into your eyes, rinse them
out with clear water and seek medical atten-
tion right away. It may result in loss of your
eyesight.
5.
Do not short the battery cartridge:
(1)
Do not touch the terminals with any con-
ductive material.
(2)
Avoid storing battery cartridge in a con-
tainer with other metal objects such as
nails, coins, etc.
(3)
Do not expose battery cartridge to water
or rain.
$EDWWHU\VKRUWFDQFDXVHDODUJHFXUUHQWÀRZRYHU
-
heating, possible burns and even a breakdown.
6.
Do not store the tool and battery cartridge in
locations where the temperature may reach or
exceed 50 °C (122 °F).
7.
Do not incinerate the battery cartridge even if
it is severely damaged or is completely worn
RXW7KHEDWWHU\FDUWULGJHFDQH[SORGHLQD¿UH
8.
Be careful not to drop or strike battery.
Do not use a damaged battery.
10.
The contained lithium-ion batteries are subject to
the Dangerous Goods Legislation requirements.
For commercial transports e.g. by third parties,
IRUZDUGLQJDJHQWVVSHFLDOUHTXLUHPHQWRQSDFN
aging and labeling must be observed.
)RUSUHSDUDWLRQRIWKHLWHPEHLQJVKLSSHGFRQVXOW
LQJDQH[SHUWIRUKD]DUGRXVPDWHULDOLVUHTXLUHG
3OHDVHDOVRREVHUYHSRVVLEO\PRUHGHWDLOHG
national regulations.
7DSHRUPDVNRIIRSHQFRQWDFWVDQGSDFNXSWKH
battery in such a manner that it cannot move
around in the packaging.
11.
Follow your local regulations relating to dis-
posal of battery.
SAVE THESE INSTRUCTIONS.
CAUTION:
Only use genuine Makita batteries.
8VHRIQRQJHQXLQH0DNLWDEDWWHULHVRUEDWWHULHVWKDW
have been altered, may result in the battery bursting
FDXVLQJ¿UHVSHUVRQDOLQMXU\DQGGDPDJH,WZLOODOVR
YRLGWKH0DNLWDZDUUDQW\IRUWKH0DNLWDWRRODQGFKDUJHU
Tips for maintaining maximum
battery life
1.
Charge the battery cartridge before completely
discharged. Always stop tool operation and
charge the battery cartridge when you notice
less tool power.
2.
Never recharge a fully charged battery car-
tridge. Overcharging shortens the battery
service life.
3.
Charge the battery cartridge with room tem-
perature at 10 °C - 40 °C (50 °F - 104 °F). Let
a hot battery cartridge cool down before
charging it.
4.
Charge the battery cartridge if you do not use
it for a long period (more than six months).
FUNCTIONAL
DESCRIPTION
CAUTION:
Always be sure that the tool is
switched off and the battery cartridge is removed
before adjusting or checking function on the tool.
Installing or removing battery
cartridge
CAUTION:
Always switch off the tool before
installing or removing of the battery cartridge.
CAUTION:
Hold the tool and the battery car-
WULGJH¿UPO\ZKHQLQVWDOOLQJRUUHPRYLQJEDWWHU\
cartridge.
Failure to hold the tool and the battery
FDUWULGJH¿UPO\PD\FDXVHWKHPWRVOLSRII\RXUKDQGV
and result in damage to the tool and battery cartridge
DQGDSHUVRQDOLQMXU\
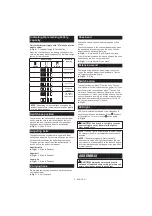
Ź
Fig.1:
1.
Red indicator
2.
Button
3.
Battery cartridge
7RUHPRYHWKHEDWWHU\FDUWULGJHVOLGHLWIURPWKHWRRO
ZKLOHVOLGLQJWKHEXWWRQRQWKHIURQWRIWKHFDUWULGJH
7RLQVWDOOWKHEDWWHU\FDUWULGJHDOLJQWKHWRQJXHRQWKH
battery cartridge with the groove in the housing and slip
it into place. Insert it all the way until it locks in place
ZLWKDOLWWOHFOLFN,I\RXFDQVHHWKHUHGLQGLFDWRURQWKH
XSSHUVLGHRIWKHEXWWRQLWLVQRWORFNHGFRPSOHWHO\
CAUTION:
Always install the battery cartridge
fully until the red indicator cannot be seen.
,IQRW
LWPD\DFFLGHQWDOO\IDOORXWRIWKHWRROFDXVLQJLQMXU\WR
you or someone around you.
CAUTION:
Do not install the battery cartridge
forcibly.
,IWKHFDUWULGJHGRHVQRWVOLGHLQHDVLO\LWLV
not being inserted correctly.
Tool / battery protection system
7KHWRROLVHTXLSSHGZLWKDWRROEDWWHU\SURWHFWLRQV\V
WHP7KLVV\VWHPDXWRPDWLFDOO\FXWVRIISRZHUWRWKH
PRWRUWRH[WHQGWRRODQGEDWWHU\OLIH7KHWRROZLOODXWR
PDWLFDOO\VWRSGXULQJRSHUDWLRQLIWKHWRRORUEDWWHU\LV
SODFHGXQGHURQHRIWKHIROORZLQJFRQGLWLRQV
Overload protection
When the tool is operated in a manner that causes it to
draw an abnormally high current, the tool automatically
stops without any indication. In this situation, turn the
WRRORIIDQGVWRSWKHDSSOLFDWLRQWKDWFDXVHGWKHWRROWR
EHFRPHRYHUORDGHG7KHQWXUQWKHWRRORQWRUHVWDUW
Overheat protection
When the tool is overheated, the tool stops automatically.
/HWWKHWRROFRROGRZQEHIRUHWXUQLQJWKHWRRORQDJDLQ
Overdischarge protection
When the battery capacity becomes low, the tool stops
DXWRPDWLFDOO\,IWKHSURGXFWGRHVQRWRSHUDWHHYHQ
when the switches are operated, remove the batteries
IURPWKHWRRODQGFKDUJHWKHEDWWHULHV
Summary of Contents for DVC260
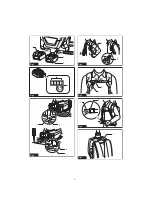
Page 2: ...1 2 3 Fig 1 1 2 Fig 2 1 2 1 2 Fig 3 2 1 Fig 4 1 2 Fig 5 1 2 Fig 6 1 Fig 7 2...
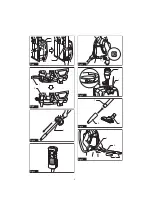
Page 3: ...1 2 3 Fig 8 1 2 Fig 9 1 Fig 10 Fig 11 Fig 12 1 2 Fig 13 1 2 3 Fig 14 1 2 3 Fig 15 3...
Page 4: ...1 2 Fig 16 1 2 Fig 17 2 1 Fig 18 3 2 1 4 1 Fig 19 Fig 20 Fig 21 Fig 22 4...
Page 5: ...Fig 23 1 Fig 24 1 Fig 25 Fig 26 1 2 3 4 Fig 27 Fig 28 5...


