background image

Lighting up the front lamp 


CAUTION: 

• 

Do not look in the light or see the source of light 
directly. 

1


008337 

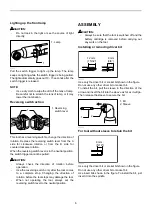
Pull the switch trigger to light up the lamp. The lamp 
keeps on lighting while the switch trigger is being pulled. 
The light automatically goes out 10 - 15 seconds after the 
switch trigger is released. 


NOTE: 

• 

Use a dry cloth to wipe the dirt off the lens of lamp. 
Be careful not to scratch the lens of lamp, or it may 
lower the illumination. 

Reversing switch action 

A

B

1


008331 

This tool has a reversing switch to change the direction of 
rotation. Depress the reversing switch lever from the A 
side for clockwise rotation or from the B side for 
counterclockwise rotation. 
When the reversing switch lever is in the neutral position, 
the switch trigger cannot be pulled. 


CAUTION: 

• 

Always check the direction of rotation before 
operation. 

• 

Use the reversing switch only after the tool comes 
to a complete stop. Changing the direction of 
rotation before the tool stops may damage the tool. 

• 

When not operating the tool, always set the 
reversing switch lever to the neutral position. 


ASSEMBLY 


CAUTION: 

• 

Always be sure that the tool is switched off and the 
battery cartridge is removed before carrying out 
any work on the tool. 

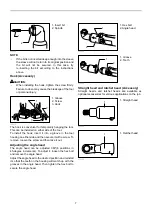
Installing or removing driver bit 

12 mm 
(15/32”)

9 mm 
(3/8”)


001266 

Use only the driver bit or socket bit shown in the figure. 
Do not use any other driver bit or socket bit. 
To install the bit, pull the sleeve in the direction of the 
arrow and insert the bit into the sleeve as far as it will go. 
Then release the sleeve to secure the bit. 

1

2


008332 

For tool without sleeve to retain the bit 

8 mm 
(5/16")


008629 

Use only the driver bit or socket bit shown in the figure. 
Do not use any other driver bit or socket bit. 
Use insert bits shown in the figure. To install the bit, just 
insert it into the spindle. 

1. Bit 
2. Sleeve 

1. Reversing 

switch lever 

1. Lamp 

Summary of Contents for DTL061RMJ

Page 1: ...1 ENGLISH Original instructions INSTRUCTION MANUAL IMPORTANT Read Before Using Cordless Angle Impact Driver BTL060 BTL061 008328 ...

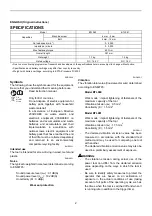
Page 2: ...acility ENE033 1 Intended use The tool is intended for screw driving in wood metal and plastic ENG905 1 Noise The typical A weighted noise level determined according to EN60745 Sound pressure level LpA 91 dB A Sound power level LWA 102 dB A Uncertainty K 3 dB A Wear ear protection ENG900 1 Vibration The vibration total value tri axial vector sum determined according to EN60745 Model BTL060 Work mo...

Page 3: ...th earthed or grounded surfaces such as pipes radiators ranges and refrigerators There is an increased risk of electric shock if your body is earthed or grounded 6 Do not expose power tools to rain or wet conditions Water entering a power tool will increase the risk of electric shock 7 Do not abuse the cord Never use the cord for carrying pulling or unplugging the power tool Keep cord away from he...

Page 4: ...se and care 24 Recharge only with the charger specified by the manufacturer A charger that is suitable for one type of battery pack may create a risk of fire when used with another battery pack 25 Use power tools only with specifically designated battery packs Use of any other battery packs may create a risk of injury and fire 26 When battery pack is not in use keep it away from other metal object...

Page 5: ...0 ゚ F 104 ゚ F Let a hot battery cartridge cool down before charging it 4 Charge the battery cartridge once in every six months if you do not use it for a long period of time FUNCTIONAL DESCRIPTION CAUTION Always be sure that the tool is switched off and the battery cartridge is removed before adjusting or checking function on the tool Installing or removing battery cartridge 1 2 3 012122 Always sw...

Page 6: ...eration Use the reversing switch only after the tool comes to a complete stop Changing the direction of rotation before the tool stops may damage the tool When not operating the tool always set the reversing switch lever to the neutral position ASSEMBLY CAUTION Always be sure that the tool is switched off and the battery cartridge is removed before carrying out any work on the tool Installing or r...

Page 7: ...ng on either side and then secure it with a screw To remove loosen the screw and then take it out Adjusting the angle head The angle head can be adjusted 360 8 positions in 45 degree increments To adjust it loosen the hex bolt and remove the angle head Adjust the angle head to the desired position and reinstall it so that the teeth on the housing will match up with the grooves in the angle head Th...

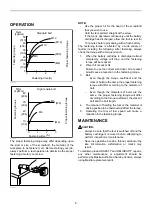
Page 8: ... 1 When the battery cartridge is discharged almost completely voltage will drop and the fastening torque will be reduced 2 Driver bit or socket bit Failure to use the correct size driver bit or socket bit will cause a reduction in the fastening torque 3 Bolt Even though the torque coefficient and the class of bolt are the same the proper fastening torque will differ according to the diameter of bo...

Page 9: ...ons Only use accessory or attachment for its stated purpose If you need any assistance for more details regarding these accessories ask your local Makita Service Center Phillips bit Bit piece Straight head Ratchet head Socket Socket adapter Various type of Makita genuine batteries and chargers NOTE Some items in the list may be included in the tool package as standard accessories They may differ f...

Page 10: ...10 ...

Page 11: ...11 ...

Page 12: ...12 Makita Corporation Anjo Aichi Japan www makita com 884752D225 ...

Reviews: