background image

5 ENGLISH

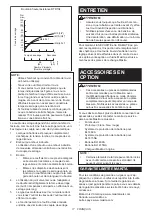
Checking the remaining battery 

capacity (BL1460A)

1

2

50%-70%

70%-100%

35%-50%

20%-35%

0%-20%

►    

1.

 Indicator lamps 

2.

 Check button

NOTE:

 Depending on the conditions of use and the 

ambient temperature, the indication may differ slightly 

from the actual capacity.

When charging

When the charging begins, the first (far left) indicating lamp 

begins to flicker. Then, as charging proceeds, the other lamps 

light, one after the other, to indicate the battery capacity.

NOTE:

 If the indicator lamp does not turn on or flicker 

when charging, the battery may be faulty. In this case, 

ask your local service center.

When using

When the tool is switched on, the lamps will light to 

indicate the remaining battery capacity. When the tool is 

switched off, the light goes out after approx. 5 seconds.

When pushing the check button with the tool switched 

off, the indicator lamps turn on for approx. 5 seconds to 

show battery capacity.

If the orange lamp flickers, the tool stops because of little 

remaining battery capacity (Auto-stop mechanism). Charge the 

battery cartridge or use a charged battery cartridge at this time.

When the tool is used with the battery that has not been 

used for a long time and is switched on, no lamps may 

light up. The tool stops because of little remaining bat-

tery capacity at this time. Charge the battery properly.

Battery protection system (BL1460A)

The tool is equipped with a battery protection system. 

This system automatically cuts off power to the motor to 

extend battery life.

The tool will automatically stop during operation if the tool 

and/or battery are placed under the following conditions:
• Overloaded:

The tool is operated in a manner that causes 

it to draw an abnormally high current.

In this situation, release the switch trigger on 

the tool and stop the application that caused 

the tool to become overloaded. Then pull the 

switch trigger again to restart.

If the tool does not start, the battery is over-

heated. In this situation, let the battery cool 

before pulling the switch trigger again.

• 

Low battery voltage:

When the battery capacity is not enough, the 

tool stops automatically and the battery indica-

tor shows following state. In this case, remove 

the battery from the tool and charge the battery.

BL1460A

Switch action

CAUTION:


• 

Before inserting the battery cartridge into the 

tool, always check to see that the switch trigger 

actuates properly and returns to the "OFF" 

position when released.

1

►    

1.

 Switch trigger

To start the tool, simply pull the switch trigger. Tool 

speed is increased by increasing pressure on the switch 

trigger. Release the switch trigger to stop.

Reversing switch action

CAUTION:


• 

Always check the direction of rotation before operation.

• 

Use the reversing switch only after the tool comes 

to a complete stop. Changing the direction of 

rotation before the tool stops may damage the tool.

• 

When not operating the tool, always set the 

reversing switch lever to the neutral position.

1

A

B

►    

1.

 Reversing switch lever

Summary of Contents for DTD044

Page 1: ...D INSTRUCTION MANUAL DE INSTRUCCIONES Cordless Impact Driver Tournevis à Chocs sans Fil Atornillador de Impacto Inalámbrico DTD044 DTD064 DTD104 IMPORTANT Read Before Using IMPORTANT Lire avant usage IMPORTANTE Lea antes de usar ...

Page 2: ...match the outlet Never modify the plug in any way Do not use any adapter plugs with earthed grounded power tools Unmodified plugs and matching outlets will reduce risk of electric shock 5 Avoid body contact with earthed or grounded surfaces such as pipes radiators ranges and refrigerators There is an increased risk of elec tric shock if your body is earthed or grounded 6 Do not expose power tools ...

Page 3: ...med Use of the power tool for operations different from those intended could result in a hazardous situation Battery tool use and care 24 Recharge only with the charger specified by the manufacturer A charger that is suitable for one type of battery pack may create a risk of fire when used with another battery pack 25 Use power tools only with specifically desig nated battery packs Use of any othe...

Page 4: ...harge a fully charged battery car tridge Overcharging shortens the battery service life 3 Charge the battery cartridge with room tem perature at 10 C 40 C 50 F 104 F Let a hot battery cartridge cool down before charging it 4 Charge the battery cartridge once in every six months if you do not use it for a long period of time FUNCTIONAL DESCRIPTION CAUTION Always be sure that the tool is switched of...

Page 5: ... with a battery protection system This system automatically cuts off power to the motor to extend battery life The tool will automatically stop during operation if the tool and or battery are placed under the following conditions Overloaded The tool is operated in a manner that causes it to draw an abnormally high current In this situation release the switch trigger on the tool and stop the applic...

Page 6: ...an be changed by pressing the button 4 Press the button and choose the desired number The displayed number changes fast by keeping pressing the button To set the first digit pull the switch trigger and then release it 5 The lamp on the right side of the display starts to blink so that the number of second digit can be changed 6 Press the button and choose the desired number The displayed number ch...

Page 7: ...eeve the sleeve will not return to its original position and the bit will not be secured In this case try re insert ing the bit according to the instructions above OPERATION 1 Presetting number of impacts is impossible for more than 200 impacts 4 seconds 2 Fastening time includes when you pull the trigger completely The proper fastening torque may differ depending upon the kind or size of the scre...

Page 8: ... damaged etc Before starting your job always perform a test operation to determine the proper fastening time for your screw If the tool is operated continuously until the battery cartridge has discharged allow the tool to rest for 15 minutes before proceeding with a fresh battery The fastening torque is affected by a wide variety of factors including the following After fastening always check the ...

Page 9: ...sories or attachments might present a risk of injury to persons Only use accessory or attachment for its stated purpose If you need any assistance for more details regard ing these accessories ask your local Makita Service Center Screw bits Protector white blue red Battery Protector for BL1460A Battery Protector for BL1415NA Battery BL1460A Battery BL1415NA Makita genuine charger NOTE Some items i...

Page 10: ... étincelles au contact desquelles la poussière ou les vapeurs peuvent s enflammer 3 Assurez vous qu aucun enfant ou curieux ne s approche pendant que vous utilisez un outil électrique Vous risquez de perdre la maîtrise de l outil si votre attention est détournée Sécurité en matière d électricité 4 Les fiches d outil électrique sont conçues pour s adapter parfaitement aux prises de courant Ne modif...

Page 11: ...lisation d un outil électrique rangez le hors de portée des enfants et ne laissez aucune personne l utiliser si elle n est pas familiarisée avec l outil électrique ou les présentes instructions d utilisation Les outils électriques représentent un danger entre les mains de personnes qui n en connaissent pas le mode d utilisation 21 Veillez à l entretien des outils électriques Assurez vous que les p...

Page 12: ...ffe de brûlures voire d explosion 4 Si l électrolyte pénètre dans vos yeux rin cez les à l eau claire et consultez immédiate ment un médecin Il y a risque de perte de la vue 5 Ne court circuitez pas la batterie 1 Ne touchez les bornes avec aucun maté riau conducteur 2 Évitez de ranger la batterie dans un conteneur avec d autres objets métal liques par exemple des clous des pièces de monnaie etc 3 ...

Page 13: ...pas pendant la charge il se peut que la bat terie soit défectueuse Le cas échéant informez vous auprès de votre centre de service après vente local Pendant l utilisation Lorsque vous allumez l outil les témoins s allument pour indiquer la charge restante de la batterie Lorsque vous éteignez l outil la lumière s éteint au bout d envi ron 5 secondes Lorsque vous appuyez sur le bouton de vérification...

Page 14: ... gâchette n est pas possible lorsque le levier inverseur se trouve en position neutre Allumer la lampe ATTENTION Evitez de regarder directement le faisceau lumineux ou sa source 1 1 Lampe Appuyez sur la gâchette pour allumer la lampe La lampe reste allumée tant que vous appuyez sur la gâchette La lumière s éteint automatiquement environ 10 secondes après que vous ayez relâché la gâchette NOTE Util...

Page 15: ...arrêt automatique ne fonctionne pas Nombre de chocs préréglés 01 99 0 Une rotation dans le sens inverse des aiguilles d une montre Le réglage du mécanisme d arrêt automatique ne fonctionne pas NOTE Utilisez le nombre préréglé comme indication Pour conserver le couple de serrage le nombre de chocs passe automatiquement au niveau de charge restant de la batterie Témoin indicateur 1 1 Lampe indicatri...

Page 16: ...1 4 ft lbs M10 3 8 M10 3 8 15 11 7 4 25 19 Temps de serrage Secondes Nombre d impacts Nombre préréglé 29 13 58 25 1 2 Temps de serrage Secondes Boulon à haute résistance DTD044 0 1 2 Nombre d impacts Nombre préréglé 58 25 116 50 1 2 N m Couple de serrage 20 14 18 13 14 11 12 9 10 7 8 6 6 4 4 3 2 1 0 M6 1 4 M6 1 4 ft lbs 16 12 Boulon standard DTD064 0 0 5 1 1 5 Temps de serrage Secondes Nombre d im...

Page 17: ...t la vitesse de l outil auront un effet sur le couple 6 Le fonctionnement de l outil à vitesse réduite entraîne une diminution du couple de serrage ENTRETIEN ATTENTION Assurez vous toujours que l outil est hors ten sion et que la batterie est retirée avant d y effec tuer tout travail d inspection ou d entretien N utilisez jamais d essence de benzine de solvant d alcool ou d autres produits similai...

Page 18: ...desordenadas son propensas a accidentes 2 No utilice las herramientas eléctricas en atmósferas explosivas tal como en la presen cia de líquidos gases o polvo inflamables Las herramientas eléctricas crean chispas que pueden prender fuego al polvo o los humos 3 Mantenga a los niños y curiosos alejados mientras utiliza una herramienta eléctrica Las distracciones le pueden hacer perder el control Segu...

Page 19: ...ramientas eléctricas Dichas medidas de seguridad preventivas reducen el riesgo de que la herramienta se inicie accidentalmente 20 Guarde la herramienta eléctrica que no use fuera del alcance de los niños y no permita que las personas que no están familiarizadas con ella o con las instrucciones la operen Las herramientas eléctricas son peligrosas en manos de personas que no saben operarlas 21 Reali...

Page 20: ...l tiempo de operación se ha acortado en exceso deje de operar de inmediato Podría correrse el riesgo de sobrecalentamiento posibles quemaduras e incluso explosión 4 En caso de que ingresen electrolitos en sus ojos enjuáguelos bien con agua limpia y con sulte de inmediato a un médico Podría perder la visión 5 No cortocircuite el cartucho de batería 1 No toque las terminales con ningún mate rial con...

Page 21: ...il mente se debe a que no está siendo insertado correctamente Verificación de la capacidad de carga restante de la batería BL1460A 1 2 50 70 70 100 35 50 20 35 0 20 1 Luces indicadoras 2 Botón de verificación NOTA Dependiendo de las condiciones de uso y la temperatura ambiente la indicación podrá diferir ligeramente de la capacidad real Durante la carga Cuando se inicia la carga la primera luz ind...

Page 22: ... que el gatillo interruptor se acciona debidamente y que vuelve a la posición OFF apagado cuando lo suelta 1 1 Gatillo interruptor Para poner en marcha la herramienta simplemente apriete el gatillo interruptor La velocidad de la herra mienta aumenta incrementando la presión en el gatillo Suelte el gatillo interruptor para parar Accionamiento del conmutador de inversión de giro PRECAUCIÓN Confirme ...

Page 23: ...al jale el gatillo interruptor mien tras presiona el botón indicador El número de impactos quedará configurado al instante Para volver a configurar el número de impactos jale el gatillo interruptor sin presionar el botón indicador para proceder con el paso 3 como se menciona anteriormente Confirmación del número actual configurado Para comprobar el número actual configurado jale el gatillo una vez...

Page 24: ...ero preajustado de impac tos se mayor a 200 4 segundos 2 El tiempo de fijación incluye cuando jala el gatillo por completo Puede que una torsión de fijación adecuada difiera dependiendo del tipo de tamaño del tornillo perno el material de la pieza de trabajo a ser atornillada etc La relación entre la torsión de fijación el tiempo de fija ción y el número de impactos número preajustado se ilustra e...

Page 25: ...desee utilizar Sujete la herramienta dirigida en línea recta al tornillo Si aprieta el tornillo durante más tiempo que el mostrado en las figuras el tornillo o la punta de atornillar podrían desgastarse estropearse dañarse etc Antes de comenzar su tarea realice siempre una operación de prueba para determinar la torsión de apriete apropiada para su tornillo Si utiliza la herramienta continuamente h...

Page 26: ... herra mienta Makita especificada en este manual El empleo de cualesquiera otros accesorios o acoplamientos conllevará un riesgo de sufrir heridas personales Utilice los accesorios o aco plamientos solamente para su fin establecido Si necesita cualquier ayuda para más detalles en relación con estos accesorios pregunte a su centro de servicio Makita local Puntas de atornillar Protector blanco azul ...

Page 27: ...27 ...

Page 28: ...s por el lijado aserrado esmerilado taladrado y otras actividades de la construcción contienen sustancias químicas reconocidas por el Estado de California como causantes de cáncer defectos de nacimiento y otros peligros de reproducción Algunos ejemplos de estos productos químicos son plomo de pinturas a base de plomo sílice cristalino de ladrillos y cemento y otros productos de albañilería y arsén...

Reviews: